- Author: Help Desk Team
Garlic (Allium sativum) is loved and respected around the world as a symbol of protection and luck. It is thought to impart strength and endurance and is prized as a natural medicinal remedy with antibacterial, antiviral and antifungal properties. Impressive for such a humble vegetable.
Garlic is best planted in the fall for the largest bulb size at harvest. In USDA growing Zones 9 and 10, aim to get your garlic in the ground 6 weeks before the first frost. For much of Contra Costa County, this will be mid to late October. Bulb formation will begin in the spring as the daylight hours increase.
Refer to our previous blog post for an explanation of hardneck and softneck garlic and selecting seed garlic for the home garden. https://ccmg.ucanr.edu/our-blog/?blogpost=60828&blogasset=12496
Site selection
Find a convenient location with access to water and select a planting site which is level for consistent irrigation. Garlic takes 6 to 9 months to mature so the bed you select will not be available for another crop from October to June. Garlic does best in full sun (a minimum of 6 hours of sun a day). Clear all weeds from the bed and surrounding area. Weeds deprive the garlic of nutrients and water and can harbor many of the pests which are attracted to garlic.
Prepare the soil
Garlic does well in a wide range of soils, but the soil needs good drainage. Damp soil surfaces encourage snails, slugs, and root diseases. Much of our soil in Contra Costa County is heavy clay, so amendments are often added to give the clay soil a better structure. Adding organic matter such as compost, manure and leaf mold works well for this purpose. Dampen the soil before you work in the amendments to help the material to combine evenly. It is best not to overwork your soil. Gently mix the soil amendments into the top 2–4 inches of the soil and rake the surface smooth. Then water the plot wel to get the microorganisms working.
How to plant
Have a fertilizer on hand such as cottonseed meal that is in the range of 5-2-2. Gently break the cloves of garlic from the bulb. The largest cloves will grow the biggest bulbs. If you are planting different varieties, keep them separate and well-marked. Dig a trench about 3” deep, add the recommended amount of fertilizer and work it into the soil. Plant the garlic cloves 8” apart, giving them plenty of space for the bulb to form. Stand each clove up in the soil with the flat side down and the point up. Cover the garlic to about 1” above the tip of the garlic. Put in your plant stakes with the variety name at the end of each row. Water the bed to settle the soil and put a 3” layer of mulch over the bed. Less frequent, deep watering is the best practice for garlic to lessen the chance of bulb rot.
Fertilizing
Garlic is a heavy feeder. In the spring when there is 2–3” of new growth, pull back the mulch to warm the soil and apply the fertilizer you used at planting, repeating every 3–4 weeks until April. In May and June switch to a phosphorus fertilizer such as rock phosphate, bone meal, or bird guano to increase the bulb size.
In addition to the big 3 (N-P-K), garlic also needs these macronutrients: calcium, magnesium, and sulfur. There are also some micronutrients essential for garlic growth and development including iron, manganese, copper and zinc. Several applications of liquid kelp or kelp meal during the growing season can supply the additional nutritional needs.
Harvest time
In late spring, hardneck garlic will form scaping, a flower stalk which forms a whorl. Remove this stalk in the early growth stage. These are delicious when made into pesto or used in a quiche.
The first of June watch for the lower leaves of the garlic to begin to turn yellow. This is an indication that harvesting is close. For hardneck garlic look for 40-50% of the leaves to turn yellow. For softneck garlic look for 1/3 of the leaves to turn yellow. Dig up a few sample garlic bulbs and check to see if the bulbs have a uniform shape with good sized shoulders. If they are not ready, give them another week or two. When the bulbs have reached full size stop watering for a week to give the bulbs a chance to harden off a bit before harvest.
Using a garden fork (or a potato digging fork) gently lift the garlic bulbs out of the ground. Work the soil off the bulb and the roots, move the garlic to a well shaded area with good air circulation.
Curing
Lay the garlic out in a single layer. Make a second pass over the garlic, cutting the roots back by half and the stem to 9 inches in length. If air circulation is lacking, use an oscillating fan to keep the air moving for the first two weeks. Let the garlic cure for 3–4 weeks. At this time cut the roots to 1/4” and the stem to 1/2” and continue to cure for an additional 2–3 weeks. When there is NO green visible in the stem the garlic is ready for storage.
Storage
Garlic needs breathing room so wire-mesh baskets or mesh bags are the best containers. Low light, cool temperatures (35-55°) and moderate humidity (40-60%) is ideal for garlic storage. Garlic can be stored in the refrigerator but once it's removed from the cold it is very quick to sprout.
With some garden prep, meeting the nutritional needs of garlic, having patience for the long growing season, and careful curing, you can be richly rewarded with a bumper crop of garlic. You may well be the envy of your fellow gardeners, family, and friends.
IPM Garlic Pest and Disease Management
https://ipm.ucanr.edu/home-and-landscape/onions-and-garlic/index.html?src=307-pageViewHLS
Garlic Cultural Practices
https://ipm.ucanr.edu/home-and-landscape/onions-and-garlic/cultural-tips/index.html?src=307-pageViewHLS
Help Desk of the UC Master Gardeners of Contra Costa County (BHD)
- Author: Help Desk Team
Whether you fall into the camp of a little goes a long way or too much is never enough, I hope to convince you that growing garlic is worthy of your time and some space in the garden. Let's look at this amazing and ancient plant.
Historically garlic grew wild over much of Europe, Central Asia and the Far East. There are references to garlic going back as far as 5000 years ago. It is believed that softneck garlic was the first cultivated garlic. It has only been in the last 1000 years that the distinction was made between hardneck and softneck garlic.
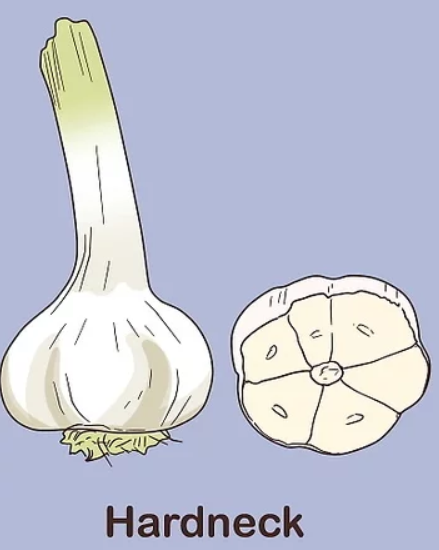
Let's investigate the difference between hardneck and softneck garlic, as they vary in their structure, flavor, and growing requirements.
• Hardneck garlic is cold hardy and known for its robust, strong flavor. This garlic typically yields fewer cloves, with each clove being large and plump. Hardneck garlic has a central, hard stalk and produces garlic scapes, which are the flowering stem. These edible scapes are produced in late spring or early summer.
• Softneck garlic is better suited to growing in warmer climates. It has a milder, less pungent flavor profile. Softneck garlic bulbs have more cloves, but the cloves are smaller. Softneck garlic has no hard, central stalk and does not produce scapes, but if you want to braid your garlic, you need to grow softneck garlic. This is the grocery store type, available because it has a longer shelf life.
Planting garlic is easy but be aware when you put it in the ground you are dedicating that garden plot for 8–10 months. I like to use the rotation of putting garlic in the ground in mid-October which allows for harvest in June when the soil is warm enough to put peppers in the ground after the garlic is pulled out. Make sure you select a variety of garlic which is mature in under 240 days.
The reason for fall planting is that the lingering warmth of the soil allows the roots to get established and allows the bulbs to develop some leaf growth before colder weather begins. Garlic needs cold temperatures to stimulate root growth. Hardneck garlic requires 4–6 weeks of cold below 40–45° F. to develop a strong bulb. This chilling process is called vernalization. Softneck garlic is less demanding and does not need the extended chill hours. This makes softneck garlic a good choice where winter temperatures are mild.
Garlic will go dormant during the cooler months but will reawaken when the soil warms in the spring, giving it a jump start on the growing season. If you miss the October planting date, you can plant in February in our Contra Costa County growing zones, but your garlic bulbs will be small. Spring planting should be your last resort. In our clay soil, raised beds are a good choice, as garlic bulbs can rot in wet, clay soil.
It is recommended that you purchase “seed garlic” because it is grown for planting out and does not go into the grocery store pipeline. Seed garlic is bred to be pest and disease free. It will not have been treated with a sprouting inhibitor which may have been applied to grocery store garlic. I know gardeners who grow grocery store garlic successfully, but my personal choice is seed garlic, if for no other reason than the wonderful and diverse varieties available.
You will need to cover the garlic with a nice cushion of mulch during the colder months. Dry leaves or straw work well for this purpose. In the spring, when you see new growth on the garlic, pull back the mulch so the soil can begin to warm. When new growth appears, begin a schedule for fertilizing. Weeds are the enemy of garlic so weed early and often, but gently so you don't disturb the bulbs.
I hope you have the space and are willing to invest the time it takes to grow a bed of garlic. I think you will be richly rewarded.
For cultural information on watering, fertilizing, and harvesting, stay tuned for the next post.
Garlic: A Brief History (from the University of Missouri): https://ipm.missouri.edu/meg/2015/9/garlic-a-brief-history/
Help Desk of the UC Master Gardeners of Contra Costa County (BHD)
Advice for the Home Gardener from the Help Desk of the
UC Master Gardener Program of Contra Costa County
Client's Request: My sister brought me some heads of hardneck garlic from her harvest in Idaho. I would like to know when is the best time to plant this garlic for this area. I have a fairly large garden area in my back yard in which I currently have tomatoes, eggplant, tomatillos, chiles, and a few weeds all of which are nearly at an end (except the weeds, sigh). I also have some space which I left fallow this summer. It all gets full sun. I appreciate any information you can offer. Thank you,
MGCC Help Desk Response: Thank you for contacting the UC Master Gardener program with your questions about growing garlic. From your description, it sounds as if you have a good space for growing garlic, as it needs good soil and full sun. October is the ideal time for planting garlic in our area with a harvest expected next June so they should be planted where you won't need the space for your spring planting.
If you would still like to grow garlic, you could use the heads from Idaho in your kitchen and purchase some more for growing in your garden. You can probably still find seed garlic at some local nurseries or online. Suppliers that are out of state but ship to California will have passed inspection, and there are several in-state suppliers.
Here are some UC links with more information on growing garlic in a home garden:
https://vric.ucdavis.edu/pdf/garlic.pdf and http://sonomamg.ucanr.edu/Vegetable_of_the_Month/Garlic/
We are not able to recommend any particular business, but some local nurseries may have them still in stock. Also, a Google search 'Suppliers of seed garlic California' brings up a number of Northern California suppliers and some of these websites have great information on growing needs and the different varieties.
I hope this helps, and if you have any further questions please do contact us again.
Help Desk of the UC Master Gardener Program of Contra Costa County (SMW)
Note: UC Master Gardeners Program of Contra Costa's Help Desk is available almost year-round to answer your gardening questions. Except for a few holidays (e.g., last 2 weeks December), we're open every week, Monday through Thursday for walk-ins from 9:00 am to Noon at 2380 Bisso Lane, Concord, CA 94520. We can also be reached via telephone: (925) 608-6683, email: ccmg@ucanr.edu, or on the web at http://ccmg.ucanr.edu/Ask_Us/. MGCC Blogs can be found at http://ccmg.ucanr.edu/HortCoCo/ You can also subscribe to the Blog (//ucanr.edu/blogs/CCMGBlog/)