
- Author: Christine Lai

"Sea of red... mulch, that is" by WSDOT is licensed under CC BY-NC-ND 2.0.
Benefits of Mulch
Mulch is one of the gardener's most useful tools: applied correctly, it suppresses weeds, improves water retention in soil, and keeps the soil temperature down. But does the kind of mulch matter? And do you tie up nitrogen when you use high carbon materials like wood chips as mulch?
Color matters
First of all, UC researcher Janet Hartin writes, don't use black dyed wood chips as mulch. Hartin, a resident of Coachella Valley, found that black dyed mulch, along with synthetic lawn and asphalt, can superheat surfaces up to 65 degrees hotter than the surfaces of plants in a study she conducted in the valley over the months May through August.
To till in or not?
Second, what about the carbon to nitrogen ratio of your mulch? This becomes an issue when mulch is tilled into the soil. Tilling in high carbon to nitrogen ratio materials like wood chips will tie up nitrogen in the soil leading to stunted plant growth. As the population and activity of the decomposers in the soil increase, they consume carbon and nitrogen, competing directly with garden plants for limited supplies of nitrogen. However, leaving mulch on top to slowly decay over time will not have this effect.
If you are tilling in your mulch, UC Riverside researchers (Pittenger 584) found that mixing in high nitrogen materials like grass clippings in with high carbon wood chips offset any temporary nitrogen tie up.
Tilling in green manures like alfalfa straw will supply nitrogen and has been found to be especially valuable to citrus trees.
Mulch and pests
Other things to consider when mulching are pests. UC Riverside researchers found that voles and gophers preferred trees with mulch. Pill bugs may find a home in leaf litter. Monitor plants and be sure to keep mulch away from stems.
A few notes on proper application
When applying mulch to trees, be sure to keep the mulch from touching the tree trunk and keep from piling too much on top of the root ball. Roots can grow up into the mulch and girdle the trunk. For other plants, keep mulch 4 to 6 inches away from stems. Apply 2 to 4 inches deep for maximum benefits.
Work Cited
Pittenger, Dennis R. California Master Gardener Handbook. Edited by Dennis R. Pittenger, University of California Division of Agriculture and Natural Resources, 2015.
- Author: Lynn Young

These jeweled toned beauties are wonderful in the garden.
Nasturtiums are quite easy to grow and usually planted in the Spring after the last frost has passed. I have seen Nasturtiums begin to grow from the previous season as early as January. Many believe they are perennials when in fact, they are annuals. There are so many varieties of Nasturtiums, my favorite being the trailing variety which I love to see climb walls, trellises, and fences. If you are without space, or have minimum garden space, Nasturtiums can be planted in a pot. Hanging pots are great for trailing Nasturtiums. They look amazing when they spill over the edges.
They grow full, flower vibrantly during the spring and early summer with jeweled tone colors, and have bright green leaves reminiscent of lily pads. Butterflies, bees and hummingbirds love this plant.
Nasturtiums grow best from seed sown directly in the soil. I have also propagated from cuttings that performed well in the garden.
Many gardeners plant Nasturtiums in the garden as a trap crop to draw away aphids from neighboring crops. Try planting Nasturtium next to cucumbers, kale and tomatoes for healthy company and natural pest control.
CARE
Nasturtiums do not need to be fertilized. In fact, fertilizer can produce more leaves than flowers. Developing a good weekly watering system should be sufficient. These beautiful blooms love full sun exposure and show tolerance for shade and some drought, although lack of water will cause flowers to wilt. When it comes to maintenance, trailing varieties can benefit from a light pruning and removal of yellowing leaves. Add the fresh green leaves to salad or enjoy a few pieces prior to discarding.
HARVEST

All parts of the nasturtium plant can be harvested for culinary use. The best time to harvest leaves is when the plant is young - approximately 6 inches tall. Harvest flowers just as they open. You can cut flowers and stems together. Collect the green seed pods when they are just over 1/4" inch in diameter. These can be used for pickling. Discard small, hardened pods.
Nasturtium seeds for future planting are easy to collect. The plants often self-sow. When they self-sow, the seeds fall to the ground, making collecting a breeze. Seeds will be a mixture of small and mature green and brown pods. I save the green pods for culinary use and collect the brown pods to grow for next season. Discard small, immature seeds, as they do not have a good germination success rate.
How to enjoy your Nasturtiums Leaves, Flowers and Seed Pods

All parts of Nasturtium plants are edible. The leaves, flowers and green seeds are used in cooking. The spicy leaves and flowers can be used fresh in salads. The green seed pods, which have a zesty tangy peppery flavor, have become known as “Poor Man's Capers.” I enjoy them fresh. There are so many culinary uses for fresh or pickled parts of the nasturtium plant. I have shared a use below.
Nasturtium Pickled Capers: 1-1-1
1 Cup of firm green seed pods
1 Cup of White Vinegar or Apple Cider
1 teaspoon of Sea Salt
8 Peppercorns
*Add a drizzle of honey for a sweet & tangy taste. Alllow the mixture to sit for 20 minutes or longer. Enjoy. Refrigerate whatever is left!
- Author: Sabrina Williams
Photos by Sabrina Williams
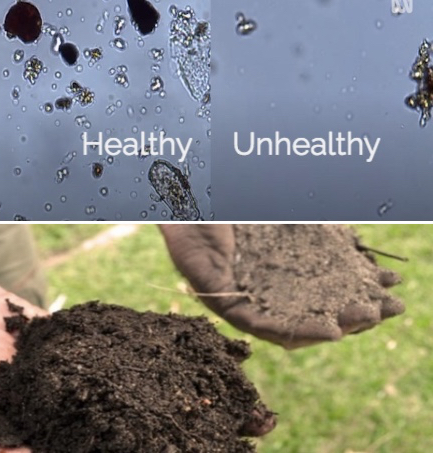
Soil is...
not dirt, of course. Many of us who have spent time in the garden know that dirt is essentially dead. Soil, on the other hand, is a living, complex ecosystem. As one of a triumvirate of life-giving elements — the other two being sun and rain — it has the power to sustain agricultural productivity and protect environmental resources. When you look at it up close, the world within it is reason enough to be impressed. In one cup of soil there are upwards of 200 billion bacteria, 20 million protozoa, 100,000 nematodes, and 100,000 meters of fungal hyphae! Sadly, human activity has contributed to the degradation of soil ecosystems, and consequently, a warmer, dirtier planet.

Soil Health Is…
also referred to as soil quality, and is defined as the continued capacity of soil to function as a vital living ecosystem that sustains plants, animals, and humans. According to the Soil Health Institute, a healthy soil provides many functions that support plant growth, including nutrient cycling, biological control of plant pests, and regulation of water and air supply.
Assessing how well soil performs its functions in the present, and its ability to do so in the future, can't be determined by any single result. Assessment relies upon many indicators. A “short” list offered by the folks at the USDA Natural Resources Conservation Service includes soil organic matter, soil structure, soil depth, water holding, habitat for soil microbes, tilth, reactive carbon, soil nitrate, soil pH, phosphorus and potassium, plant and microbial activity, earthworms, soil respiration, and total organic carbon.
Prioritizing Healthy Soil Is…
the best way to create resilient ecosystems. In doing so, we can reduce global food insecurity and environmental impacts of greenhouse gases. There is a lot of talk about CO2 (carbon dioxide) and its contribution to greenhouse gases. A powerful way to reduce CO2 in the atmosphere is to sequester it in our soils. Plants naturally help remove it through photosynthesis and sending the balance to the soil. So, not only does soil do the yeoman's work of retaining water and nutrients, but incredibly, it also sequesters carbon in excess of that retained by the sum of all plants and the atmosphere!
Importantly, healthy soil also feeds the world. It helps the 500-million smallholder farms globally who produce 80% of the world's food. According to the World Resources Institute, these farms will not be able to produce enough food for over 9 billion people without dramatic changes in how food is produced, including focuses on soil health and water management.
We are…
all stewards of the soil. The benefits of healthy soil don't just accrue to the small farms described above. Home gardens worldwide also can combat soil-depleting practices through crop diversity, proper fertilization, and no-till gardening. And, as more households in urban areas grow more at our homes, yards and urban gardens, we are altogether more productive per unit of area than are large producers.
We aren't often presented clear opportunities to have a hand in averting a point-of-no-return climate crisis. As growers, soil is…ours.
- Author: Sabrina Williams
Gardening and working in the community as a volunteer present a meaningful opportunity to help others engage in a fulfilling activity. It's also an opportunity to encourage more ethnically diverse groups of growers by learning about and introducing different regional crops into our growing repertoire. I draw from experience volunteering in a variety of primarily Black, Latino, Indigenous and Asian farm communities over a few decades — but there are certainly many others to learn from in our region! The main lesson has been to make gardening relevant beyond the obvious benefit of “grow to feed yourself.” Making connections to culture creates incentives for involvement.

Food as Identity
The “culture” in agriculture derives from the word cultivate. Before the 19th century, the word culture was quite specific to preparing the earth for crops. It serves as a reminder that we are cultivating community when we suggest culturally relevant crops – ones often part of culinary practices based upon where folks (or their ancestors) come from. These practices, also referred to as “foodways,” represent a rich intersection of history and tradition.
Gardening within foodways creates communal and generational connections. In some instances, it has even served as the basis for empowerment initiatives and actions around food justice. Overall, when people recognize foods they want to eat, they are more encouraged to grow them.

Garden as Grocery
Several of the crops in local cultural foodways are no strangers to Los Angeles groceries, but a lot of folks don't even consider growing them or know that they are actually easy to grow in Los Angeles gardens. Perhaps the best known is the Three Sisters Garden, a trio of crops that honors the traditions of Indigenous foodways. Corn, beans and squash are grown in complementary positions and offer balanced nutrition. In other traditions, the following offerings are just a tip of the iceberg (not lettuce though!) of moderate-to-easy to grow plants.
For Black gardeners, plants like okra (especially burgundy variety for show), cowpeas (black eyed peas), sweet potato, fish peppers and collard greens are easy growing options.
In Mexican and Central American communities, many growers might appreciate nopal (prickly pear cactus), chayote, sapote, epazote (an easy herb), tomatillo and a variety of chiles.
Local Asian foodways often focus on produce popular in Chinese and Southeast Asian communities. These include jujube (Chinese date), coriander (cilantro), bok choy, kohlrabi (su hào), Thai basil, Thaieggplant, sweet potato leaves and lemongrass.
The great thing is that many of these crops—sapote, squashes, sweet potatoes, cilantro—overlap in foodways and cultures, further uniting our tables. Several are variations on things that a lot of people already grow, like eggplant, peppers and kale.
Our great fortune in being able to grow a diversity of plants should also serve as inspiration for tapping into, and learning about, the diversity of communities and (agri)cultures in our region.
- Author: Judy Gomez
Telltale Roots: Secrets From the Underground
As a newbie Master Gardener (class of 2020), I am constantly reminded of how much I don't know and how much more I need to learn. I also find myself looking at my garden in a very different way. I am noticing little holes and winding trails on leaves, weirdly shaped bugs, seedlings that disappear overnight, and soil that never seems to be wet no matter how much I water. Which takes me to the saga of…...NEMATODES!
As I am always anxious to get the first seeds in the soil, early this spring I planted the first of three plantings of pole beans (Kentucky Wonder) in one of my raised beds. I prepared the soil as I usually do with compost, chicken manure and worm castings. I noticed that I did not have as bountiful a crop of beans as I usually do but didn't think much of it. By the end of June, the beans were done so I pulled them out to make room for a second planting of zucchini. As I pulled them out, I stopped short and stared at the ugly deformed roots (and of course took pictures) that looked like this:


Back in the deepest recesses of my brain, I remembered something from the Master Gardener course about a “pest” that attacks the roots of plants. So I went back to my class notes, found some scribbles about nematodes and Googled ucanr nematodes. This took me to a very comprehensive 5-page article (Pest Notes) about these little microscopic eel-like roundworms that attack the roots of all sorts of plants. The most damaging ones to gardens are the root knot nematodes. Woefully, I had a prime example of the damage done by these little destructive buggers.
The swollen areas on the roots (called galls) interfere with the ability of the roots to absorb water and nutrients. As I explained to my 7-year-old granddaughter (Master Gardener in training), if something messes with the roots, it messes with the plant.
Oh, but there's more to this saga! 
About a month later, I was pulling out my Bird Nest Gourds from a totally different raised bed and, lo and behold, the roots looked almost exactly like those of my beans! I learned that root knot nematodes are difficult to control, and can spread easily on garden tools, shoes and infested plants. I am sure I have spread them everywhere.
So it was time for action! I still had sweet potatoes and peppers growing in the bed where I pulled out the infested beans, so I have not attacked (pun intended) that bed yet. But the gourds were growing in a bed of their own, so after re-reading the UCANR Pest Notes on nematodes more carefully, I settled on solarization to try to destroy the nematodes in that location.
Solarization? There is a first time for everything. Googling ucanr solarization gave me all the information I needed to do this. Apparently covering the soil tightly with clear plastic in hot summer weather for 4-6 weeks can heat the top 12-18 inches of soil up to 140 degrees which can kill nematodes and their eggs. The article also sadly declares that this is only a temporary solution as these sneaky nematodes may move deeper into the soil to escape the heat and only the ones in the upper 12 inches may be killed.


I will plant some brassicas in this bed after the 4-6 week “quarantine” period.
So now I wait…
Fingers crossed.
