- Author: Lauria Watts
Last night was our continuing education class for Master Food Preservers. It was well attended, informative and entertaining.
Master Food Preserver (MFP) Laura Simpson ran last night's show-she talked to us about Smoking Meats.This class included discussion about meat curing at home, with emphasis on curing BACON (a personal favorite of this author and MFP). Hot smoking of meats (the safe way to do it at home) sounded easy enough to do safely and deliciously. It was also great to hear that the home-smoker can make some cold smoked things like smoked mozzarella.
A rough-and-ready barrel smoker from the Library of Congress: http://www.loc.gov/pictures/resource/ppmsca.20732/
MFP Simpson also discussed types of smokers. Tips on smoking with these were given. You can smoke on a kettle-type grill, a water smoker, barrel barbecue or even a gas grill using the appropriate techniques. These barbecues and grills that are commonly found at home were illustrated.
Did you know that there is not much difference in the flavors of different woods' smoke? Wood chips don't need to be soaked, and smoke penetrates meats more easily when the surface is kept wet? With the info she gave, the good reference books and the handout provided, well I feel ready. I don't know about you other attendees, but I want go out and smoke some bacon myself, right now.
Maybe I will try that bacon recipe I have been thinking about. And mmm, smoked mozzarella, smoked provolone. It was a great class!
- Author: Lauria Watts
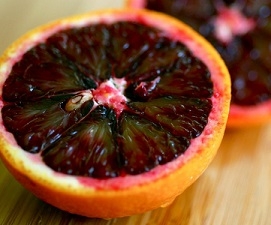
Interesting fruit, no? Our blood oranges were supposed to be Cara Cara Navels, but we got a dark, dark blood orange; it is mostly darker than the one pictured here. Ours definitely has a "red" taste to it, sorta like berries or raspberries, and are generally much darker than the orange at right--that pigment is what gives them that berry flavor.
Now is the time of year a lot of citrus comes ripe all over southern California. That's when the significant-other-hubby-type-person starts to gently urge (read "nag"here) me to do taste the blood oranges and do something with them. For a semi-dwarf tree, it sure bears well. And for some reason, the wildlife ignores the fruit, so we always have plenty.
He usually picks them a little too early. When I taste them they have flavor but are much too sour to eat right then. If I wait, they never seem to get so ripe that I really want to eat them out of hand, but they make a great jelly or marmalade. I think they would make a great syrup too.
Here is a recipe from the National Center For Home Food Preservation for some spiced orange jelly. I leave the spices out so the flavor of my blood oranges shines through.
Spiced Orange Jelly with powdered pectin (Omit items below and will have plain Orange Jelly)
http://nchfp.uga.edu/how/can_07/orange_jelly_spiced.html
Yield: About 4 half-pint jars
2 cups orange juice (about 5 medium oranges)
1/3 cup lemon juice (about 2 medium lemons)
2/3 cup water
1 package powdered pectin
2 tablespoons orange peel, finely chopped (omit for plain orange jelly)
1 teaspoon whole allspice (omit for plain orange jelly)
½ teaspoon whole cloves (omit for plain orange jelly)
4 sticks cinnamon, 2 inches long (omit for plain orange jelly)
3½ cups sugar
Procedure: Sterilize canning jars and prepare two-piece canning lids according to manufacturer's directions.
To make jelly. Mix orange juice, lemon juice, and water in a large saucepan. Stir in pectin. Place orange peel, allspice, cloves, and cinnamon sticks loosely in a clean white cloth; tie with a string and add to fruit mixture. Place on high heat and, stirring constantly, bring quickly to a full rolling boil that cannot be stirred down. Add sugar, continue stirring, and heat again to a full rolling boil. Boil hard for 1 minute. Remove from heat. Remove spice bag and skim off foam quickly.
Pour hot jelly immediately into hot, sterile jars, leaving ¼ inch headspace. Wipe rims of jars with a dampened clean paper towel; adjust two-piece metal canning lids. Process in a Boiling Water Canner.
Process in a boiling water canner, for half pints or pints:
At 0 to 1000 ft. -- 5 minutes.
At 1001-6000 ft. -- 10 minutes.
Over 6000 ft. -- 15 minutes
- Author: Lauria Watts
Home-canned chicken is wonderful. And the broth/stock that forms in home-canned chicken is worth every penny you spent on the chicken, jars, pressure canner. . .
Oh, man-oh-man, do I love a sale BIG TIME! Caught a local market with fresh, name-brand chicken thighs, drums and split chicken breasts on sale for 67 cents a pound!. I had not seen any fresh chicken at that price for a very, very long time--so of course I bought my limit of thighs--they have so much more flavor than breasts. I rushed them home and they sat in the coldest part of my fridge for a day, waiting for me to pressure can them.
These thighs were fresh--Great! Wide mouth pint jars were dug out of storage, washed and made ready. Lids were rounded up and cleaned for sealing. National Center for Home Food Preservation (NCHFP)/USDA canning instructions checked for time and weight at my altitude. The chicken was rinsed, cleaned, skinned and de-fatted in preparation for loading into jars. However, I found that I had not considered the size of the thighs when I purchased them. I mean, how big could they be, right? After all they are chicken thighs, no?
. . .At the last minute I dug out wide mouth rings. . . I don't have too many of those, and some were of questionable roundness. . .
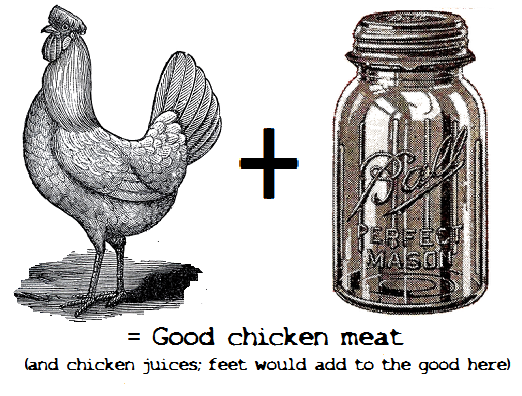
Surprise! These were monster chicken thighs. This is good, because big chickens equal larger thighs, and larger thighs have more connective tissue and more meat. The chicken juices would have plenty of gelatin, making for great flavor and smooth, rich feel in the mouth.
BUT -- the thighs were so large that I could only fit 1 full thigh and maybe a little more. So as I packed the thighs I cut chunks off of other thighs to fill each jar. Some jars had one thigh bone, some had two. It worked. The good stuff I wanted, all that good gelatin at either end of the thigh bones, was preserved.
Lids and rings were applied, the canner was loaded. I checked the canning directions again. The canner was sealed and vented appropriately, loaded, and brought up to weight-jiggle. The processing went great, the weight jiggled just right, all was well in my little kitchen. After cooling, jars were unloaded, merrily boiling.
But wait! THREE of those jars were not boiling. Remember those rings I mentioned? Alas, three no-seals and I think it was because of the "funky" rings--or maybe it was the old lids? Into the fridge they went--what a pain! Note to self: Buy a whole bunch of boath regular and wide-mouth lids WITH rings, regularly, like every year. The unsealed jars went into the fridge and my husband was very happy with his chicken stew with dumplings the following night.
(BONUS--My tip for today: When you find a deal on lids, DATE each box! AND inspect all of your rings regularly for rust and roundness.)
Any way, the thighs jellied up very nicely, so I am thinkin' about canning up a bunch of chicken foot broth. Chicken feet can be purchased at the local 99 Ranch store (chicken feet are called chicken "paws" there). They would look pretty funky up on a shelf--but they'd make GREAT stock to go with some great home-canned chicken!
Now hie thee to thy kitchen and give the following a try. It's easy-peasy, really!:
- Author: Lauria Watts
I know, some of you out there are wondering what to do with fresh, home-made sauerkraut. First thing I recommend is to taste it and if you like it, eat it. Try some on a little pile of fresh rice to check out your sauerkraut's flavor.
If you don't like it, keep trying and maybe it will grow on you?
If you DO like it, well, that opens up a lot of other options. You could try a classic sandwich, The Reuben--delicious! A likely looking suspect (of a recipe) is here: Reuben Sandwich at Simply Recipes .
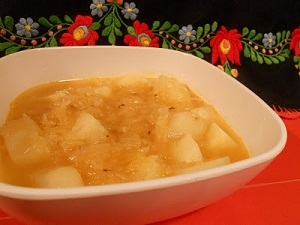
How about a soup--the weather is kinda cool enough for soup right now! Simple sauerkraut soup at Czech Vegan
How about a drink before dinner? Sauerkraut Martini at The Kitchn
Dip for chips with that drink-- Sauerkraut Corned Beef Dip at The Food Network
A side dish perhaps? Very simple creamy sauerkraut with chives
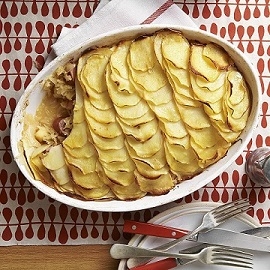
Main dish! Sauerkraut & Sausage Casserole on Eating Well
And lastly, but not leastly, DESSERT! Sauerkraut Pie with Palatable Pastime
Did any of the above whet your appetite for sauerkraut?
- Author: L. Watts
What a meeting! You missed it!
Market! Link! Social Media! Pictures! SB County expectations! Gray-scale flyers! Photo album! Out-reach! Class opportunities! Great ideas, good food (of course we had good food!)
These are just a few of the things we brain-stormed in the Marketing Brainstorming meeting we had this past Saturday. There was a good turn-out at Susan Israel's very nice house—thank you Susan for hosting.
Check out some pics:
Complete with Post-its! You cannot see all the ideas flying around here, but look at the number of post-its on the windo in the back and you will get an idea of the number. And there were even more by the end of the meeting.
This picture did not include one of Suzy's dogs that climbed up on the back of the couch and and licked Lane's head to get his attention!--all very sweet dogs.
There were a lot of very good Ideas to help publicize the MFP program. Many things to think about and start to take action on.
For starters, one easy Idea for you all: If you post anything, anywhere on the web as a response to a food/canning article, item, blog, picture or such, please include in your signature “Master Food Preserver of San Bernardino County.” If you have a webpage of any sort, please link to us ! This will help us to come up in results for searches about canning/food preservation. If you can make this a link to our Home page or blog or Facebook page it would be even better. If you need help with this just e-mail me!
COMING UP: Brining, smoking a bird for T-Day, from Darrell Fluman. It's a good one so don't miss it.
Now I leave you with the recipe for the delicious Meyer Lemon Polenta cake that Suzy served at our meeting. Not a preservation recipe, but it uses optional candied lemon slices and we TALKED about canning stuff!!!
Meyer Lemon Almond Cake
http://www.sfgate.com/recipes/article/Meyer-Lemon-Almond-Cake-6036459.php
Serves 8-10
This cake pairs the bright flavor of Meyer lemons with a moist, buttery crumb made of almond flour. This is naturally gluten-free (as long as you use gluten-free flour blend to coat the pan). It can be gussied up with a topping of candied lemons, or served without.
Tips From Suzy: The recipe is hard to follow. I've learned to do some prep first: A small bowl of just the almond flour, a small bowl of the lemon zest/lemon juice/vanilla, and a small bowl of polenta (just cornmeal--don't tell anybody)/baking powder/salt/cardamom powder. They get mixed in with the butter/sugar/egg mixture in that order. And any lemons will do.
The cake:
8 ounces (2 sticks) unsalted butter, softened
1 to 2 teaspoons all-purpose flour or gluten-free flour blend
1 cup sugar
2 cups almond flour
3 large eggs
½ teaspoon vanilla extract
¼ cup Meyer lemon juice (about 1 large lemon)
2 tablespoons finely grated Meyer lemon zest (about 2 large lemons)
½ cup medium-grind polenta (cornmeal!)
1 teaspoon baking powder
¼ teaspoon kosher salt
¼ teaspoon ground cardamom
Candied lemons (optional):
1½ cups sugar
2/3 cup water
3 to 4 medium Meyer lemons (about 10 to 14 ounces), sliced 1/8-inch thick, seeds removed
For the cake: Preheat the oven to 325 degrees, and place a rack in the middle.
Place the butter in a large mixing bowl or the bowl of a stand mixer fitted with the paddle attachment; set aside. Use the butter wrappers to grease the inside of a 9-inch springform pan and sprinkle with the flour, rotating to coat the bottom and sides of the pan; discard excess flour. Cut a circle of parchment paper to fit the bottom, place inside the pan and set aside.
Add the sugar to the butter; mix at medium-high speed until light and fluffy, about 4 minutes, scraping down the sides of the bowl once or twice. Add the almond flour and mix slowly to combine.
Add the eggs, one at a time, beating thoroughly to combine, scraping down the sides of the bowl, before adding the next. The batter should have a light, mousse-like texture.
Remove the bowl from the mixer. Using a large spoon or rubber spatula, gently fold in the vanilla, lemon juice and zest. Add the polenta, baking powder, salt and cardamom, continuing to fold carefully.
Spoon the batter into the prepared pan and smooth out to the edges. Set the cake pan on a rimmed baking sheet and bake 45-50 minutes, until the top is golden brown and the center is set.
Remove the cake from the oven and let sit 10 minutes. Run a butter knife around the edge of the cake to loosen, then remove the sides of the pan. Leave the cake on the bottom of the springform pan, place on a rack and let cool. The cake can be made a day ahead; loosely wrap or place in a cake carrier and store at room temperature.
For the candied lemons: Combine the sugar and water in a shallow saucepan and heat over medium-high until the sugar dissolves and the mixture comes to a strong simmer. Working in batches, add the lemon slices and continue to simmer, turning the slices occasionally, until the peels turn translucent, about 6-7 minutes, depending on the thickness of the slices. Remove from heat and let cool. The candied lemons can be made a day or two ahead; refrigerate in the syrup.
To finish the cake: Remove the candied lemon slices from the syrup and blot with paper towels. Overlap the slices atop the cake.
Note: Reserve the remaining syrup to mix with mineral water or club soda for a light spritzer, or to add to a citrus-based cocktail that calls for simple syrup. Or, use it to sweeten lemonade.


