

- Author: Dustin Blakey

All over our region we are receiving reports of fire blight occurring on fruit trees. This bacterial disease primarily infects pears, apples, quince and pyracanthas in our area. While there are a few other species out there that can be affected, it is unusual to see them attacked. Peaches, plums and cherries are not affected by this disease.
Fire blight is a bacterial disease. It usually gets its start during the bloom period of susceptible hosts. Early on it looks like wilted shoots and flower buds. Most gardeners do not notice the disease until it has turned entire shoots black. This burnt appearance happens suddenly which gives the disease its name.
By the time you see burnt shoots, it is too late to do anything to stop it. You're too late now. This summer, plan on pruning out all diseased wood. If you miss any, remove the remainder this winter. Removal of diseased material is important in controlling the disease in the future. The disease is primarily spread through flies and bees interested in the flowers. By removing sources of infection via pruning, your chances of getting the disease diminish. Sometimes this means pruning out a lot of the tree.
Disease growth is favored by a certain range of temperatures that occur in spring. In our area this coincides with turning on irrigation which raises humidity. Late spring storms, even if they don't bring rain, do often raise humidity as well.
There isn't really an effective spray option available to homeowners. Even farmers have a hard time with sprays of this disease. The UC IPM program has a brief summary of spray options at the end of this informative fact sheet. If you do spray, this occurs during the infection season as a means to prevent the disease. After-the-fact sprays have no effect. Don't bother trying.
There are great differences in susceptibility to fire blight by cultivar (variety). If you find that your pear or apple is always being afflicted with fire blight, consider replacing it with a more-resistant cultivar. Usually catalogs point this out.
- Author: Harold McDonald

One plant I'm confident has been on the top ten from the beginning is California coffeeberry. Coffeeberry is a member of the Rhamnaceae, or Buckthorn family. I've always known it as Rhamnus californica, but recently it has been reclassified as Frangula californica.
Many of you are probably familiar with coffeeberry, as it is one of the most widespread plants of the California landscape. I normally associate it with the chaparral and oak woodlands, but one or more of its subspecies can be found in nearly every community throughout the state. You can see an interesting map of its distribution here or go to the CalFlora website. Locally, I have encountered coffeeberry only occasionally, most notably in the south fork of Big Pine Creek. Then just yesterday, I saw some tremendous specimens up a little side canyon near the creek crossing on Baker Creek Road.
When I found coffeeberry at a nursery years ago, I knew it only from the Santa Cruz mountains, and I wasn't even aware it occurred on the eastside, so I considered it 50-50 that it would make it through the winter. Though the leaves do look a bit stressed by the end of the winter, it always comes roaring back in the spring. I made my first planting close to the house, thinking it would benefit from the extra protection, but I have planted several more over the past dozen years, and all have thrived (“thrived” being a relative term here in the far western reaches of Chalfant!). The other foundations of my landscape as far as evergreen broadleaved shrubs are mountain mahogany, bitterbrush and sugar bush. While I don't trust coffeeberry to be as cold tolerant as the first two, which are more common local natives, it is hardier than the last, Rhus ovata, a native of the SoCal coast ranges (but which I first noticed in Sedona) that is definitely another of my top ten shrubs.

Depending on the authority you consult, there are between two and six subspecies and several named cultivars. I have one I purchased as a tiny baby from the Bristlecone Native Plant sale (ssp. californica?) maybe eight years ago that is now six feet tall. From Theodore Payne Nursery near San Fernando, I purchased Frangula californica tomentella, which has done less well, but it is in a very challenging location and still looks pretty good. My others are all the widely available ‘Eve Case' cultivar. The descriptions online say that ‘Eve Case' is somewhat smaller than the species, but that has not been the case for me. In my yard, the natives seem to have smaller, less glossy leaves. I have some plants that get water daily during the growing season and others that get a soaking every week or two. All have done well. You can just leave them alone and they look great, but they take kindly to any amount of pruning. I have even cut them back to the ground, and they crown sprout beautifully. In my yard they seem to reach a height and width of about eight feet, but, as I said, they are very amenable to whatever size you want to make them!
This is not the easiest plant to find, but a few individuals do show up each summer in our local nurseries, and they are widely available in native plant nurseries throughout the state. So bypass those boring shrubs at the big box stores, go your local nursery and ask them nicely to order a few coffeeberry plants for you (one gallon is fine if you can get it). You will not be disappointed, and the birds and the bees will definitely thank you.

- Author: Alison Collin
Optimum growing and pollinating conditions lead fruit trees such as apples, peaches and plums to set far more fruit than the tree can sustain to maturity. If all these fruits are left on the tree they will be small and of poor quality and the total weight of such a load on the branches will cause them to break off or split at the crotch, often causing severe damage to the tree. Crowded fruits also encourage pests such as codling moths and diseases such as brown rot and scab. Over-cropping prevents the tree from putting energy into producing flower buds for the following year which will be detrimental to that crop. Apple varieties with biennial patterns of production - those with cycles that produce a bumper crop one year and nothing the next - may be induced to fruit annually by drastically thinning early during the productive year, even to the point of removing all flowers from alternate spurs.


Many trees shed part of their crop naturally, a process known as “the June Drop” but which can begin during May in California. However, this is often not sufficient to produce quality fruit at harvest.
One of the most psychologically challenging tasks that a gardener faces is removing perfectly healthy fruit (sometimes by the bucketful) in order to leave more manageable numbers. The earlier in the season that the surplus fruits are removed, the larger the individual remaining fruits will become. It takes some seasons of experience to judge how many fruits to remove but a steely resolve will be amply rewarded. The largest fruit in any cluster is usually left, unless it is obviously damaged.
Apples: These should be thinned to one or two fruits per cluster depending on variety and the overall set of flowers. One fruit per spur 6-8 inches apart is the aim but, if the overall crop is light, clusters of two may be left. Realistically the fruit often grows in frustrating patterns with groups of 5 beautiful apples on one spur and then several spurs with no really good fruits forcing a decision as to whether or not to leave two fruits on the good spur! Fruitlets are removed using scissors or other fine cutters which can reach inside the cluster to the stem. These can be cut close to the fruit and the little stem may be left without any detrimental effect. It is vital not to just pull on the fruit since this will often drag the whole spur off the branch. Some gardeners grasp the stem of the fruit between their first two fingers and “roll” the fruit off with their thumb. There are usually a variety of sizes and shapes in each cluster so begin by removing the small, damaged and misshapen ones first. Then there is the agonizing decision of which of the remaining two perfect fruit to leave. I find that usually one has a slightly thicker stem than its partner so I would leave that. In order to get the best sized fruit at harvest the ideal leaf to fruit ratio for apples would be around 75:1 for early varieties down to 40:1 for the later ones, but who's counting!

Peaches: The same basic principles apply but a little more space is usually left between fruit – about 6- 9 inches. However they grow much tighter to the stem and are best removed by grasping the fruit firmly and twisting it round until it detaches. For those just out of reach, I have found that barbecue tongs (the sort with a looped end) make an efficient removal tool.
Plums: Thin to about 3-4 inches apart. Overloaded plums will naturally drop fruit at the stone hardening stage, so sometimes growers thin in two stages; lightly when the fruits are small, and then finally once the natural dropping has ceased.
Cherries and Nuts are not usually thinned.
Pears: Often thin themselves, but if extra thinning is needed in order to end up with one pear per spur, the time to do this is when the fruitlets begin to turn downwards.
Thinning is undoubtedly a rather tedious business, but when harvest time comes and the fruits are large, lush and healthy, you will be so pleased that you made the effort.
The continuing drought in California and the Western United States has made it necessary for all of us, no matter where we live, to find ways to save precious water. Now that our three sons are out of the house, Lori and I decided that the removal of some grass in our yard would be a start. We could remove grass in a sunny backyard area as a test, and as an added bonus use the newly-cleared space for growing less water intensive, sun-loving vegetables and flowers.
The main problem we had to tackle, aside from the labor required to dig out and dispose of the turf, was how to prevent the grass from growing back and weeds from encroaching on the exposed area. We considered a number of options to eliminate grass including initial removal and continuing weeding, herbicides, tilling, weed cloth, cardboard and newspapers.
 3/17/15: Cutting grass around hose used to mark test area. |
 3/18/15: Tilling area prior to applying newspaper. Note dug out perimeter. |
|
Each of those options brings with it its own advantages and disadvantages which had to be weighed. Continuing weeding to (hopefully) keep grass at bay would be a pain in the neck—and back—and we saw little upside in this option. Herbicides would probably get rid of the grass, but would probably require several applications. Most importantly to me, they are not good for the environment and any future planting we wanted to do, including vegetables. Tilling can harm the natural soil texture, spread seeds and chop up grass into small pieces that can grow. Weed cloth would probably work but it's expensive. Cardboard would probably work too but it's difficult to work with. Old newspapers reportedly work well and they are readily available from the local newspaper office for nothing, and using them carries the added benefit of recycling.

First we needed to select a location where the lawn would be removed. Because we have so many trees in the backyard that shade a lot of area, we selected a location in the middle of the yard that gets as much sun as possible. We wanted to have a sunny location where vegetables and flowers would grow well.
We began the test in mid-March 2015 hoping to get the new area ready to plant before summer. I started by outlining a spot on the lawn using a hose and then proceeding to remove the grass. First I used a cutter to make a nice edge along the hose. I then dug out the edge of the grass inside the cut to a full shovel depth, about six inches. This has the added benefit of minimizing the infiltration of adjacent grass as it cannot easily cross the open space. Next I tilled the grass in the rest of the area, and raked and pulled as much leftover grass as I could.

In mid-April we took on the task of getting water to the new planting area. We decided to tap into an existing drip irrigation line that's on a timer and about 25 feet away. I used the cutter to make a line in the grass then dug down and peeled back the grass leaving it attached at one edge to facilitate putting it back once I'd made the water connection. I then dug a trench about 12 inches deep. It was a bit tricky cementing the new connection to the existing pipe which was about two feet deep. Once I had made the connection I ran pipe in the ditch and covered it with the dirt I'd removed and the grass I'd peeled back. Finally Lori connected a drip irrigation system to the new pipe and put heads where we were going to plant.
Then we got to plant! We waited until early May hoping to avoid freezing (it's all a matter of risk tolerance). Lori planted squash seeds, peppers, cucumbers, a gerbera daisy, marigolds and one dahlia tuber we had left over after planting 39 in our existing garden. We've had problems in the past with bugs eating our young plants so we put a fence around the area to keep the dogs out and then Lori sprinkled a bit of snail/earwig bait to give them a chance to grow strong and better survive a pest onslaught.
 3/18/15: Test area with grass tilled, raked and removed, ready for newspapers |
 3/18/15: Ready to plant! Just waiting install the drip supply line and warmer weather. |
 4/14/15: Trench dug and drip supply pipe installed and ready to backfill. Note the grass laid over to the left, making it easier to put it back where it came from. |
 5/10/15: A few days after planting. No grass or weeds have come up. |
It's now June. Everything we planted is doing quite well. On May 26 Lori did some minor cleaning and mulching of the area and found minimal grass and weed infiltration. Since we created the new planting area very little grass has come up, and any that has mostly came from the surrounding grass, not through the newspaper. So, at this point I would call the test a success. I will update this report as the summer and fall growing seasons progress and we have a better handle on how successful the test has been. But, so far so good! If it continues to work this well we may remove more grass in the future using the same method.
I'll keep you posted.
 3/18/15: Lori wetting the blood meal spread on the newspapers. |
 5/29/15: Looking good this morning! |
What do you do with a narrow grass path, much infested with weeds? I inherited such from the previous home owner and found that it was difficult to mow since it was sunken, and the border of railroad ties necessitated that the grass edges be clipped by hand. I considered replacing the grass with pea gravel, decomposed granite or coarse bark, but a stack of hexagonal concrete pavers discovered in a forgotten corner immediately suggested a solution.

The strip is irrigated by a Netafim subterranean dripper system which is tied in to another area of the garden. It would be a major task to rearrange the pipework, but I could rearrange the plants to considerably reduce the amount of water that both areas needed.
Digging was not feasible because of the embedded underground pipes, but the packaging from a recently delivered mattress provided a ready means to solarize, so I stretched the plastic sheeting over the area and weighted it down with rocks. It was May and I continued to irrigate which encouraged all manner of weeds to germinate but they were quickly destroyed by the heat of our desert sun. I left the plastic in place for the rest of the year just to maximize the effect. The advantage of solarizing rather than digging is that the compacted soil is undisturbed so settling is less of a problem when laying the pavers.

Creeping thyme (Thymus praecox arcticus) is low growing, heat tolerant, and can withstand foot traffic so I raided my daughter's garden for starts to plant between the pavers and along the sides. They were rather poor specimens with not much root and I planted them about 1ft. apart. All grew but were slow to establish. I did not have enough to finish the project but, much later, I found a cell pack of thyme at the local nursery and planted those six plants. They grew much faster, but by the next season it became apparent that the two plantings were of different varieties! “Pink Chinz” has grayish green leaves and flowers later, while “Elfin” - a much tighter grower with tiny leaves and early, minute flowers - was more of a bright green. I do trim the plants around the paving stones once a year to keep the edges defined, and mow the spent flowers but otherwise they have been trouble free with no obvious diseases or pests. It is now three years since I planted and I am not sure how long it will be before the original plants become woody and some sort of replanting will be called for.

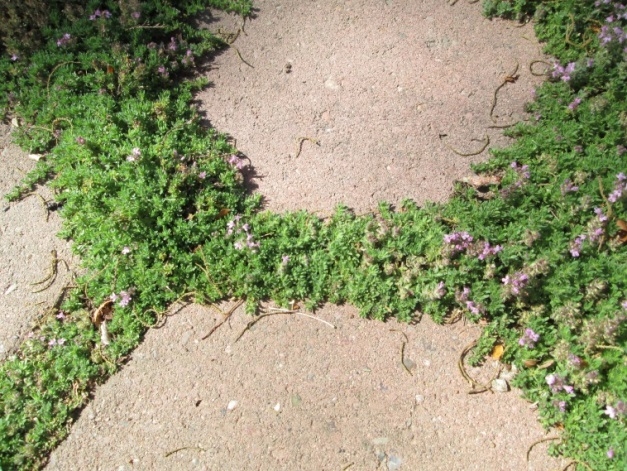
Although none of the original weeds grew back, various seedlings had to be removed by hand from the rather large areas between the plants until they filled in so I was pleased that I had not decided to replace an entire lawn. Not much grows through once established, but removing yellow Oxalis corniculata from the depths is tedious and reminds me of a school nurse looking for louse nits! Once in flower weeding can only be done when bees are not around - in the early morning or after the sun goes down. Hive bees love this plant and come by the hundreds daily. So far none of us has been stung while walking along the path, but I don't go bare foot and I encourage children to use an alternative route.
I am delighted with the results – one of my gardening successes even if it is two-tone!

