By Penny Pawl, UC Master Gardener of Napa County
Three years ago, I wrote an article about creating African keyhole worm-compost bins in my garden beds. This summer it was time to harvest compost from two of the bins.
I used garbage cans with ¼-inch holes drilled in the sides and bottom so the worms can go back and forth. As they move about, they take some of the compost with them and spread it in the garden bed.
Mine are all raised beds. The bins were installed after hardware cloth was added to the bottom of each bed to foil gophers. With time, the hardware cloth will rust and need replacement.
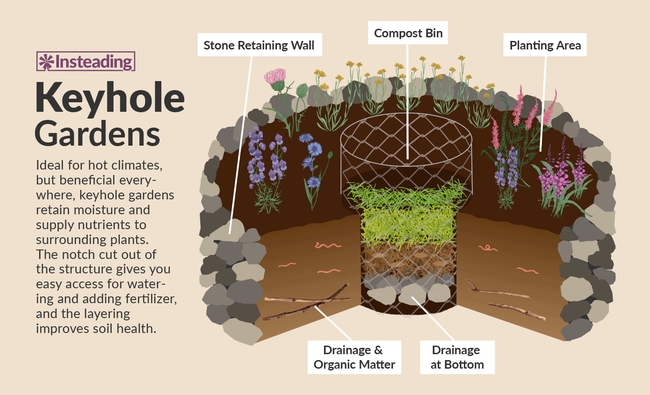
Keyhole gardens originated in Africa when people created kitchen gardens using materials they had lying around. The design is circular with a keyhole-like entrance. A worm compost bin made out of chicken wire or other materials is placed in the center, and the gardener puts kitchen waste in the bin. When the compost is ready, it is spread over the garden.
The first garbage can I checked was half full of compost. I transferred all the uncomposted material on top to another bin. Then I prepared a mesh bag (the kind potatoes come in) full of my red wiggler worms' favorite foods, like bananas, lettuce and melon rinds. I placed this bag on top of the finished compost as a lure. Slowly the worms and sow bugs started moving from the compost into the mesh bag. These worms are expensive and I didn't want to lose any. Luring most of them into the mesh bag took about two weeks.
Why do I want the sow bugs? They also eat decomposing material and leave their droppings, which are as beneficial to plants as worm droppings are. On one online forum I follow, a worm composter was looking for sow bugs to add to his bin. I have found that they move in naturally.
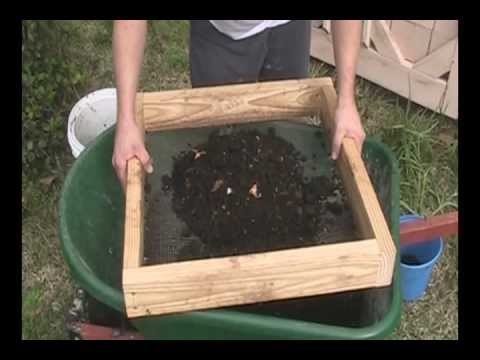
I put the composted material on a screen over a tray. In the tray I put new damp bedding: newspaper, cardboard, old leaves, straw. Neither red wigglers or sow bugs like light, so they will leave the compost and move into the new bedding. Then I can sift the compost to get out any large pieces that haven't fully broken down. These big things go into the bottom of the new bin.
I move the sifted compost to a large, long tray in my hothouse to dry. If stored damp it will mold.
The biggest problem I have encountered is that tree roots also like keyhole gardens. I wasn't aware of this problem when I built the beds, and I had to cut the tree roots out. Also, my arms aren't long enough to reach the bottom of the garbage can so I eventually need help getting all the finished compost out.
Once a bin is empty, I use the layer method to build a new bin, alternating torn damp newsprint, dried leaves, rice hulls, coffee grounds and a dash of chicken manure. The worms and other critters in the bin will mix these materials, which should be as damp as a wrung-out sponge. Usually, I top off the layers with banana peels or old lettuce. On top of all that, I place a piece of black plastic and put the lid on the can.
Once I see that the worms are settled and eating the items in the can, I start feeding them my kitchen garbage. Three garbage bins have yielded 15 gallons of worm gold, as we gardeners call it. I will spread it around my yard to feed all my plants this fall.
If you would like to learn more about composting, take a look at “Backyard Composting,” a video that several Master Gardeners and I produced in partnership with Napa County Library. You can find it on YouTube.
Food Growing Forum: Napa CountyMaster Gardeners will present a discussion of “Cane Berries” on Sunday, November 14, from 3 p.m. to 4 p.m., via Zoom. Register here to receive the Zoom link.
Got Garden Questions? Contact our Help Desk. The team is working remotely so please submit your questions through our diagnosis form, sending any photos to mastergardeners@countyofnapa.org or leave a detailed message at 707- 253-4143. A Master Gardener will get back to you by phone or email. For more information visit http://napamg.ucanr.edu or find us on Facebook or Instagram, UC Master Gardeners of Napa County.
.
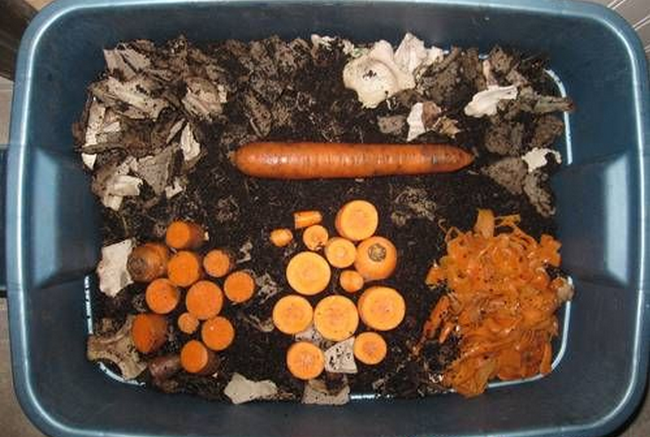
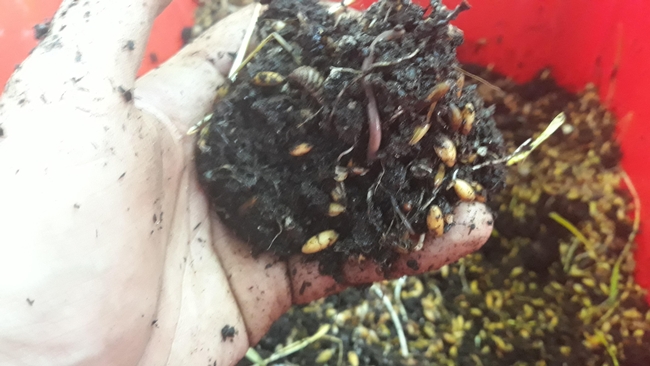
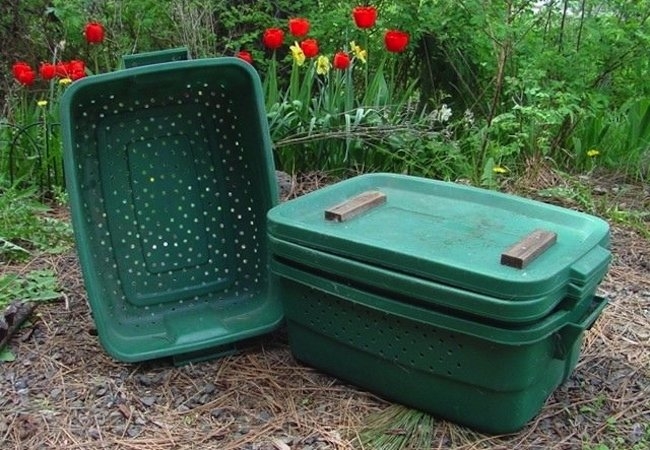
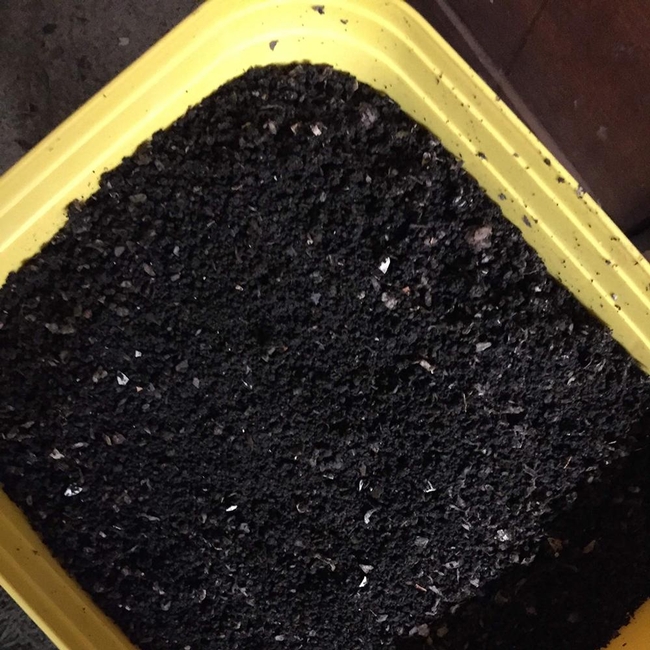
I have a manure farm in my backyard. Before you decide to move on to another article, you should know that my farm is small, only about two square feet in size. It consists of a plastic bin in which live hundreds of small, red worms. Known as "red wigglers", they are different from the earthworms you find in your garden. These little wonders will eat your food waste and create nutrient-rich manure that you can use in your garden.
My worms live very comfortably in their little storage bin, nestled in a bedding of shredded newspaper. Every now and then I take some leftover vegetables and place them under the bedding. Before long, the little red wigglers are all over it, chewing it up and turning it into the garden version of "black gold."
Their manure, or castings, looks much like soil at first glance. It is, however, around five times more nutrient rich then regular soil. The worms are good at their job of consuming and excreting up to half of their body weight in organic matter each day. This leaves me in awe. What if I could attempt such a feat?
Getting started on worm composting, also known as vermiculture, is easy. Obtain a wood or plastic container roughly one foot deep. Drill ¼-inch holes on the sides and bottom to allow air and moisture to pass in and out of the container.
Fill the bin with 1-inch thick strips of damp, but not wet, newspaper. This bedding will help your worms stay cool and damp, as well as give them an additional food source. Glossy newspaper inserts or magazines won't work as bedding. Choose a location that is not too cold or hot. I keep my bin in a shady corner of my patio, but many people keep theirs inside in the basement or laundry room.
Now that you have built your worm home, you can add worms and begin feeding them table scraps. Don't overwhelm them with too much food at first. Watch to see how quickly they eat what you give them, and raise the amount as the population grows. They reproduce rapidly, so you won't have long to wait.
Your new friends will be happy to have any leftover vegetables, fruit, dead flowers, tea bags, coffee grounds and even egg shells. They are vegetarian, however, so don't feed them any meat or dairy products. It is also best to minimize acidic foods such as citrus.
If all goes well, in a few months you will start to see worm castings accumulating at the bottom of the bin. There are many ways to harvest them, but I find the following method to be the easiest. First, remove the finished compost and set it aside. After adding fresh bedding, place hardware cloth across the top of the bin. Put the finished compost on the hardware cloth and let the sun or another bright light shine onto it. The worms will move away from the light, through the compost, and out the bottom into the new bedding. Afterward, pick through the compost to find any stragglers that you can transfer by hand.
Now you have a highly nutritious, homemade fertilizer. You can use it wet, but to store it for later use, let it dry. Just sprinkle it in your garden before watering to enrich your soil. I also like to put a handful in the bottom of a planting hole to give the new plant a healthy start in my garden.
Red wigglers can be found at many fishing supply stores and online. You can also get some worms and a free bin if you attend a Master Gardener worm-composting workshop (https://compost.naparecycles.org/). The workshop is also your chance to get more detailed information on vermiculture. I started my bin after attending such a workshop, and now can't imagine how I ever gardened without it.
Workshop: U. C. Master Gardeners of Napa County will host a workshop on “Landscape Trees, Shrubs and Maples” on Saturday, June 10, from 9:30 a.m. to 11:30 a.m., at the University of California Cooperative Extension, 1710 Soscol Avenue, Napa. The workshop continues from noon to 2 p.m. with a field trip to a local garden. Trees and shrubs add pleasure and value to your garden. Discover an array of options for the home garden and how to add structure and interest with landscape trees and shrubs. Tips for selecting, planting, and caring for trees and shrubs will be discussed. Please bring a sack lunch, dress for outdoor conditions and wear good walking shoes. Online registration (credit card only)
Mail-in registration (check only or drop off cash payment).
Master Gardeners are volunteers who help the University of California reach the gardening public with home gardening information. U. C. Master Gardeners of Napa County ( http://ucanr.edu/ucmgnapa/) are available to answer gardening questions in person or by phone, Monday, Wednesday and Friday, 9 a.m. to Noon, at the U. C. Cooperative Extension office, 1710 Soscol Avenue, Suite 4, Napa, 707-253-4143, or from outside City of Napa toll-free at 877-279-3065. Or e-mail your garden questions by following the guidelines on our web site. Click on Napa, then on Have Garden Questions? Find us on Facebook under UC Master Gardeners of Napa County.
- Author: Denise Seghesio Levine
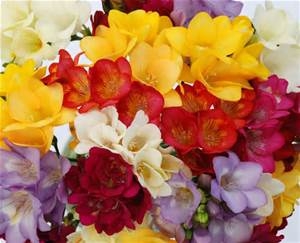
Freesias are a member of the Iridaceae family. They were first found in Cape Province, South Africa, about 200 years ago by a German physician named Friedrich Heinrich Theodor Freese. Most of the varieties that thrive in California descend from just two of the many hybrids Dr. Freese discovered.
Freesia blooms grow along one side on a slightly branched stem with tuft-like narrow leaves. Most varieties reach about one foot in height.
Many flowers have ancient myths attached to them, but freesias, being of recent discovery, leave no tales in their wake. In modern florist language, freesias symbolize innocence and friendship and are the commemorative flower for the seventh wedding anniversary.
Like other plants indigenous to Mediterranean climates, freesias do best where winters are wet and summers are dry. Many favorite plants in Napa County gardens—perhaps some you grow—originated in southern Africa.
Freesias look best planted in groups or masses rather than in tidy little rows. They bloom pretty dependably 10 to 12 weeks after planting, so with careful planning, you can have blossoms in beds and pots throughout dreary winters and rainy springs. Read the labels at the nursery, however, because some propagators pre-force corms to provide blooms as early as five to eight weeks after planting.
While gardeners in most areas wait until March to plant freesias, Napa County has warm-enough winters to give us a jump on these colorful, fragrant blooms. You will see freesia corms in local nurseries this month.
Freesia corms are fragile, and the fresher, the better. Know where you intend to plant them before you head to the nursery to pick them out. For the most robust blooms, get them in the ground or into pots as soon as you can.
To plant in beds, prepare the soil about a foot deep. Make sure the bed drains well since standing water will rot the corms. Freesias prefer full sun or light morning shade but have done well almost everywhere I have planted them. Plant the corms two to four inches apart and two inches deep, then water the bed well.
Freesias also thrive in pots. Just fill the pots with good potting soil and plant the corms about an inch deep with their pointed ends up. Keep the soil moist but not soaking wet. Six corms will fit comfortably in a five-inch pot. Be sure to plant them where you can enjoy the sight of their arching, trumpet-shaped flowers and catch their wonderful scent.
Once foliage emerges, keep the beds or pots moist. Do not let the soil dry out until the flowers have faded and the foliage begins to yellow. You can deadhead the blossoms so your garden looks neat, but leave the foliage to die back naturally. The leaves provide the energy for the corms to store for next season's blooms. If your freesias are in pots, you can move them to a resting spot, out of sight, until they are ready to bloom again.
You can experience freesias indoors in two ways. You can force bulbs in dishes or pots, or you can enjoy the blooms as cut flowers in vases.
To grow freesias indoors, plant fresh corms an inch deep, pointed end up, in regular potting soil. Water well and find a sunny, south-facing window to perch them in. Expect your bouquet in 10 to 12 weeks.
When the show is done, let the pots dry out and start over. A favorite ceramic pot full of freesias is beautiful on a desk, on a kitchen windowsill, or in a sunny bathroom.
Long-lasting freesias are a lovely choice when you are ordering a bouquet from a florist for friends or family. With a change of water daily and a little floral preservative, freesias can look fresh and smell divine for up to three weeks.
Workshop: The UC Master Gardeners of Napa County will host a free workshop on “Worm Composting” on Saturday, September 26, from 9 a.m. to 11 a.m., at the Napa Valley Museum, 55 Presidents Circle, Yountville. Explore worm composting, an ideal solution for composting kitchen scraps and returning the nutrients to your soil, especially when outdoor space is limited. Co-sponsored by Napa Recycles! Free Online Registration.
Master Gardeners are volunteers who help the University of California reach the gardening public with home gardening information. U. C. Master Gardeners of Napa County ( http://ucanr.org/ucmgnapa/) are available to answer gardening questions in person or by phone, Monday, Wednesday and Friday, 9 a.m. to Noon, at the U. C. Cooperative Extension office, 1710 Soscol Avenue, Suite 4, Napa, 707-253-4143, or from outside City of Napa toll-free at 877-279-3065. Or e-mail your garden questions by following the guidelines on our web site. Click on Napa, then on Have Garden Questions? Find us on Facebook under UC Master Gardeners of Napa County.
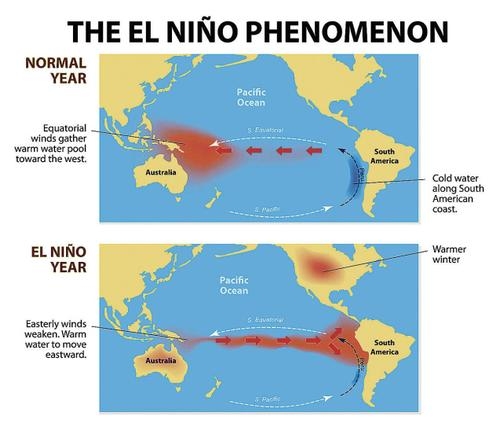
For the Napa Valley, El Niño refers to a weather pattern in which warming sea surfaces cause heavier-than-average winter rains and wind with warmer-than-normal temperatures.The U.S. Climate Prediction Centerhas predicted 65 percent likelihood that we will feel the effects of El Niño as summer ends, with that probability rising to nearly 80 percent by the end of the year. The National Oceanic and Atmospheric Administration says that this weather pattern usually continues for nine to twelve months.
Because of the current drought, the idea of a wet winter is welcome to me. The coming rains are too late for a number of my trees and shrubs, which are either dead or have dead branches. And the high winds that accompany El Niño storms could blow any of these trees down. Clearly I need to trim dead branches and trees and make sure weak plants are staked properly.
El Niño storms often dump massive amounts of rain in a short time, creating flash floods and heavy water build-up in yards. You can find some good suggestions on how to handle storm water as well as how to collect it for future use at www.countyofnapa.org. In the search box, type “slow it spread it sink it” to find an online reference guide by that name.
Since good drainage is extremely important to plant health, my other pre-storm chores involve clearing a place for the rain water to go. These tasks include clearing weeds from the run-off ditches in my yard as well as cleaning out rain gutters and spouts.
Highly saturated soils make it hard for plants to survive. In wet soil, t is almost impossible for roots to take up all the oxygen that the plant needs, which causes the roots to decay. Deep roots are the first to rot. If the condition continues shallower roots will also be damaged. Even plants that don't appear to be flooded may have problems during extended wet weather. And you may not see the damage until next summer. One of the best defenses for your winter vegetable garden is to make sure you have well-drained soil and to plant in mounds.
After an El Niño season, everything may appear normal in your garden until summer temperatures top 90°F. After the 1997-98 El Niño season, Napa County farm advisor Dean Donaldson warned Master Gardeners about this phenomenon in the group's newsletter. “Sometimes tree growth is simply stunted,” wrote Donaldson. “Usually, however, people observe their beautiful trees and shrubs suddenly turning from green to yellow or reddish brown. Usually it is the entire tree and it happens within a few days of hot weather. Insects are attracted to those weakened trees and often get the blame. If the whole tree dies, you can blame El Niño.”
When those record-breaking El Niño rains subsided and weather warmed up, fungal and bacterial pathogens emerged on foliage. Many trees and shrubs evidenced phytophthora root and crown rot. Slime molds appeared on soil surfaces, and snails and slugs proliferated.
Anthracnose, fire blight, and powdery mildew all thrive after a mild, wet spring. When you see evidence of these diseases on plants, cut out and discard the affected material immediately. Sanitation is the number-one way to keep these diseases from spreading. Iron chlorosis may also be a problem in wet soils.
The best thing we can do for our gardens before an El Niño-influenced winter is to create good drainage. Afterward, watch for symptoms of root rot, fungus or bacterial diseases.
Garden Tour:The UC Master Gardeners of Napa County invite you to their sixth garden tour, “Down the Garden Path,” on Sunday, September 13. On this self-guided educational tour you will see seven gardens by Master Gardeners in and around the City of Napa. These gardens illustrate how Napa County Master Gardeners use University of California research-based horticultural information to develop and maintain their own gardens.
Tickets: $30 Advance/ $35 Day of Event. Purchase tickets at http://ucanr.edu/ucmgnapa. Or you can purchase tickets at the UC Master Gardener office (address below). For more information, call 707-253-4143.
Workshop: The UC Master Gardeners of Napa County will host a free workshop on “Worm Composting” on Saturday, September 26, from 9 a.m. to 11 a.m., at the Napa Valley Museum, 55 Presidents Circle, Yountville. Explore worm composting, an ideal solution for composting kitchen scraps and returning the nutrients to your soil, especially when outdoor space is limited. Co-sponsored by Napa Recycles! Free Online Registration.
Master Gardeners are volunteers who help the University of California reach the gardening public with home gardening information. U. C. Master Gardeners of Napa County ( http://ucanr.org/ucmgnapa/) are available to answer gardening questions in person or by phone, Monday, Wednesday and Friday, 9 a.m. to Noon, at the U. C. Cooperative Extension office, 1710 Soscol Avenue, Suite 4, Napa, 707-253-4143, or from outside City of Napa toll-free at 877-279-3065. Or e-mail your garden questions by following the guidelines on our web site. Click on Napa, then on Have Garden Questions? Find us on Facebook under UC Master Gardeners of Napa County.
- Author: Deborah Stevens
My worm hobby began in 1999 after I attended a Master Gardener composting class. This hobby continues to fascinate me. Worms recycle my kitchen garbage, and I'm still amazed by the process.
Two years ago I went to North Carolina State University's annual vermiculture conference. The conference was so inspiring that I went again last year. It is the only conference about earthworm farming and mid- to large-scale vermicomposting in North America.
The conference, coordinated by a university extension specialist, offers science-based information. One of the topics was the difference between vermicompost tea and leachate.
Both begin with red wigglers, which are small earthworms that live near the top of the soil and consume organic matter. I feed my worms kitchen garbage and disease-free plant debris from my yard. My goal is to create vermicompost and aerated compost tea for nourishing a healthy, chemical-free garden.
To make aerated compost tea, you need a 12- to 24-hour aeration cycle, de-cholorinated water and finished compost. Alternatively, you can make the tea in a bucket in three to seven days by stirring occasionally.
By introducing air, you encourage the proliferation of aerobic microorganisms and discourage the anaerobic microorganisms that may produce byproducts unfavorable to plant growth.
Vermicompost tea contains a large diversity of bacteria, fungi, protozoa and nematodes. These microorganisms increase soil biological activity, encourage plant vigor, yield, bud break, fruiting, flowering, color, root volume, seed germination, and pest and disease resistance. You can use vermicompost as a foliar spray or soil drench.
Many worm composters are unfamiliar with the topic of aerated compost tea, preferring to use the leachate that many vermicompost systems encourage. Although leachate seems to benefit plants, it comes with some risk.
Research suggests that the use of leachate should be discouraged. Vermicompost is not leachate. The excess water that drips through a worm bin is leachate. It picks up undigested material which may contain pathogens and chemicals toxic to plants and humans.
A properly maintained worm bin will not collect or seep excess water or leachate.
Use leachate to water a favorite weed, or flush leachate down the toilet. Using leachate on plants, especially edibles, is not worth the risk of pathogenic contamination.
As for the vermicompost produced by red wigglers in the worm bin, the worms and microbes gobble up the pathogens in their environment and do not release the pathogens back into the soil.
Microbes are part of a worm-bin ecosystem. They live and work amongst the worms in the vermicompost, eating and overpopulating the pathogens while being ingested by the worms.
The vermicompost is ready to use when you don't recognize the original feed stock. It should smell clean and earthy and appear brown and crumbly.
I wondered if the pathogens the worms previously digested are freed upon their death. Otto D. Simmons III, a professor of biological and agricultural engineering at North Carolina State University, says that “live worms digest the dead ones and the pathogens are eaten by the surviving worms.”
So why use aerated compost tea? Because it adds organic life to the soil, improves soil structure, water retention, root depth and growth.
A foliar spray of vermicompost tea protects plants from pests and diseases, thus reducing the need for chemicals. I love the idea that my plants seem happier and stronger due to my kitchen waste.
Be sure to use non-chlorinated water when making tea or watering your worm bins. City dwellers can set a jug or bucket of water out for 24 hours to de-gas the chlorine. Rain water collected in buckets is a good alternative.
Master Gardeners are volunteers who help the University of California reach the gardening public with home gardening information. Napa County Master Gardeners (http://napamg.ucanr.edu) are available to answer gardening questions in person or by phone, Monday, Wednesday and Friday, 9 a.m. to Noon, at the U. C. Cooperative Extension office, 1710 Soscol Avenue, Suite 4, Napa, 707-253-4221, or from outside City of Napa toll-free at 877-279-3065. Or e-mail your garden questions by following the guidelines on our web site. Click on Napa, then on Have Garden Questions?

