News to Grow By
Shortcut Links: Help Desk / Events / Webinars / Growing Gardeners / News to Grow By / Demo Gardens / Our Blog / Ask a Master Gardener / Edible Gardening / This Season in the Garden / Sustainable Gardening / School Gardens / Community Gardens / Resource Links / FIND US! / Volunteer! / About Us
Spring 2026 NtGB
"There ain't Nothing Better in Life than True Love and a Homegrown Tomato"
— Old saying
Spring has arrived! And with it, comes the moment we’ve all been waiting for… the Great Tomato Plant Sale! But that’s not the only reason to celebrate; we’re also thrilled to welcome you to the brand-new Gehringer Demonstration Garden in Concord, a fresh space designed to inspire, teach, and grow alongside our community.
This issue is bursting with ideas to get you excited about the season ahead. You’ll discover expert tips for growing abundant, flavorful vegetables, explore the beauty and benefits of California native lupines, and uncover the fascinating ways plants adapt and thrive—even when water is in short supply.
We’re also here to help you garden smarter and safer, with practical guidance on managing pests and plant diseases, plus important tips to protect yourself from mosquito-borne illnesses.
And if you’ve ever been curious about composting, now is the perfect time to jump in.
So, pour yourself your favorite drink, step outside, and settle in, you won’t want to miss a single article. Your most vibrant, successful garden season starts right here!
Hedwig Van Den Broeck and Robin Mitchell, editors.
Here is your link to subscribe to this newsletter.
List of Articles
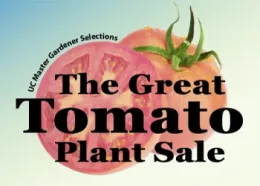
Spring is Here and GTPS is Near!
We are looking forward to seeing your smiling faces very soon. Please mark your calendars for the 3 locations in Contra Costa County as we’d hate for you to miss a single minute of the excitement. See you there!
Get the full scoop on this fabulous event!
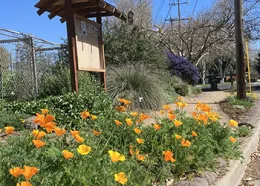
Launch of the New Gehringer Demonstration Garden
Located in the public walking space outside the Gehringer Community Garden fencing, at 1790 Lynwood Dr. in Concord, it will provide a real-life demonstration of the versatility and adaptability of California native plants.
Join the community for the Launch Event on Saturday, April 4th from 1 to 3 PM, hosted by the Contra Costa UC Master Gardeners.
Read what makes this event so exciting!
Introducing New Dwarf Tomatoes for 2026 at GTPS
The Dwarf Tomato Lineup just got Better!
Have you ever wished for the taste and quality of an heirloom tomato, but on a plant, you could grow in a small space or container?
Last year, we were excited to introduce several varieties from the Dwarf Tomato Project that achieve just that. This year, we are offering three new varieties that performed well for us last summer.
Find out more about these new Dwarf Tomatoes
Watertight Plants: A Gripping Story of Survival
Plants are Astonishing! Even in their highly vulnerable state of immobility, they are capable of developing defenses to outside forces that threaten them. Around 500 million years ago, land plants first appeared and were small and moss-like, lacking true roots and stems. They required moist environments, mostly growing in bogs.
Continue reading this gripping survival story.
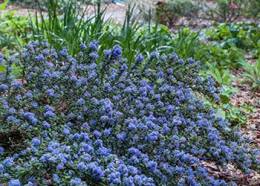
California Native Lupines are a Wonderful Addition to a Garden
They have dramatic bloom stalks and support many insects and other critters.
Lupines are in the pea (or legume) family, Fabaceae, which means that they fix nitrogen in the soil. In California, there are 70 lupine species and 43 varieties that are recognized by botanists, resulting in 113 taxonomic groups. Many of these native lupines are difficult to identify and occur only in particular areas in the state.
Discover all the details of these stunning CA native flowers.
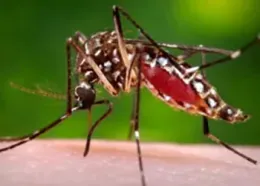
Help Prevent Mosquito-Borne Illness In Your Community this Season!
Why a Tiny Bite Can Have Big Consequences!
Mosquitoes are more than mere nuisances; they transmit disease to hundreds of millions of people every year! For this reason, they are justifiably considered the most dangerous animal on the planet.
So, how can we protect ourselves from bites and prevent mosquito-borne illnesses from affecting our communities?
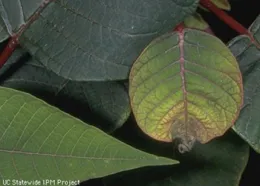
My Plants have Spots, Specks, and Odd Coloring
As the growing season unfolds, many gardeners begin taking a closer look at their plants, wondering whether everything is thriving as it should.
Spring is often the time of year to determine whether a little help might be needed to keep our plants healthy. Knowing what the plant should normally look like makes it easier to recognize when something is amiss.
Find out what might cause these symptoms
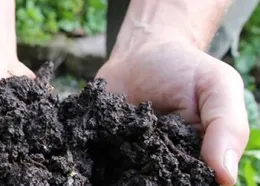
Compost Alchemy: Turning Scraps into Garden Gold
Every trash day, I happily wheel my green waste barrel to the curb. The municipality will turn my garden and kitchen waste into compost that, in a few months, I’ll buy as a bag from my nursery.
Wait…what? I’m throwing away organic scraps today, just to buy them back as compost in a few months. I’m giving away a valuable resource that I could have myself for free!
Learn more about Composting 101
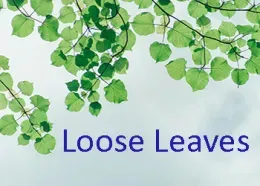
Loose Leaves for this Spring
A perfect invitation to step outside and reconnect with your garden. As new growth emerges and the days grow warmer, this is an ideal time to plant, nurture, and set the stage for a thriving landscape in the months ahead.
Here are a few great tips on spring gardening, maintenance, and pest management
Across Contra Costa County, something wonderful is happening—and it’s all thanks to you. Through workshops, garden visits, farmers’ market conversations, and community events, we’ve had the privilege of learning and growing together.
Because of your curiosity and commitment, more gardens are thriving with pollinator-friendly plants, water-wise practices, and homegrown food. You’re choosing the right plants for the right places, composting, conserving water, and creating spaces that support both people and the environment.
We are truly grateful to be part of your gardening journey. Your willingness to learn, try new practices, and share your experiences is what makes our community stronger, greener, and more connected.
For a visual representation of your impact, you can access this PDF link:
Thank you, Contra Costa County residents, for helping our county grow greener, one plant, one garden, and one gardener at a time.
Spring is bursting with opportunities to dig in and grow something wonderful! Be sure you’ve marked your calendar for the Great Tomato Plant Sale (GTPS) and the exciting debut of the new Gehringer Demonstration Garden—both perfect places to find inspiration for your own garden. And don’t miss our upcoming Citrus webinar on April 21st, where you’ll pick up tips to keep your trees thriving.
The UC Master Gardeners of Contra Costa County are back in full swing, offering a rich lineup of talks, classes, and hands-on learning experiences. Whether you’re just getting started or looking to take your garden to the next level, we’re here to help—stop by our Help Desk or visit an Ask a Master Gardener (AAMG) table at your local farmers market and let’s grow together!
For those of you, looking to dive even deeper, both our UC Master Gardener website and the UCANR Pest management website offer an extensive library of additional resources and guides to support your winter projects.
And here are quite a few Daily Observances you can honor until we meet again in the summer:
3/28 - National Weed Appreciation Day
4/5-9 - National Wildlife Week
4/4 - International Carrot Day
4/5 - National Dandelion Day
4/6 - California Poppy Day
4/6 - Fresh Tomato Day
4/14 - National Gardening Day
4/22 - Earth Day
5/2 - Herb Day
5/3 - National Garden Meditation Day
5/3 - International Permaculture Day
5/8 - National Public Gardens Day
5/12 - International Day of Plant Health
5/16 - National Love a Tree Day
5/19 - Plant Something Day
5/20 - World Bee Day
5/21 - Eat More Fruits & Vegetables Day
5/22 - International Day for Bio-Diversity5/29 - Learn About Composting Day
Go back to the list of Spring 2026 Articles
Feel like taking a walk down memory lane? We invite you to explore our collection of past issues to see just how much News to Grow By has blossomed.
Winter 2026 NtGB
"The color of springtime is in the flowers; the color of winter is in the imagination."
— Terri Guillemets
A new year invites fresh intentions and renewed curiosity. Winter, often seen as a quieter season in the garden, is actually a wonderful time to deepen our skills and expand our understanding. In this issue, you’ll find practical and inspiring guidance on winter-perfect techniques such as espalier, rose pruning, grafting, and pruning native plants — all ways to grow as gardeners while our landscapes rest.
Beyond the garden, we’re focusing on critical home maintenance: protecting your outdoor living spaces from winter’s toll and securing the rainwater your landscape will depend on later. Plus, for a bit of lasting cheer, learn the secrets to keeping your holiday poinsettia healthy well into the new year.
As always, being a UC Master Gardener is about more than tending our own gardens. It’s about caring for our communities. We’re proud to share how our collective efforts continue to make a difference in addressing food insecurity, reminding us that every skill we learn and every plant we nurture can have a wider impact.
For those looking to dive even deeper, our UC Master Gardener website offers an extensive library of additional resources and guides to support your winter projects.
We hope this winter issue informs, inspires, and invites you to read on.
Hedwig Van Den Broeck and Robin Mitchell, editors - Contact Us
Putting the "YAY" in Espalier
Whether you are a newly budding gardener or a vine-ripened horticulturalist, espalier (pronounced “es-PAL-yer” or “es-pal-YAY”) is an artistic and skill-building method of growing plants that can be incorporated into your home garden. The word "espalier" refers to the technique of training and pruning a woody plant to grow in a flat, two-dimensional plane, usually along a wall, against a fence, or between support posts. This style of growing can be an incredibly beneficial method for saving space, improving access to fruit, managing pests, and protecting plants against harsh weather.
There are several shapes, known as forms, that can be created using espalier, from the classic horizontal cordon structure seen in vineyards across the Contra Costa American Viticultural Area1 to the more complex, lattice-style Belgian fence. Although many types of ornamental and fruiting plants can be trained using espalier, some species are more suited for these formal, symmetrical shapes. When choosing a plant to espalier, you will want to consider the characteristics of the individual plant, including age, maintenance, chill hours, and pollination requirements. Young, bare-root trees are a wonderful choice for espalier, as they are considered easy to train.
Fruit trees are a popular option for formal espalier forms, with apples, apricots, cherries, and pears being an easier choice due to fruit production on short branches or many fruiting spurs. Species that fruit on longer branches, such as peaches and nectarines, can also be used but may require more training and thoughtful pruning practices. For an additional challenge, gardeners can combine espalier training with grafting to grow multiple varieties of fruit, often seen with apples and pears, on one plant. Commonly espaliered ornamentals include magnolia, camellia, bougainvillea, and pyracantha. These flowering trees and shrubs can be well-suited for creating informal-style espalier forms.
After you choose a plant, the next step is to determine the right location and type of structure needed for your espalier. When deciding where to plant, pay attention to the soil drainage and the proximity to other plants or structures. Espaliered plants can be especially sensitive to sunburn, so it is important to consider the angle and quantity of sunlight the location receives. Before planting, you will want to build a structure to support your espalier form. Although materials used may vary, the basic structure requires a foundational post, wall, or fence with support wires set and spaced to reflect the chosen espalier form. You can find example images and tips for creating an espalier structure in this UC ANR article.
Once your espalier structure is created, it is time to plant! First, dig a hole at least twice the width of the root ball of the plant and at a depth so that the crown, or flare, of the plant is 1-2 inches above the surrounding soil level. If you are using a fruit tree grafted onto a rootstock, face the notch of the graft union northeast. Water, mulch, and fertilize as required for your chosen plant species.
The espalier training technique used will depend on the type and form of the plant. Maintenance of your espalier plant should be conducted year-round. For all espalier plants, prune and tie new shoots to conform to the desired pattern and structure of your espalier during the dormant season and remove branches that grow outward at right angles to the flat surface and those that crowd other branches during the spring and summer. The technique for creating a traditional horizontal cordon-style espalier is pictured below.
Even with a modest learning curve and an initial financial investment, espalier is a rewarding technique that provides gardeners of all experience levels an opportunity to create eye-catching structures that combine beautiful, elegant form with practical abundance.
1An American Viticultural Area, or AVA, is a designated region that has specific geographic and/or climatic features that distinguish it from surrounding areas and impact how grapes are grown. The Contra Costa viticultural area was established by the Alcohol and Tobacco Tax and Trade Bureau (TTB) on March 14, 2024. More information about AVAs can be found here.
For more information on espalier plant choice, structure creation, planting, and maintenance, check out these UC ANR resources:
"Espalier" by the Marin County UC Master Gardeners
"How to Espalier" by the Marin County UC Master Gardeners
Garden Talk: Espalier Fruit Tree Basics by the Marin County UC Master Gardeners
Talk: Introduction to Espalier by the Napa County UC Master Gardeners
Easy Guide to Hard Pruning Roses this Winter
Roses bring a stunning beauty to the spring garden, and who can’t resist sniffing those first few blooms? The key to abundant blooms this spring is hard pruning your roses during winter. In Contra Costa County, the best time to hard prune roses is January to February, after the last frost.
Why do we hard-prune roses in winter? Roses are prolific growers, climbing high and wide during the growing season. This growth can become unwieldy and, worse, sap energy from the shrub. Hard pruning in winter has three benefits.
- Helps you shape the rosebush to make it attractive and fit your space.
- Directs energy towards new spring blooms.
- Promotes health by eliminating diseased branches and hiding places for pests.
Prepare before you begin. Always wear eye protection, thorn-proof gloves (preferably gauntlet-style), long pants, and long-sleeved clothing while pruning. Use disinfected, sharp bypass cutters for trimming branches or longer loppers for tall or climbing roses.
How much to prune? Expect to remove about 1/3 to ½ of last year’s growth from your roses. It may sound like a lot, but your roses will reward you.
What’s the goal? Different roses have different pruning goals.
- Hybrid Tea, Floribunda, and Grandiflora—Remove enough branches to create a vase-like shape with an open center. This allows air to circulate and the sun to reach the branches. When finished, expect to have 6-10 well-positioned canes, 2–4’ tall.
- Miniature & Shrub Roses—Manage the size and shape by trimming overly vigorous branches.
- Climbing Roses—Cut back branches to six lateral canes. Affix canes to a structure with wire or string. For climbers that bloom only once per year, prune after spring blooming is finished.
Ready to Hard Prune? Great! Follow these 5 steps to hard-prune hybrid tea, floribunda, and grandiflora roses. (For pruning FAQ’s on these and other types of roses, including shrub, miniature, or climbing, check out https://ucanr.edu/node/129797/printable/print.)
- Remove all leaves so you can see the structure of the plant
- Prune away branches that fit the 4D’s: Dead, Damaged, Diseased, Deranged
Cut branches that fit the 3 C’s: Crossing, Competing, Crowding… or thinner than a pencil
Find the outward bud and prune to a 45-degree angle. This step will force the new lateral growth outward (keeping the interior airy and open). Make your cut ¼” above the outward-facing bud at a 45-degree angle. The angle helps water flow away from the bud, preventing rot.
- Lastly, clean up the base. Cut any suckers from beneath the bud union because they will take energy from the plant. Remove debris, old leaves, and pruned branches, and put them in your green bin to prevent disease and pests from spreading.
Post-Prune Care—Help your rose stay strong during winter and get ready for the big bloom.
- Apply compost 2-3 inches deep around the rose plant, but push it away from the rose canes
- Apply organic or natural, balanced, rose-specific fertilizer in the spring once you see 2-3 inches of new growth. Follow label instructions for application.
- Optional – apply a horticultural oil to smother overwintering scale and insect eggs while doing the least harm to beneficial insects.
Have confidence! While there aren’t many guarantees in life, you can trust that hard winter pruning of your roses will reward you with a burst of beautiful blooms this spring. Don’t worry about cutting too much or the wrong way. Roses are forgiving and resilient. Trust the process now, and your garden will do the bragging this spring!
For more information about planting, pruning, and caring for roses:
https://ipm.ucanr.edu/home-and-landscape/roses-cultural-practices-and-weed-control/#gsc.tab=0
Handy one-page pruning guide:
https://ucanr.edu/sites/default/files/2025-02/407670.pdf
Tree Grafting for Garden Fun
Plant and tree grafting is an ancient and worldwide practice. I was fascinated on a recent trip to the Mekong Delta in Vietnam by a demonstration of jackfruit tree grafting by a family nursery supplying trees to nearby Saigon markets. What struck me most about this demonstration, half a planet away from Contra Costa, was how remarkably similar their grafting techniques appeared to our own. Would you like to try this fun and interesting practice in your own backyard garden?
Grafting is the process of joining two trees or plants to grow as a single entity. In most cases, one plant provides the roots, root crown, and lower trunk, collectively known as the rootstock, while another plant provides the upper leafing, flowering, and fruiting parts, known as the scion. The goal is to create a single unified plant that takes advantage of the best qualities of each half. For example, a rootstock may offer disease resistance and hardiness, while the scion offers diverse fruit varieties in a single plant or tree.
History of Tree Grafting
Tree grafting is an ancient horticultural practice that dates back thousands of years. Early evidence suggests that grafting techniques were used in China and the Mediterranean as early as 2000 B.C.E. Ancient Greek and Roman texts describe the art of joining two plants to improve fruit quality and yield. This method offered early farmers the ability to propagate desirable fruit varieties and develop disease-resilient orchards, shaping the diversity of fruit trees we enjoy today. Benefits of grafting have included:
- Soil-borne disease resistance
- Improved growth from vigorous rootstock
- Adaptability to unique or varying growing conditions
- Increased fruit yields and variety in limited spaces
- Faster tree maturity to its fruit-producing stage
A well-known current example of successful commercial grafting is the apple tree. Almost all popular apple varieties, such as 'Honeycrisp,' 'Fuji,' and 'Granny Smith,' are cultivated by grafting branches of these varieties onto robust, disease-resistant rootstocks, ensuring consistent fruit quality and tree vigor. Commercial citrus trees are almost always grafted as well. For example, growers or suppliers frequently graft sweet orange scions onto disease-resistant rootstocks to produce abundant, healthy fruit even in challenging soils. Over the centuries, grafting has evolved with improved techniques and tools, remaining a professional skill in commercial operations.
But what about the backyard gardener? Is grafting becoming a lost home gardening art? In the 1950s and ’60s, home gardening hobbyists grew fascinated by grafting. Only today’s most dedicated enthusiasts find enjoyment with, for example, grafting “fruit salad” trees. These trees, grown typically for confined spaces, bear several types of stone fruits like plums, peaches, and apricots on a single tree each season. If you adopt a few simple grafting techniques, you, too, can develop your own fruit salad trees.
Tips for Successful Grafting
Tree grafting can be fun and easy if you follow these steps:
- Choose a healthy, disease-resistant, robust rootstock that is compatible with your choice of scion tree parts. Your knowledgeable garden center staff can help you with this important step.
- Choose one or multiple scion branches from existing healthy fruit trees in your own yard or from a garden center. Branches are typically available at the same time as bare-root trees in late winter or early spring (very soon!). You can also purchase healthy fruit tree scions online.
- Use clean, sharp grafting tools to make precise cuts for a snug fit between the graft surfaces. Various joining techniques exist, but the most common and successful home gardening techniques are “Whip and Tongue” for young tree whole trunk grafting of two similar-sized parts, and “T-bud” for adding new scion branches of one inch or less in diameter to an existing fruit tree.
- For the whip-and-tongue technique (see diagram),
- Diagonally cut the end of the rootstock trunk at about a 60-degree angle.
- Cut a long groove or “tongue” into the middle of the rootstock trunk and down about one inch.
- Make a similar but mirror-image diagonal cut of about 60 degrees at the base of your scion trunk, then cut a similar tongue groove into the middle of the scion to fit into the rootstock cut.
- For a T-bud graft (see diagram),
- Make a T-shaped cut in the existing fruit tree branch where you would like the new bud branch to grow (A & B).
- Cut off a single bud under the cambium layer (green, growing tissue just beneath the bark) or a short length of branch with a couple of buds (C).
- Narrow the thicker end of the bud or branch into a sliver (C).
Insert the bud or sliver into the T-cut on the existing tree branch (D)
T-budding diagram. Courtesy of UCANR.
- Align the cambium layers of both pieces as closely as possible to encourage a successful fusion. The cambium is the thin layer just beneath the bark that transports water and nutrients throughout the plant.
- Secure the graft union tightly with grafting tape or a rubber band, ensuring there are no gaps for drying out or infection (E). Seal any exposed cut surfaces with grafting wax or a tree wound dressing to prevent moisture loss and infection.
- Keep the grafted plant in a sheltered location out of direct sun and wind until new growth appears, indicating a successful union. This typically takes 30-40 days in mild weather. You should choose a good time of year, typically spring, with little chance of extremely hot or cold weather. Monitor moisture levels, avoiding both waterlogging and dry soil surrounding the rootstock during the healing process.
- In 60-90 days, your new rootstock and scion-grafted combo will be ready to transplant into its forever home.
UCANR provides literally dozens of grafting technique videos on their YouTube channel at. Just search for “UCANR grafting videos.” Many are for professionals, but others are introductory videos for home gardening enthusiasts. Here is a UCANR comprehensive guide to Grafting methods, as well as a Stone Fruits tree grafting guide. For a 60-year-old classic lesson on grafting techniques, check out Grafting Techniques.
With time, good technique, and a little imagination, your garden will be home to some interesting and productive fruit trees sure to delight you and amaze your friends and neighbors.
Rainwater Harvesting for the Win — Part II
Water is the very definition of life. It is the source of all life on Earth; it is what we search for on other planets to prove the possibility of life there. Without water, everything dies. Extreme heat and drought are the enemies of all life.
But we are running short on water. Droughts are becoming more frequent, and their consequences are more severe. Recently, the City of Tehran began rationing water and warned its citizens that the “drought was so severe that the capital may have to be evacuated.”1 The huge infrastructure of canals, dams, and aqueducts we have constructed in California to move water around the state is useless if there is not enough rain and snowfall from the sky.
In the United States, we use about 40% of our residential water for outdoor purposes. In Contra Costa County, we live in a Mediterranean climate, which means that normally we have cool, wet winters and hot, dry summers. For almost six months a year, we get no rain. Even in normal years, we will need to use plenty of water to irrigate our gardens if we are to get through the hot, dry summers.This is where we, as UC Master Gardeners of Contra Costa County, can be helpful. While there may be no more untapped, unallocated water, there are strategies to use the water we do have more effectively: more conservation, more efficient irrigation systems, capturing more rainwater and storm run-off, and better usage of non-potable water.
In the Fall issue of News To Grow By, we focused on the extraordinary benefits of sub-irrigated planters (SIPs), which capture rainwater, store it, and then provide it to the plants growing in them on an ‘as-needed’ basis throughout the dry summer growing season. But this article will focus on the four to six months of the year when we are blessed with naturally distilled, free water from the sky in the form of rain and how we can collect that rain. (It’s not too late this winter for you to still collect rainwater in your own garden!)
But you will first need to think a bit differently about your garden. It is more than the collection of plants, trees, pathways, and structures you have placed in it. It is a ‘mini-watershed’— “the total area of a landscape draining or contributing water to a particular site or drainage.”2 You will want to devote some time to looking closely at your own watershed to understand and see where there are natural slopes, where rainwater collects, or where there is bare, compacted dirt that is impenetrable and contributes to runoff. Are there areas of your garden where, if you raised the soil level and created a swale, you could collect more rainwater and prevent this runoff? Or are there other areas where, if you dug down and made a depression, you could collect rainwater?
In his outstanding 2-volume handbook, Rainwater Harvesting for Drylands and Beyond 2, Brad Lancaster has a very simple mantra for all of us to memorize if we want to garden more sustainably using harvested rainwater: “slow, spread, and sink.” Lancaster reminds us that before we plant any plants, we must first plant rainwater. Here are some of the easy ways we can plant rainwater in our own gardens.
- Collect water from the highest point in your watershed…your roof!
The largest single rainwater catchment ‘basin’ in your watershed is the roof of your house. It is your built-in rainwater collector. A rough rule of thumb for calculating the amount of rainfall runoff volume from a roof is 600 gallons of water per inch of rain falling on a 1000 square foot roof. (Lancaster, V. 1, p. 184). An average rainstorm of just 2” of rain produces 1200 gallons of harvestable rainwater. Even if we only divert the downspouts back into the garden, we are still harvesting that rainwater. But we can even take it a step further and store that rainfall in cisterns, culvert tanks, barrels, and large containers for later irrigation use during the hot, dry summer.
- Slow down runoff and spread it out!
One of the easiest ways to harvest rainwater in our gardens is to slow runoff during a storm and spread it out across the landscape, giving it more time to infiltrate the soil. If you live on a hill, the steeper the slope, the faster the runoff. The goal of rainwater collection is to slow this runoff down within our watershed and give rainwater time to soak down into our garden’s soil. Bare dirt is the culprit. It is prone to getting compacted and reducing the ability of rainwater to infiltrate. The answer is simple: mulch, mulch, mulch! Mulch will slow down runoff and allow water to slowly soak down through the mulch and, with time, into the soil. On steep slopes, be sure to add swales, which direct runoff into the soil by spreading and sinking its flow. Swales also prevent mulch from being washed away in huge storms. Mulch turns the soil in our gardens into a giant sponge! Let the leaves from your trees accumulate and decompose slowly, protecting the soil from the erosive force of falling raindrops.
- Create infiltration basins throughout our gardens.
Another word for an infiltration basin is a “rain garden.’ These rain gardens are relatively shallow depressions dug into the earth to capture and hold rainwater. Unfortunately, we don’t think too often about digging down in our gardens, except when we are making holes for our plants. But small depressions work particularly well on flat landscapes that have no berm. They can also work on moderate slopes, where we can create terraces of these depressions. These basins should be planted and mulched. We can also create simple basins around the trees in our garden, 1.5 to 3 times the diameter of the tree’s canopy dripline, by building up a low berm, slanting in towards the tree, to hold rainwater, allowing it to soak down into the trees’ roots. These are tree wells. With a little more effort, we can dig infiltration trenches at the edge of the tree canopy, fill them with gravel to let rainwater soak down and percolate into the root zone of the surrounding soil. Or, we can dig a deeper hole, sink a plastic pipe with holes in it, and backfill it. This will encourage deeper, more robust, and drought-tolerant root development.
In his 1986 groundbreaking book, Cadillac Desert 3, Marc Reisner charted the billion-dollar battles over water rights and competition for water in California that transformed the state into a “semidesert with a desert heart.” He spoke elegantly about the vulnerable aspect of the “promise of inexhaustible water in our desert empire.” But by collecting rainwater, by sheet mulching lawns and planting instead drought-tolerant plants, by installing SIPs with rainwater reservoirs and undergrounding drip irrigation systems, and by using grey water, each of us can continue to garden more sustainably, using less water, and be better prepared for the hot, dry summers of our Mediterranean climate. Slow, spread, and sink!
References
- Mahoozi, S. & Solomon, E . As Aquifers Dry Up, Tehran Rations Water and Calls for Rain Prayers. New York Times, 11/9/2025.
- Lancaster, Brad. Rainwater Harvesting for Drylands and Beyond. Volume 1, 3rd Edition, Rainsource Press, 2019.
We highly recommend this 2-volume set and it is available at the Contra Costa Library. - Reisner, Marc. Cadillac Desert. 1986.
Pg 1: “semidesert with a desert heart.”
Pg 499: “promise of inexhaustible water in our desert empire.” - San Francisco Rainwater Harvesting Manual - SFPUC https://www.sfpuc.gov/sites/default/files/learning/RWH_Manual_Final-APR2018.pdf
- G3 Green Gardens Group, CA Watershed Approach to Landscape Design, 2018
https://greengardensgroup.com/landscape-guidebooks/california-watershed-approach-to-landscape-design/
Banner photo courtesy of Gary Kernick - Change of Seasons
Winterizing Patio Container Gardens for Small Spaces Gardening
With winter’s chill in the air, it’s essential to prepare your container patio garden to withstand cold weather. Start by moving the most sensitive, smaller plants inside the house or in wind-sheltered wall nooks to take advantage of the extra warmth. Insulate larger pots by wrapping them with burlap, bubble wrap, or frost blankets, especially if they’re made of ceramic or clay, which can crack in freezing temperatures. Water less frequently, but don’t let the soil dry out completely, as winter winds can dehydrate plants.
For perennial herbs and ornamentals, trimming back annual growth helps prevent frost damage. If you grow annuals, remove them and refresh the soil to get ready for new annuals in the spring. Here are some other handy cold-weather tips for patio gardens:
- A heated interior exudes a touch of warmth through your home’s exterior walls. Extra-sensitive plants can take advantage of this extra bit of heat by moving their pots next to the exterior wall. It helps to mount your heavier pots on rolling platforms, which can be purchased online or from your favorite garden center.
- Add a thick layer of mulch or straw on top of the planter pot’s soil to retain moisture and regulate soil temperature. Consistent soil moisture is crucial in cool weather, as it both keeps plants hydrated and insulates the pot’s soil from rapid temperature changes.
- Remove dead or diseased foliage, and trim back healthy perennial growth, leaving at least three growth buds on each main stem for leafing out in the spring.
- Heavy winter rains can overwhelm your pot’s drainage. Look for standing water in pots and remove the excess water with a ladle or cup. Use a screwdriver or other pointed tool to unclog drain holes at the base of the pot. Plant roots can drown quickly in too much water.
- Winter is also a good time to check your irrigation system for clogs or leaks, especially if it has been exposed to cracking from sub-freezing nights. In our region, chilly nights rarely dip below 25°F. But Central and Eastern Contra Costa cities have recorded several cold outbreaks into the teens Fahrenheit over the past twenty years.
- If you grow winter-ripening citrus (Mandarin or navel oranges) in pots, you should cover them on sub-freezing nights with a frost blanket or an old cotton bedsheet to protect the ripening fruit from freezing temperatures, but allow the tree to breathe. You can do the same with tender or new landscape plants. Older small incandescent holiday lights strung under the protective sheet add a few extra degrees of warmth on very cold, windy nights and add an unearthly glow to your patio or deck!
- What should you do if patio plants are frost-damaged? Be patient! Don’t prune off dead-looking branches, but instead wait until the weather warms. Damaged leaves and branches can help protect new growth from more frost damage. Once you trim off the damage, wait at least a month to give your plant a chance to recover. If the plant doesn’t bounce back, it’s a shopping opportunity!
With a little extra care, your small-space garden plants can survive our cold weather or heavy rain spells and bounce back to thrive next spring.
Poinsettia (Euphorbia pulcherrima)
by Cheryl Schmidt
Who doesn’t love this vibrant plant in December? It comes from Mexico and is pronounced "poin-set-te-uh." It loves warmer weather, between 65 °F and 70 °F.
What do you do with these plants after the holidays? Many throw them away, but you don’t have to. You could keep it as a green house plant that will last 10 to 20 years, or you could plant it in the yard and watch it grow to 10 to 15 feet as a green shrub and live for decades. Poinsettias will grow outdoors in USDA climate zones nine to eleven, but not colder than 50 °F.
Poinsettias are beloved during the holiday season but are often thought to be highly poisonous. In reality, they are not deadly, though the milky sap can cause mild stomach upset or skin irritation in some people and pets. For this reason, it’s a good idea to place poinsettias out of reach of children and animals. Wearing gloves when handling the plant can also help prevent skin irritation.
To keep your houseplant alive, put it near a window that offers bright, indirect sunlight. If the plant is placed in direct sunlight, the leaves could burn. It doesn’t like drafts from windows, heating vents, or areas of temperature fluctuation. Keep the soil moist but not soggy. Check the soil daily to see if the top two inches are wet; it could need watering about once a week.
When watering, remove the decorative foil and anything else covering the container. Water must be able to drain from the bottom.
Your attention to the plant should pay off for a couple of months, and then it will go dormant. At that time, the leaves will start to fall off, and it probably won’t look attractive. Trim the stem four to six inches from the soil.5 Trim each branch, leaving several leaf nodes on each stem to help keep its robust shape. Check for insects such as whiteflies, mites, thrips, etc. Sometimes you can wash them off the leaves with water. Management may require insecticidal soap, horticultural oil or sprays, soil granules, etc. If there is an abundance of insects, it may not be worth keeping the plant. If you do apply a pesticide, use an insecticide or miticide that is labeled for indoor use, following all instructions8.
As the plant emerges from dormancy and goes from skeleton to budding, it is time to fertilize. When you see new growth, use a houseplant fertilizer at half strength every three to four weeks9. This is also a good time to repot into a slightly larger container using a good-quality potting mix. Continue to expose the plant to indirect light and keep the soil moist.
The next step would be to cut each branch about an inch to encourage growth. Continue watering and fertilizing during the summer months through September9.
If you want the plant to rebloom in December, follow the steps below. In late September or early October, begin preparing it for its holiday color: red, white, or pink, depending on the variety. Poinsettias develop their vibrant hues as the weather cools and the days get shorter.
When it is time to get the plant ready to bloom, it will need to be secluded in total darkness for about 16 hours. The plant can be put in a box, room, closet, or anywhere it will be away from any amount of light. For the remaining eight hours, place the plant in bright, indirect sunlight. Keep the temperature around 60 °F and reduce water to signal the plant to prepare for color.
Follow this procedure until Thanksgiving. At that time, place the plant in sunlight and decrease water. When bracts and flower buds appear, stop fertilizing. The plant should bloom by mid-December.
References
- Douglas, Sharon M. Dr. Poinsettias: Disease Prevention and Control. The Connecticut Agriculture Experiment Station.
- Gillette, Barbara. How Long Do Poinsettias Last? Try These Tips to Keep Them Alive Longer. The Spruce. People Inc. Publishing Family, 11/17/25
- Goodspeed, Jerry. Could You, Should You Keep Your Poinsettia Year-Round? Utah State University Extension.
- Hughes, Megan. 4 Must-Know Tips for Keeping Poinsettias Colorful All Season. Better Homes and Gardens, 11/25/25.
- What Should I Do With My Poinsettia After the Holidays? Iowa State University Extension. 12/3/2024
- Lamp’l, Joe. Turning Poinsettias Red Again. Growing a Greener World, PBS. 11/6/2025
- Spangeberg, Bruce. Poinsettia Trivia and Care. University of Wisconsin Madison Extension. 12/16/2024
- Houseplant Problems, UC IPM Pest Notes, Publication 74172. University of California Integrated Pest Management Guidelines.
- Weisenhorn, Julie. Growing and Caring for Poinsettia. University of Minnesota Extension, 2024.
UCANR Resources
- Poinsettia Care, UC Cooperative Extension, Central Coast and South Region
- Poinsettia - Tips for Care and Reblooming, UC ANR, The Coastal Gardener.
- How to Keep Your Poinsettia Healthy and Ensure it Blooms Again, UC Master Gardeners of Humboldt and Del Norte Counties.
- Selecting and Caring for Poinsettias, UC Master Gardeners of El Dorado County
- Poinsettia Fact Sheet, Riverside County UC Master Gardeners
Fresh Produce, Real Impact: Fighting Food Insecurity in Contra Costa County
Every Wednesday morning, something extraordinary happens. Nearly 300 pounds of sun-warmed tomatoes, crisp lettuce, and freshly picked herbs travel just a few short miles from soil to table—not to a farmers market or grocery store, but directly into the hands of local families who depend on this harvest to eat well that week.
As the cost of living continues to rise, an increasing number of our neighbors are facing painful choices between keeping the lights on and putting healthy food on the table. Grocery prices remain about 30% higher than before the pandemic, and recent reductions in food assistance have only deepened the strain. Today, food donations have become a lifeline for one in six Americans, including thousands of households right here in Contra Costa County.
One local response to this growing need is both powerful and practical. ‘Our Garden’, the UC Master Gardener demonstration garden in Walnut Creek, donates between six and seven tons of fresh, organic produce each year—enough to fill a delivery truck week after week, all year long. That translates into roughly 700 family-sized bags of fruits and vegetables making their way to kitchen tables across the county. This isn’t corporate philanthropy or government aid; it’s neighbors caring for neighbors.
Each week, UC Master Gardeners of Contra Costa County harvest, sort, wash, and deliver this bounty with care and intention. As Master Gardener Janet Miller explains, the team at Our Garden understands which varieties travel well, what families actually cook with, and how to maximize every growing season. They’re not just growing food—they’re growing hope, one harvest at a time.
Once harvested, this fresh produce quickly reaches those who need it most through trusted community partners. White Pony Express specializes in rescuing and rapidly redistributing highly perishable, nutrient-rich foods to food pantries, shelters, senior centers, schools, and other agencies. Nearly 90 percent of the food White Pony Express distributes is perishable, and most of it is delivered the same day it is received, ensuring families get food at peak freshness and nutritional value.
Monument Crisis Center is another vital link in this chain of care, serving families throughout Contra Costa County with food, education, and referrals. The Center supports approximately 2,200 households and more than 8,000 individuals, receiving over 25,000 pounds of donated food each month.
At both White Pony Express and Monument Crisis Center, the arrival of fresh produce is greeted with genuine joy. Staff know these donations represent meals families will actually want to eat, nutrients that truly nourish, and a powerful message that someone cares about their wellbeing.
Fresh produce doesn’t just fill stomachs—it transforms lives. When a family receiving food assistance gets fresh bell peppers instead of only canned vegetables, they can make a cherished family recipe. When a senior on a fixed income receives tomatoes and basil, they can taste summer instead of opening another can of soup. This is more than nutrition; it’s dignity, culture, and connection.
The impact is profound: improved physical health, lower household food expenses, stronger child development, greater emotional stability, culturally appropriate meals, and a more sustainable food system through reduced waste.
In a world where food waste and food insecurity exist side by side, Our Garden offers a different story—one where careful cultivation meets immediate need, volunteer expertise becomes community strength, and fresh produce bridges the gap between hunger and health, isolation and connection, and scarcity and abundance.
Resources:
https://www.monumentcrisiscenter.org/
https://whiteponyexpress.org/
Fall 2025 NtGB
"Autumn is a second spring, when every leaf is a flower.”
– Albert Camus
Our final newsletter of the year is brimming with ideas to keep your garden—and your imagination—thriving through the cooler months.
Discover smart ways to harvest rain, choose resilient California natives and shade-loving plants, and stay ahead of invasive plants.
You’ll also enjoy uplifting stories from our own community, including successes in our demonstration and school gardens, as well as a first look at the firescaping garden planned for MOFD Station 42 in Moraga.
And with the holiday season just around the corner, our fragrant herb garden piece is bound to spark delicious creativity in your kitchen.
This fall issue also marks our year’s close. We’ll take a short winter pause, but you can still catch a few classes, talks, webinars, and Farmers Market events during this fall season—details are on our website.
Thank you for helping our mission flourish in 2025. We can’t wait to welcome you back in January with fresh opportunities to learn, grow, and garden together. Wishing you a joyful holiday season and happy gardening from all of us at UC Master Gardener Volunteers of Contra Costa County!
Hedwig Van Den Broeck and Robin Mitchell, editors - Contact Us
Supply in the Sky: Rainwater Harvesting for the Win
If you had a desire to plant a garden that not only grows veggies in raised beds, but also nurtures 5,000 seedlings for a plant sale and features a pollinator garden to help those veggies thrive, would you choose a site that has no piped-in water and no electricity? It’s improbable that you would even give it a second thought.
This is the story of how the Water Conservation Garden in the El Cerrito hills went from improbable to surprising to astonishing in the span of just a couple of years.
In March of 2022, UC Master Gardener volunteers Liv Imset and Liz Rottger proposed a plan to the program's leadership teams to use such an improbable site for a new demonstration garden. Their vision was to devise, implement, and test strategies for capturing and storing rainwater. These strategies needed to be simple enough for home gardeners to implement in their own gardens and also support all of the planned plantings for the garden.
California was in a deep drought at the time. El Cerrito had received only 8 inches of rain that winter and 10 inches the year before. Note that the average rainfall for El Cerrito is 22 inches a year. We were in a state of drought emergency. Water restrictions were plentiful, and we were anticipating another scant water year for the coming winter. It was a bold move to take over this site of an underutilized community garden and demonstrate to the community how we could all use techniques and solutions that conserve and preserve two of our most precious resources: water and electricity.
Building Sub-Irrigated Planters
For the rest of that year, the garden team built three 8’ x 4’ raised veggie beds with water reservoirs beneath the soil. Two of the beds used a newly pioneered method of using reclaimed PET plastic water bottles as a substitute for gravel for the water storage reservoirs, thus “Plavel.” Norman Hantzsche and Matt Woll of Questa Engineering Corporation in Richmond, CA, had developed this heretofore untapped opportunity to recover and convert single-use plastics (AKA waste products) into viable and useful building materials. And our very own Liv Imset had worked at Questa Engineering with Norman and Matt. The three of them worked hard along with the garden team on implementing the first two sub-irrigated planters (SIPs). These first two beds were appropriately named Alpha and Beta.
The extraordinary thing about these two 8-foot-by-4-foot beds is that each has a built-in reservoir that holds 239 gallons of water. The beds fill up with rainwater, then act as self-watering systems during the dry season. Here’s the math for calculating reservoir capacity, in case you’re curious.
8 ft. x 4 ft. x 1 ft. x 7.48 gal. per cubic foot = 239-gallon reservoir
Dr. Pepper Bed
A third raised bed, dubbed Dr. Pepper, was built that year as well. It was named after the “Albopepper” blog and YouTube channel, where a fellow named Al Gracian explains in great detail how to construct various types of sub-irrigated planters. His technique for using corrugated drainpipe was used for this bed. https://albopepper.com/SIP-raised-bed.php
This bed was a bit different in its construction. Having built two Plavel beds, the team felt these were a bigger project than many DIYers would be willing to tackle. So, instead of using recycled PET plastic water bottles as the structure for the reservoir of the Dr. Pepper bed, a 4-inch black corrugated drainpipe, normally used for drainage, was utilized for the reservoir. This bed has one-third the water-storage capacity of the Plavel beds, since the drainpipes only stand 4 inches tall, as opposed to one foot tall. Here’s the math for calculating the storage capacity for this bed.
8 ft. x 4 ft. x 0.33 ft. x 7.48 gal. per cubic foot = 79-gallon reservoir
One more 4’ x 8’ bed was built that first year and was named the “Control Bed.” This bed has no rainwater harvesting method built into it. It’s used by the garden team to gauge how much water the 4’ x 8’ veggie beds would otherwise need if they didn’t have self-watering systems installed.
Stock Tank SIPs
In May of this year, Liv Imset, who is the Master Gardener volunteer with an engineering background in SIPs and other drainage and water purification solutions, came up with the idea of converting stock tanks to SIPs. She planned to use commercial-grade plastic milk crates as the main reservoir. Tucking in several lengths of 3-inch drainage pipe around the sides of the crates would provide even more water-holding capacity. We promptly scheduled a public hands-on workshop where we built one on the site. This 100-gallon stock tank now has a subterranean water reservoir of 37 gallons.
Rainwater Harvesting Potential of the Site
Aside from the three raised veggie beds and the stock tank with the rainwater harvesting capacity, the site also has a 1,500-gallon cistern. A shed on the site empties rainwater off its 12' x 8' metal roof into six 55-gallon barrels. There are also eight more 55-gallon barrels near the beds.
The cistern and barrels have a total capacity of 2,270 gallons. The three raised beds and stock tank capture and store a total of 594 gallons. All told, the site collects and stores 2,864 gallons of water.
The large cistern is filled in a unique way: a concrete ditch runs along the bottom of the slope, channeling winter surface water from the hillside. That water is pumped uphill to the tanks using a solar-charged battery power station installed by Howdy Goudey. Thanks to this system, the cistern—holding 1,500 gallons—has been completely filled each winter for the past several years.
Measuring and Monitoring
Since the first plants were planted on this site, the garden team has kept meticulous water-use records. Every drop of water used on the site is measured and recorded. And the moisture levels in the soil of all the beds are noted, as well as the appearance quality of the plants. We're very proud that since January 2024, no supplemental water has been brought to the site. This garden subsists solely on the supply from the sky.
The Astonishing Part of this Story
Vegetables are high-water-use plants. They require a significant amount of water and need to be watched carefully and watered frequently. Using the water-use records for 2024, the following table shows how much water the garden team applied to the three sub-irrigated planters. Rainfall initially filled these beds’ reservoirs. The team didn’t need to add water to the reservoirs until August 10.
Bed in 2024 | Water Requirement - May 11 - Sept. 21 | Supplemental Water Added |
Alpha bed | 490 gallons | 40 gallons (8% of requirements) |
Beta bed | 490 gallons | 46 gallons (9% of requirements) |
Dr. Pepper bed | 490 gallons | 48 gallons (10% of requirements) |
Rainwater Harvesting Benefits on this Site
What makes this astonishing is the fact that at least 90% of the water needed for the vegetables in these beds was provided by rainfall - that free water that falls from the sky! Of the 490 gallons required during this dry period, the garden team only applied, at the most, an extra 48 gallons to each bed! Nature provided the rest. The ramifications of this are huge! These beds not only provide us a way to grow vegetables using 1/10 of the water needed, but they’re self-regulating as well. The plants have access to a constant supply of water. We only need to make sure there is water in the reservoirs. During this period in 2024, the rainwater in the reservoirs lasted three months before more water needed to be added.
This appears to be a wonderful solution to water supply issues that plague us on a regular basis in California. And the work done up front to provide the infrastructure for this massive water savings seems well worth it. Rainwater harvesting for the win!
Photos courtesy of Fletcher Oakes and Lori Palmquist
Seasonal Update on our Central and East County Demo Gardens
As most of our readers probably noticed, this summer in Contra Costa County was unusually cool. Some of you may have observed different behavior in your home gardens as a consequence, and might like to know how two of our Master Gardener demonstration gardens reacted to milder temperatures.
Very Distinct Gardens
Rivertown (East County)
Although the East County garden in Antioch, called ‘Rivertown’, is actually older than our Central garden ‘Our Garden’, in Walnut Creek, it was ‘inherited’ by Master Gardeners volunteers relatively recently. We didn’t have the luxury of developing it from scratch, and as a consequence, we also inherited the soil in the raised beds. As we’ve begun to steward this garden, we have encountered surprises that have thrown some curveballs that have presented challenges (or opportunities, if you will), including finding a weed barrier under the raised beds.
Given its history, Rivertown, led by Lisa Bramblet, continues to be a true experimental garden where Master Gardener volunteer learning goes hand in hand with our mission of education. We illustrate in real time, for instance, the proper way to improve the soil or to treat susceptible plants for disease and insects—including the three-striped potato beetle, a persistent pest on our tomatillos this summer! Additionally, Antioch is warmer in the summer than Walnut Creek, and that, too, presents a learning opportunity for our large and varied county.
Our Garden, Walnut Creek (Central County)
By contrast, we developed the 1-acre Walnut Creek garden ‘Our Garden’ literally from the ground up. We began with double digging to prepare the in-ground beds, and over the years, have had full control of the soil, which today is excellent. This is now both a teaching and a production garden from which we harvest produce to distribute to local charities, including Monument Crisis Center and White Pony Express.
Richmond Low Water Garden and Water Conservation Garden (West County)
You can read about the successes of the West County Water Conservation Garden and the Richmond Low Water Demo Garden in additional articles in this fall issue or by following the links.
2025 Seasonal Highlights
So what did the gardens experience during our unusual summer? Perhaps surprisingly, they were quite pleased with it! Here are some specifics.
Rivertown
After a scorching 2024, the cooler temperatures were a welcome relief, reducing the heat stress on the plants and contributing to higher output. The plants also appreciated the addition of new shade cloth. The tomatoes, in particular, did quite well under the shade cloth, and the eggplant and peppers were also pleased. Early on, the basil wasn’t happy about the heat, but it is currently thriving. Even a relatively cool summer in Antioch can be quite warm!
There is a small orchard in the garden with an Asian pear, pomegranate, orange, and fig tree, among other fruit, and it thrived this year. The little adolescent espaliered persimmon tree, in particular, is totally covered in persimmons! More fruit trees are planned for 2026.
Rivertown strives to demonstrate a variety of garden styles that might be of interest to the community. There is a thriving herb garden, a wheelchair-accessible trug planter, as well as a lovely vertical shade garden.
In accordance with our mission of learning and teaching, master gardener volunteers are conducting multiple ongoing experiments. The garden beds at Rivertown are accessed via crushed granite paths, and we are in the process of assessing whether the rocky material contributes to heat.We conduct regular soil tests in the quest to optimize the growing medium and are also studying the water, some of which is supplied by the city and some via a well.The quality of the water and the soil is foundational for garden success.
If you would like to learn more, you are invited to visit Rivertown at the Contra Costa County Fairgrounds (1201 W. 10th Street), which is open to the public every Tuesday from 10 a.m. until noon through October.
See this link for specific directions: About Rivertown Garden | UC Agriculture and Natural Resources.
Master gardeners volunteers are very fortunate to have this partnership with the city of Antioch and the state of California, and we look forward to expanding and strengthening that relationship in the future.
Our Garden in Walnut Creek
This demonstration garden is managed by Janet Miller, who told us that, although fruits and vegetables ripened a bit more slowly than in past years, the plants were extremely healthy and seemed relieved not to have to face another summer like last year! It was another blockbuster year for output success. Year to date, we have harvested over 12,000 pounds of produce, which has been given to charitable organizations in the community.
The overall success of the garden was helped by a major project earlier this year to ‘rat-proof’ the garden. Although the garden has been fenced with wire for some time, there has been a significant interest in our produce from rats who regularly helped themselves to bright red tomatoes and anything else they hankered for. To minimize sharing with these locals, our intrepid team, led by Steve Griffin, attached ¼” wire hardware cloth to the existing fencing around the entire perimeter of the garden and then added a 1-foot strip of metal flashing around the top. Although the rodents might climb up the hardware cloth, they aren’t able to navigate the slippery flashing to get over the fence, and our inventory shrinkage has been reduced to almost nothing.
The soil at Our Garden has been nourished over the years via organic amendments and best practices, such as no-till planting, composting in place, and cover crops. The key ingredient, however, is our homemade compost, continually in production via our dedicated composting team.As plants finish their growing season and are cut back, roots remain in the soil to feed it, while cut branches join the compost operation, now in full swing as summer winds down. This is the miracle ingredient in producing the garden’s bounty.
Some of the specific successes this year included the vineyard, which overachieved, providing over 600 pounds of grapes.
For the first time, the pole beans were grown on tall (6-7’) trellises, which they very much enjoyed, producing a bumper crop. The flowers were especially beautiful; zinnias and others luring pollinators to come and participate in the production process.
The cool weather also permitted leafy greens like lettuce, chard, and kale to continue to grow during the summer, rather than being relegated just to the cooler months.
As always, we try new varieties of vegetables, searching for those that will be most appealing to the public, who can acquire them for themselves during our plant sales. We enjoyed the apricot zebra tomato very much, as well as a healthy Korean avocado squash, Teot Bat Put.The small winter squash, Lodi, has been a new delight. Stay tuned for future updates on new and repeat varieties planned for 2026!
Were there any issues with unwanted insects or diseases? Very few. As ever, mosaic virus bothered yellow zucchini (you’re not alone if you have this challenge!). There have been some cabbage loopers (treated with Bacillus thuringiensis) on brassica shoots, which are now in the ground for the fall/winter. To deter ants and aphids that can introduce disease, we spread diatomaceous earth around the base of fruit trees in the orchard. But all in all, there were very few issues with flying and crawling pests this year!
Educational talks at ‘Our Garden’ in Walnut Creek continue on Wednesdays at 10 a.m. through October, so take advantage of these last opportunities of the season (see below.) The attendance, averaging over 50 people each week, continues to grow, and we are enthusiastic about and appreciative of our community’s commitment to ongoing education.
- October 01 - Growing Cherry Trees
- October 08 - Composting - 'Let me Count the Ways'
- October 15 - Tea from Your Garden
- October 22 - Planning a Rain Garden
- October 29 - Garden Hacks
Read: Seasonal Updates on the Richmond Low Water Demo Garden
Read: Successes of the Water Conservation Garden in El Cerrito
Seasonal Update on our West County Demo Gardens
There are two MGCC Gardens in West County: the Low Water Garden in Richmond, a Master Gardener of Contra Costa County (MGCC) demonstration garden, and the Water Conservation Garden in El Cerrito. We hereby note that a Seasonal Update on our East and Central Demo Gardens has also been published in a separate article of this fall issue.
Very Distinct Gardens
Learn how the Water Conservation Garden thrives—don’t miss Master Gardener volunteer Lori Palmquist’s insightful article featured in this fall issue.
For the Low Water Garden, we interviewed Master Gardener volunteer Brian Kerss, who, along with Master Gardener volunteer Dan Lent, is the co-lead of the Low Water Garden in Richmond.
What is the history and mission of the Low Water Garden?
The Low Water Garden actually got its start back in 2005 in the middle of one of California’s many droughts, as a collaboration between East Bay Municipal Utility District (EBMUD) and the City of Richmond to demonstrate to the residents of the city how easy it was to save water by planting a low-water landscape. EBMUD took the lead on the design and layout of the garden, and the City took on its ongoing maintenance. It was designed to demonstrate resource-efficient gardening. But, over the years, the garden was neglected, and by 2018, when Master Gardener volunteers of Contra Costa joined the partnership with the City of Richmond and EBMUD, the garden was overrun with weeds, and many of the original plants had also died.
What has been the role of MGCC?
MGCC volunteers took on the responsibility for redevelopment of the entire Low Water Garden and for its ongoing maintenance. We cleared its weeds, removed plants that didn’t belong, and installed a whole new drip system. There was, for example, lots of bermuda grass growing throughout the garden. We used sheet mulching to remove this tenacious, noxious grass.
What has been the greatest challenge MGCC has faced at the Low Water Garden?
The garden is located in the Richmond Civic Center. It is next to the main parking lot for the area, which also includes the library, the Catholic Church, and school across the street. We often need to remind ourselves that this is an urban garden in the heart of a large city, open to the public at all times. There’s unfortunately always lots of trash to pick up, and we sometimes lose a plant.
What has been most gratifying about the work of MGCC at the Low Water Garden?
We have transformed the entire garden! It is now a very beautiful, natural landscape with a variety of habitats that, at any time of the year you happen to visit, are filled with many wonderful plants well-suited to our Bay Area summer-dry climate. Visitors now stop by regularly and tell us how much the garden means to them. Recently, a city employee told us how much she enjoys walking the garden’s paths.
That always makes our work worthwhile!
Read and learn how the West County Water Conservation Garden thrives
Read more Seasonal Updates on our Demo Gardens in East and Central County
Douglas Iris Adds Color to Shady Garden Areas
Douglas iris (Iris douglasiana) is a great foundational plant for a sunny or shady part of your garden. The foliage is green all year round, and when in bloom in the spring, it is a welcome spot of color in shaded areas.
While they can tolerate full sun, a good location for Douglas iris in a garden is one that gets some filtered sun in the early morning but is in bright shade most of the day. Keep in mind, there will be less blooms if they are in deep shade.
Douglas iris bloom faithfully every spring, and can be separated and spread out to fill a garden bed. And they are quite good at outcompeting most weeds, including oxalis -- a few weeds can grow through the iris foliage, but nothing compared to the number that would be there without the iris, and the weeds are also easier to spot and pull.
Douglas iris flowers in the wild have a wide range of colors from white to light blue, dark blue, lavender, and deep purple. Pt. Reyes National Seashore in the spring is a great place to observe the variation of bloom color in wild iris.
Douglas iris are easy to grow from seed, which will generally result in a deep blue/purple flower. Because the seeds will have their own unique, varied genetics, you might be surprised at the beautiful and distinct shade of blooms that emerge.
Some interesting varieties have been bred from the native iris, with many interesting and unusual colors. Some to look for in nurseries include "Canyon Snow", which has a white flower, and "Canyon Sunshine", which has a butter-yellow flower.
Douglas iris requires very little, if any, summer water, although it is probably good to add supplemental water if the spring rains have been sparse..
Calscape ( https://calscape.org/loc-California/Douglas'%20Iris%20(Iris%20douglasiana) says that Douglas iris prefer slow-draining soil, including heavy clay, which is the soil type of many gardens. With heavy soil, the recommendation is to be careful not to overwater the plants.
Douglas iris is a wonderful, long-lived perennial that remains green year-round. It's a great choice as a border plant or for planting in a lightly shaded area of your garden.
And fall is the time to plant any native plant, including Douglas Iris.
Resources
Here are some previous articles about planting natives in the fall.
- Calscape description for Douglas Iris
https://calscape.org/Iris-douglasiana-(Douglas-Iris) - Plant Natives this Fall
https://ucanr.edu/site/uc-master-gardener-program-contra-costa-county/article/plant-natives-fall - Native Plants for Summer Bloom
https://ucanr.edu/site/uc-master-gardener-program-contra-costa-county/article/native-plants-summer-bloom - Native Plant Resources
https://ucanr.edu/site/uc-master-gardener-program-contra-costa-county/article/native-plant-resources - Plant Native Shrubs Now for Winter and Spring Bloom
https://ucanr.edu/site/uc-master-gardener-program-contra-costa-county/article/plant-native-shrubs-now-winter-and - Now Is the Time to Plant Natives in Your Garden!
https://ucanr.edu/site/uc-master-gardener-program-contra-costa-county/article/now-time-plant-natives-your-garden
Tackling the Invasive Tree of Heaven
If you have a tree of heaven in your yard, you may be familiar with unwanted seedlings sprouting across your yard and seemingly from every nearby crack. The tree of heaven was originally brought to the United States from China in the 1800s and quickly became a fast-growing and popular ornamental shade tree.
Today we know, however, that the tree has become a problem across the globe as it disrupts habitats. It reproduces aggressively through dense root suckers and wind-blown seed. A mature tree, 40 to 60 feet tall, can produce 325,000 seeds in a single year, while its roots damage sidewalks, foundations, and sewers.
In addition to being classed as an invasive species itself, the tree of heaven is also host to the invasive Spotted Lantern Fly. This pest is causing millions of dollars in damage yearly to farms, and in particular to vineyards.
How You Can Help
You can help to stop the spread of the tree of heaven by removing seedlings when you see them. The parent tree has several distinctive characteristics:
● Grey bark with diamond-shaped fissures
● Large leaves, up to 3 feet long, with 10 to 27 pairs of dark green opposing leaflets. The leaflets are smooth except for two notches, or teeth, at the base.
● Flowers are small, pale yellow-green, in upright clusters
● Seed clusters are 1 to 2 inches long and can be green, yellow, red, or brown.
Tree of Heaven has a distinctive bark pattern.
Controlling Tree of Heaven Seedlings
It’s very difficult to eliminate tree of heaven seedlings. The best control is to hand pull them before their tap roots become established. For slightly larger saplings, tools like a weed wrench can be used, but you need to be careful to get the entire root. Hand pulling works best in the spring when the soil is still moist.
As the soil dries out and hand pulling becomes more difficult, chemical control can be used on root suckers. The best time to control tree of heaven with an herbicide is in mid-summer to early fall when the tree is moving nutrients to the roots. Herbicides should be applied to leaves or cuts in the stem. While some resources suggest cutting the stem and painting it with the herbicide, this method may lead to more root suckering, according to research done in Pennsylvania.
There are several post-emergence herbicides that are available to residents. Others are available only to licensed professionals. Products containing glyphosate or triclopyr (or both) are most effective against tree of heaven. You can find a list of these products in the herbicide chart in the link below, along with instructions on how to apply them. (Look for the Stem Injection section.)
When you use an herbicide (or any pesticide), make sure you follow all label instructions and safety precautions.
Woody Weed Management: https://ipm.ucanr.edu/PMG/PESTNOTES/pn74142.html
Finding Beauty in the Shade on Patios, Porches and in the Yard
Creating a vibrant shaded area is all about contrast and creativity—playing with layers and combining plants of varying heights and textures for a natural, woodland vibe. Before you start planting, it’s important to understand the light, soil, and microclimates in space. The following steps will help you select plants that thrive and create a lush, layered retreat.
1. Know your Shade Levels
Shade isn’t one-size-fits-all. Plants have different tolerance levels for reduced sunlight, so understanding the light patterns in your space is crucial.
Full Shade
These areas receive no direct sunlight, often found under dense tree canopies, between buildings, or on the north-facing side of structures. Choose plants that specifically thrive in full shade, like ferns or certain types of ivy.
Partial Shade
These spots get some direct sunlight, typically in the early morning or late afternoon. Many flowering plants, like bleeding heart or foxglove, can adapt well to partial shade.
Dappled Shade is commonly created by trees with light foliage; this is an area where sunlight filters through leaves. Plants like tiarella or astilbe thrive in such conditions.
Observing these light patterns at different times of the day and also throughout the year will help you select plants that thrive in your garden space.
2. Check Soil and Moisture
Shade-loving plants often have specific soil requirements. Most shade plants, especially woodland types, prefer soil that retains some moisture without becoming waterlogged. Amend heavy soils with compost or organic matter to improve drainage and texture. Shaded areas, especially under trees, may have nutrient-depleted soil. Enrich it with leaf mold, mulch, or slow-release fertilizers to provide a nutrient boost. Continue improving soil quality over time.
3. Matching plants to microclimates is important
Shaded areas often have their own microclimates influenced by factors like proximity to walls, trees, or bodies of water.
- Areas near walls or fences might retain heat but receive limited sunlight.
- Spaces under trees can have dry soil due to root competition.
Group plants with similar moisture and light needs together for easier maintenance and better overall growth.
- Consider plant size and growth habits.
- Shade-loving plants come in a variety of sizes, from low ground covers to taller focal points.
- Ground covers are ideal for filling in space and preventing weeds. Plants like lamium or ajuga form dense mats in shady areas.
- If compact shrubs will fill the bill, small shrubs like boxwood or Japanese pieris can provide structure without overwhelming a space.
If it’s vertical interest you’re looking for, climbing or upright plants like hydrangea and ferns add height and visual interest. Use hanging baskets or trellis systems to maximize planting space and add a vertical element that draws the eye upward.
5. Don’t forget about container plants
Many smaller, shade-loving plants, such as coleus and certain small hostas, are well-suited for pots and containers. The key advantage of containers is that they are portable! If you have a certain need, whether it’s color, height, or soil requirement, a pot can be the answer.
6. Finish with Color, Texture, and Mulch
Combine plants with complementary foliage shapes and colors for a layered, dynamic look. Remember, mulching around shade plants helps retain moisture, suppresses weeds, and improves soil quality over time.
Some plants to consider ...
Hostas are excellent for shady areas under trees and come in various sizes and leaf colors.
Ferns add texture and vibrancy to shaded areas.
Heucheras offer colorful foliage and thrive in dappled light.
Flowering plants: Impatiens produce colorful blooms in full to partial shade. Rex begonias offer striking patterns on their large leaves. For continuous summer blooms, try bellflowers or astilbe.
Ground covers and small perennials: Mondo grass and ajuga are great for adding low-level texture in small gardens or borders.
Vines and travelers: Sweet potato vines and dichondra are excellent choices for hanging baskets, adding color and volume to vertical spaces
To add structure and height to your garden, you might want to include these beauties.
- Hydrangeas (shade-tolerant varieties): Especially the oakleaf hydrangea, which thrives in partial shade with large, showy blooms.
- Boxwood: A classic small evergreen shrub that works well for edging or as a focal point.
- Daphne odora: A compact shrub with fragrant pink or white flowers.
- Japanese pieris: Evergreen shrubs with cascading white flowers and colorful new growth
Shade-loving plants bring beauty to your garden and support local wildlife. Many shade-loving flowers attract bees, butterflies, and other pollinators, even in lower light conditions. Dense ground covers and shrubs provide shelter for small creatures like birds, insects, and frogs.
While shade gardens are generally low-maintenance, their care requirements can vary.
- Pruning needs: Some plants, like ferns, require regular pruning to maintain their shape.
- Others, like ground covers, may need occasional thinning to prevent them from overtaking the area.
- There are also seasonal considerations. You need to know whether the plants are evergreen or deciduous. For year-round interest, include a mix of both types.
- Pest and disease resistance awareness. Choose varieties known for resistance to common problems in shaded sites.
Shade gardening can add a new dimension to your property. With the right plant in the right area, a dark spot or corner can come alive! It opens a whole new world of plant interest and selection to the gardener, bringing much pride and joy to the process!
Resources:
- Shade plants for your landscape. Barbara Fraser, UCCE Master Gardener, UC Davis
- California Master Gardener Handbook
Photo courtesy by Lorraine Frey
UCMG Volunteers to Create Firewise Demonstration Garden at MOFD Station 42
The UC Master Gardener volunteers of Contra Costa County are excited to announce an upcoming Firewise Demonstration Garden at the Moraga-Orinda Fire District (MOFD) Station 42 on Moraga Road. This project will showcase practical, attractive landscaping strategies that reduce wildfire risk—especially the often-misunderstood Zone Zero, the critical five feet closest to a home or structure.
The idea began with MOFD Director and Master Gardener volunteer Steve Danziger, who envisioned a living example of fire-resistant design for the community. At the August 20 MOFD Board meeting, Anna Wendorf (Landscape Designer and Master Gardener volunteer) and Dawn Kooyumjian (Master Gardener volunteer co-ordinator for Contra Costa County) presented the concept and a preliminary garden plan. The board enthusiastically approved the project and re-allocated previously earmarked funds of $5,000 to support its installation.
Planting is scheduled to begin in October, an ideal season for establishing new landscapes. Anna Wendorf describes the garden as “a great opportunity to demonstrate the Zone Zero, which everyone is really curious about.”
The design will feature:
- A five-foot non-combustible buffer along the station’s front wall.
- Demonstration islands of low-fuel, fire-resistant plants—including California natives and Mediterranean species.
- Educational signage so visitors can learn how each practice contributes to fire safety.
- Sample fire-safe fencing and pathways leading into the redwoods, complete with inviting seating areas.
The team hopes to incorporate donated materials such as fire-resistant fencing, gravel, and stone. Local Master Gardener volunteers from Lamorinda, along with community partners like the Rotary and local garden clubs, are already pledging support.
As Vice President Craig Jorgens noted when the board voted unanimously to move forward, “We’re excited to see how this project can make our communities fire-safe and beautiful at the same time.”
Stay tuned for volunteer opportunities as we bring this inspiring garden to life—and help neighbors throughout Contra Costa County see how Firewise principles can be both practical and beautiful.
Are you inspired to help bring the Firewise Demonstration Garden to life?
Join us by volunteering—just email Steve Danziger at danzi26@yahoo.com to get involved and receive updates. Donations of fire-resistant materials such as gravel, stone, plants, fencing, or even funds are also welcome to help the garden flourish. And once it’s planted, spread the word and invite your neighbors to visit and discover how to create their own beautiful, fire-safe landscapes.
Photo courtesy of Hedwig Van Den Broeck
Return to News to Grow By
Creating a Thanksgiving Herb Garden: How to grow herbs for your holiday meals
As Thanksgiving approaches, many of us start planning our holiday meals. While turkey, cranberries, and pumpkins may get most of the attention, herbs also play an important role in our Thanksgiving meals. Herbs like sage, thyme, rosemary, parsley, and chives provide flavor and a pleasing aroma to our meals. They can also easily be grown indoors and enjoyed throughout the winter.
Commonly used herbs for the holidays
A variety of different herbs are used around the holidays and can also be used throughout the year. A few examples of commonly used herbs include:
Sage: If you have stuffing (or dressing) during the holidays, odds are you're using sage. Sage is a shrubby, perennial plant that can grow to be 2-3 feet tall and tends to sprawl as it ages. Most varieties have gray-green leaves, but purple and golden cultivars can also be found. The leaves are slightly fuzzy and have a pebbly texture.
Thyme:is a perennial plant that forms a mound around 6 to 12 inches tall and wide. Plants will produce woody stems and have small, gray-green leaves. There are many types of thymes, like creeping thyme and 'citrus' thymes with lemon, lime, and orange fragrances, but French and English are the most popular for culinary use. Thyme is often used in stuffing and, since its flavor and aroma aren't negatively affected by long, slow cooking, can be used to season turkey.
Rosemary is another woody, perennial plant often used to season poultry. Rosemary is not reliably hardy in zone 6 or colder, so it is usually grown as an annual, but it can be brought indoors and overwintered. Rosemary grown indoors often dries out quickly, not because of a lack of soil moisture (they prefer drier soils), but because of low humidity. During the holidays, rosemary plants can commonly be found as Christmas tree topiaries.
Parsley
Parsley is often overlooked or simply used as a garnish, but it can be used in stuffings and in rubs for turkey, among other things. Parsley is a biennial (it takes two years to complete its life cycle) that is grown as an annual. Flat-leaf parsley is used in cooking because it has more flavor, while curly parsley is used as a garnish.
Chives: can add flavor to mashed potatoes or as a garnish to brighten a dish. They are clump-forming perennials that grow from underground bulbs. Their leaves are round and hollow and will produce pink flowers in the summer, which are also edible.
Growing herbs indoors
To grow herbs for Thanksgiving dinner, consider the following steps:
- Choose the right herbs: Common Thanksgiving herbs include parsley, sage, rosemary, and thyme. Bay laurel, marjoram, chives, oregano, and cilantro are also great additions.
- Garden or Potted: When selecting a container to grow herbs, make sure it has drainage holes. Use a good-quality potting mix, and avoid using garden soil. Use a water-soluble fertilizer for herbs following the label directions every two weeks, but don't fertilize more often. Fertilizing too much can negatively affect the flavor and aroma of your herbs.
- Growing Conditions: Sun-loving herbs like bay laurel and chives need at least 6-8 hours of bright light each day. Windows with southern exposure are often a good option. However, if your windows don't receive enough light during the winter months, you can use supplemental lighting.
- Humidity: Most herbs will grow best with temperatures between 50 and 70 °F. Avoid placing plants near heat vents, which can quickly dry out pots. Heated air also causes homes to be rather dry. Clustering plants together, placing pots on a tray of water and pebbles, or running a small humidifier can help increase humidity near the plants.
- Fresh vs. Dried: Fresh herbs are used three times more than dried herbs in recipes. Fresh herbs add a more intense flavor and aroma to dishes.
By following these guidelines, you can successfully grow herbs for your Thanksgiving dinner and enjoy the added flavor and freshness of home-grown herbs.
Additional Information & Resources
Basic Herbs for a Kitchen Garden, Tulare/Kings Counties
Culinary Herbs Profiles, Sacramento County
Herbs in Your Garden, UCANR
Photo courtesy of UCANR, Karen Schaffer, Uriel Mont, and Pexels.com
School Gardens Team can Help Your School Also!
The Contra Costa UC Master Gardener volunteer Team works hand-in-hand with teachers, staff, and parents to create, improve, and beautify school gardens throughout Contra Costa County. Master Gardener volunteers play an important role in over forty elementary, intermediate, and high school gardens, plus a few associated after-school daycare centers. Does your school need assistance to pull together a beautiful and productive instructional learning garden? A butterfly or pollinator garden? Or how about just beautifying the entrance to the school office? The School Gardens Team can help!
Each participating school is assigned a UC Master Gardener volunteer to act as a conduit into our county program’s resources and expertise. We can assist your school's “champions” plan new or renovated gardens, advise your team about research-based best practices, or help design effective and efficient irrigation plans, planting bed placements, plant lists, pest control, and fun student project ideas. Your UC Master Gardener volunteer liaison has access to specialists in the program who can be called upon to help solve difficult issues. It’s like having your own free garden consultants at your fingertips to answer questions or help guide improvements.
Did you know that the Contra Costa UC Master Gardener volunteers School Gardens team has a budget? That means we can also donate to your effort small tools, hand gloves, bags of garden soil, irrigation control devices, seedlings, or other small items that you may need.
As a recent example of working with School Gardens, the Oakley Elementary School District had four different school projects this past spring. UC Master Gardeners worked in a collaborative effort with faculty, parents, and students at both Laurel and Oakley Elementary Schools to enhance several set-aside spaces into thriving vegetable gardens where students can plant, maintain, and harvest fresh veggies, all the while learning about nature’s rhythms, needs, and challenges.
At Vintage Parkway and O’Hara Park Middle School, revitalizations of pre-existing gardens were needed. During the COVID pandemic school closures, many school gardens fell into disrepair from a lack of attention. “The O’Hara Park garden had many dead plants, lots of weeds, and a torn-up greenhouse,” says UC Master Gardener volunteer and East County Co-lead Amanda Merrill, “As we looked around, we saw that there were still some irrigation lines, a few rescueable plants, and the intact frame of the greenhouse.” They now have a fully restored student garden, thanks to the planning and hard work of all team members.
And at Delta Vista Middle School, a team of students and parent volunteers, with input from UC Master Gardener volunteers, implemented a new Butterfly Attracting Garden. The soil was a real challenge, heavily compacted and dry as a bone under landscape cloth. Students and parent volunteers pulled back most of the cloth, then heavily watered it before amending, planting, and mulching.
Summer Lake Elementary has two new garden spaces—one for the whole school to enjoy and another created just for the kindergarteners. Amanda has consulted with both groups, and both gardens have been grateful recipients of seedlings and seeds from the UC Master Gardener Program. The students and staff were very excited about their first crop of tomatoes this summer.
Students were thrilled to see the first butterflies visit in the spring. They created colorful signs and a beautiful Thank You poster for the UC Master Gardener Program. Plus, it was an effort where the whole community could come together. Amanda Merrill says, “It was a long time in the works, cutting through red tape and acquiring private donations, but Cristina Langley, a teacher, and her Girl Scout troop were able to realize their goal. Brentwood Home Depot donated plants, soil, mulch, and labor as part of their giving back to the community program.”
The three beautiful and heartfelt posters that Oakley School District students created to thank UC Master Gardener volunteers for our part are now adorning the wall of our “Central Command” for the whole program, the Help Desk office in the Contra Costa County Department of Agriculture building in Concord. Email the Help Desk for assistance with your school garden project at: Help@ccmg.ucanr.edu.
Loose Leaves for this Fall
Autumn in the garden is full of change—and so are the updates. From must-see events to practical tips and timely reminders before Master Gardener Volunteers will take a short break during the holidays. Here is a quick round-up to keep you informed, inspired, and ready for the season.
Upcoming Webinar: What To Do About Weeds
Tuesday, October 21, 6:00 - 7:30 pm
Go to our webinar page for more info
'Our Garden' in Walnut Creek
has six more engaging Wednesday talks coming up this fall. Each talk starts at 10 a.m., and is filled with fresh tips and inspiration for your fall gardening.
We’d love to see you there—visit 'Our Garden' webpage for the full schedule and join us for one (or all!) of these lively sessions.
Autumn’s cooler weather makes it perfect for planting.
Our Fall Garden & Landscape Checklist might be useful to refresh beds, add plants, and prep for spring. Check it out!
And here are a few more fun October dates to remember:
- 10/2 - National Kale Day
- 10/2 - World Farm Animal Day
- 10/4 - World Habitat Day
- 10/12 - Farmers Day
- 10/14 - Indigenous Peoples’ Day
- 10/15 - National Mushroom Day
- 10/16 - World Food Day
- 10/21 - National Apple Day
- 10/31 - Halloween
Summer 2025 NtGB
"Just living is not enough... one must have sunshine, freedom, and a little flower.” – Hans Christian Andersen
This summer, we're focusing on science-based, sustainable gardening practices that not only support your garden but also the environment. Inside, you'll find tips on earning Firewise USA® certification, designing water-wise lawns, and insights from a UC Davis study on how plants adapt to less water. We're also spotlighting the honeybee crisis, how to support pollinators with simple watering stations, and where to turn when you need expert advice, because Master Gardeners are here to help.
Looking to dig deeper? Visit us anytime at ccmg.ucanr.edu for trusted resources and local gardening guidance.
Let’s grow smarter, together.
Hedwig Van Den Broeck and Robin Mitchell, editors - Contact Us
Neighborhood Firewise USA Certification 1-2-3
After the Palisades and Altadena firestorms in Southern California, Contra Costa homeowners don’t need to be reminded that we also live in risky wildfire territory. Homeowners face multiple threats, including complete loss of their homes and possessions, insurance premium increases or cancellations, and the cost of hardening their homes and surroundings against fire. How can we homeowners create a more fire-resistant community? One program that hundreds of Contra Costa neighborhoods have already adopted is Firewise USA certification.
The Firewise USA® program from the non-profit National Fire Protection Association (NFPA) is a nationwide initiative designed to help communities reduce wildfire risks by implementing fire-resistant practices. Achieving Firewise certification requires a clear plan, community involvement, and a commitment to making long-lasting changes. Here's a step-by-step guide to help your neighborhood through the process.
- Organize a Neighborhood Project Committee - Form a group of community members who are passionate about fire safety to lead the initiative. A dedicated team ensures the program stays organized, work can be equally shared, and that your certification remains the primary goal.
- Host a Firewise USA Education Event - Organize workshops or neighborhood events to educate residents on fire-safe practices, highlight the importance of Firewise USA certification, and guide them through the certification process. What new fire safety laws are going into effect? What are fire-safe landscaping best practices? What changes are newly required by insurance companies? Michelle Rinehardt, Firewise county coordinator for Contra Costa Confire, is a great person to invite to discuss these topics and more. Contact Michelle at (925) 440-5831, or mrine@cccfpd.org. Raising awareness with your neighbors helps to gain the support and participation you’ll need when the work phase begins.
- Submit a Firewise USA Certification Application - The National Fire Protection Association (NFPA) will track your progress through regular updates. Include your community size, action plan, event summaries, and investment records. The no-cost application formalizes your neighborhood's efforts and leads to certification. You can apply with as few as eight homes in your neighborhood. “In fact”, says Marilyn Saarni of Contra Costa UC Master Gardeners, “an optimal number might be 15 to avoid spreading limited grant money too thinly.”
Assess Wildfire Risks - Conduct a wildfire risk assessment for your neighborhood. This can be done with the help of local fire authorities or wildfire specialists. Every Contra Costa fire district office now employs one or more individuals focused on community wildfire information, assessment, and coordination. Call or email them to schedule the neighborhood risk assessment walkthrough. Do you have tree canopies that hang over your key access roads? Are your attic vents wrapped? Understanding your neighborhood’s vulnerabilities is key to creating an effective, targeted action plan.
- Develop a Neighborhood Action Plan - Use the risk assessment report to identify targeted wildfire risk-reduction measures, such as creating defensible space, clearing flammable vegetation from roadsides and shared spaces, and using fire-resistant fencing and building materials.
- Invest in Risk Reduction (Do the work!) - Implement the work or changes outlined in your action plan. This could include home-hardening, Zone-0 improvements, weed abatement, trimming trees up and bushes down, removing dead growth, and installing low-flammability landscaping or noncombustible fencing. These are the actual improvements that will increase your neighborhood's resilience to wildfire, and can improve your chances of reducing home insurance costs or retaining existing insurance.
Remember that fire-wise work on private property is the sole responsibility of property owners. Firewise USA certification is a voluntary program, and project planning committees and coordinators do not have the authority to demand action. However, more and more local and state ordinances are being put in place to ensure compliance with wildfire safety measures. It is in every property owner’s best interest to comply as much as their budget allows by making necessary improvements on their property.
- Track Volunteer Hours and Investments - Keep a record of neighbor time and money spent on Firewise USA certification activities. These figures are necessary documentation for certification and demonstrate your community's commitment to wildfire preparedness. Be patient and allow neighbors to complete necessary work when their schedules and resources permit. The National Firewise Council allows 3 years from the date the application is accepted to complete all work.
- Celebrate Certification and Maintain Preparedness - Once certified, celebrate your achievement with a neighborhood event. Stay vigilant, maintain your compliance and improvements, update your action plan, and participate in annual Firewise Day activities and reviews. Continuing efforts ensure long-term wildfire resilience and keeps your Firewise USA certification active.
There are many community, state, and national organizations offering assistance to communities interested in becoming more fire safe. For more information, check out these helpful websites:
- National Fire Protection Association (NFPA): https://www.nfpa.org/education-and-research/wildfire/firewise-usa
- California Fire Safe Council: https://cafiresafecouncil.org/
- Cal Fire Wildfire Preparedness Information: https://www.fire.ca.gov/prepare
- Mt. Diablo Fire Safe Council: https://diablofiresafe.org/
- West Contra Costa Fire Safe Council: https://wccfiresafe.org/
Key local officials:
Derek Berumen – Contra Costa Confire Firewise Inspector (925) 941-3300, dberu@cccfpd.org
Marc Evans – West County FD Firewise Coordinator – (925) 876-4820, marc.evans6@yahoo.com
Jeff Isaacs – Moraga-Orinda FD Chief (925) 258-4500
In addition, some of the best advice can be found right next door. Inquire with your friends and neighbors about communities or neighborhoods near you who are in the certification process or have already achieved Firewise certification. Other neighborhood coordinators are usually happy to orient groups you form. They can point out local restrictions or other gotcha’s that interfered with their process.
How to Get Started: A few local UC Master Gardener (MG) volunteers have taken the initiative to pursue additional training outside the MG program to support wildfire preparedness in their communities. For example, Pam Schroeder received independent training through the Moraga-Orinda Fire District (MOFD) and now serves as a volunteer Fire Adapted Community Ambassador—a role separate from her MG work, focused on helping residents identify and reduce wildfire risks around their homes.
In this capacity, Pam has conducted dozens of free fire safety assessments for homeowners in Orinda and Moraga, offering personalized reports to guide practical mitigation steps.
“Most homeowners, when they contact me,” Pam shares, “say, ‘I’m so overwhelmed, I don’t know where to start!’ We begin with the Zone 0 area right next to their home and work outward. With a plan of small, manageable steps, the whole process becomes doable—and effective.”
UC Cooperative Extension (UCCE) Director, Yana Valachovic has developed a YouTube video that reviews home fire mitigation tactics that worked (and some that did not) during the massive Palisades and Altadena fires in January. This link will take you to Yana’s video: https://www.youtube.com/watch?v=a-VG12URQrc . All county Master Gardener programs across the state are part of the UCCE division.
Contra Costa UC Master Gardeners are launching a fire-wise landscaping demonstration garden at Fire Station #63 in Richmond, in partnership with the West Contra Costa Fire Safe Council and the Richmond Fire Dept. headed by Fire Chief Aaron Osorio. A launch party will take place in September 2025. The public will be welcome to visit, so watch for more announcements.
MGs Steve Danziger and Hedwig van den Broeck have presented dozens of informational webinars on the topic of wildfire safety in Contra Costa in cooperation with Contra Costa Libraries, Garden clubs and private organizations. One of Hedwig’s key messages is that because of climate change, what worked for fire safety in the past may not work in the future. In her talks, she often cites Washington governor Jay Inslee—later echoed by former President Barack Obama—who said, “We are the first generation to experience the effects of climate change, but the last to do something about it.”
Achieving Firewise USA certification is a rewarding process that enhances your neighborhood's preparedness for and resilience to wildfires. By taking action now, your neighborhood can become a model for fire safety and inspire other neighborhoods to join in. Together, we can create a safer, more wildfire-resistant region - one neighborhood at a time.
For more information, here are links to previously published articles on creating and maintaining defensible space around your home and garden:
Understanding Defensible Space Zone 0
Understanding Defensible Space Zone 1
Understanding Defensible Space Zone 2
Lawns: Are We Loving Them or Leaving Them?
Ah, the good old lawn! Whether we’re kicking around a soccer ball or backyard camping with the kids, we’ve got to love it. Our fascination with the mean green is a much-studied phenomenon. The social and cultural perceptions of expanses of turfgrass are woven into the fabric of our lives, especially for those of us who remember running out to the grass at recess to frolic and romp and let off steam.
At 50 million acres, lawns constitute the single largest irrigated acreage in the United States. Corn comes in a paltry second place at 12 million acres. According to UC ANR’s Center for Landscape and Horticulture, the state of California has an estimated four million acres of managed turfgrass. The number most likely reflects the amount of commercial (including homeowners’ associations), industrial, and institutional lawns. It seems that number could be virtually doubled if you were willing and able to count all the residential front and backyard lawns in the state.
https://ucanr.edu/site/center-landscape-urban-horticulture/turfgrass-management
Lawn Replacement
Despite being so desired for its form, function, and curb appeal, turfgrass has been vilified in California for close to 20 years. The turfgrass that we favor in Northern California, cool-season turfgrass, is a water-guzzling beast in terms of the amount of water it demands to keep it green and healthy. Because of this, you would be hard-pressed to find a water district in this state that isn’t offering incentives to “lose the lawn” at their expense through their lawn-replacement rebate programs. These rebate programs require that the grass be removed and replaced with low-water plantings. They also require that the sprinklers be removed and efficient drip systems installed in their stead.
The turfgrass battleground in California has made it into law as well. Assembly Bill 1572, signed by Governor Newsom in 2023, will be enforced in stages over the next several years. This new law bans non-functional (or purely decorative) turfgrass for commercial (including homeowners' associations), industrial, and institutional sites. We’re already seeing vast stretches of lawns either browning out or disappearing as this law creeps slowly toward fulfillment. Click the following link for more info. https://leginfo.legislature.ca.gov/faces/billNavClient.xhtml?bill_id=202320240AB1572
Cool-season turfgrasses are the preferred lawn species in Northern California because they have growth and color year-round. But Jodie Sheffield, the seed and sod specialist with Delta Bluegrass in Stockton, says they’re seeing a massive shift in the market toward warm-season grasses, because they’re much more drought resistant, robust, and rival cool-season grasses in their lush appearance. And when it comes to durability and resilience, warm-season grasses consistently outperform their cool-season counterparts.
Many sports fields and golf courses in Northern California have made the switch from water-guzzling cool-season grasses to warm-season grasses. Even Oracle Park and Levi’s Stadium, homes of the San Francisco Giants and 49ers, respectively, have switched to hybridized Bermuda grass, a warm-season turfgrass. And did you know that warm-season grasses only require a little over half the water their thirsty cool-season cousins do?
But switching out lawns for low-water landscapes could have consequences we haven’t bargained for. Jessie Godfrey, Environmental Horticulture and Water Resources Management Advisor with UC Cooperative Extension, informs us there are “considerable tradeoffs” that come with lawn removal on a large scale. The foremost tradeoff to her mind is that irrigated turf landscapes provide evaporative cooling that helps to make higher temperatures from climate change more tolerable. And removing evaporative cooling from thermal equations has thermal consequences. There’s much research that supports the view that yards landscaped with drought-tolerant plants, in contrast, may “create an ecosystem disservice in the form of increased localized microclimate heat.” (Chow & Brazel, 2012; Vahmani & Ban-Weiss, 2016)
As is often the case, taking actions to solve one environmental issue causes an imbalance that tips the scales toward issues of another type. Ultimately, the onus is on each of us with lawns to make informed decisions.
Options for Action
With respect to solving the challenge of our high-water-use lawns and using water more efficiently in the landscape, we present a few available options:
- Replace existing high-water turfgrass with a lower-water-use turfgrass or alternative groundcover.
or - Remove the turfgrass and replace it with low-water plantings.
or - Simply reduce the size of the lawn.
Replacing the high-water-use turfgrass with a lower-water-use turfgrass or groundcover that acts like a lawn is very well explained by UC Master Gardener volunteer Henry Shaw in a webinar talk he gave in 2024. Henry does a great job of qualifying several good candidates using the desirable attributes of lawns that we’ve grown to love. If you choose this option, you can leave your existing sprinklers in place and not experience the negative tradeoff consequences described above. You can find that video here: https://www.youtube.com/watch?v=Cn0k9HKxrYw
The option of removing the turfgrass in favor of low-water plantings is best employed by using the lawn-replacement rebate program of your water provider. In Contra Costa County, the prominent water districts EBMUD and Contra Costa Water District both offer generous incentives to help offset the cost.. Links to their rebate programs can be found at the end of this article.
If you take any of the actions above, be careful to ensure that trees in the turfgrass area aren’t compromised. During the last drought, we saw many trees suffer or die from a lack of water when lawn irrigation was turned off or disconnected. Trees - not only offering shade and beauty, but are of the utmost importance in performing essential ecological services and providing habitat for local fauna and pollinators.
The inspiration for writing this article was that the author is witnessing a growing number of new lawns being installed, since the last two winters were abundant with rainfall. There’s a tendency to be lulled into feeling secure about water when the sting of drought has waned. But the future of the potable water supply in California remains uncertain. We weather wild swings between drought and deluge. So, choosing whether to love lawns or leave them will help shape how resilient we can be in the face of dwindling resources and upcoming water restrictions. There’s much hope and support for preserving our precious water supply.
*See below examples of low-water turfgrass alternatives that require much less water than the standard Northern California lawn.
References
California Center for Urban Horticulture - Plant Factors for Turfgrasses
https://ccuh.ucdavis.edu/wucols/water-factors-for-turfgrasses
Chow, W.T.L., & Brazel, A.J. (2012). Assessing xeriscaping as a sustainable heat island mitigation approach for a desert city. Building and Environment, 47, 170-181. https://doi.org/10.1016/j.buildenv.2011.07.027.
Contra Costa Water District Lawn-to-Garden Rebate: https://www.ccwater.com/160/Lawn-to-Garden-Rebate
EBMUD Lawn Conversion Rebate Program: https://www.ebmud.com/water/conservation-and-rebates/rebates/lawn-conversion-rebate
UC Guide to Healthy Lawns
https://ipm.ucanr.edu/PMG/menu.turf.html
UC Verde Buffalograss Turfgrass https://ccuh.ucdavis.edu/uc-verde-buffalograss
Vahmani, P., & Ban-Weiss, G. (2016). Climate consequences of adopting drought-tolerant vegetation over Los Angeles as a response to California drought. Geophysical Research Letters, 43(15), 8240-8249. https://doi.org/10.1002/2016GL069658
Smart Watering, Beautiful Gardens: Lessons from UC Davis
Imagine walking through a vibrant, blooming garden in the heat of summer—where every plant is thriving, even though it’s been weeks since the last rainfall. Is this vision wishful thinking? Maybe not! Thanks to 20+ years of research by the University of California’s Landscape Plant Irrigation Trials (UCLPIT), we now know that many of the most beautiful plants in our gardens don’t actually need as much water as we once thought.
UC scientists have been testing how ornamental plants perform with less and less water at research sites in both Davis (Central Valley climate, full sun) and Irvine (coastal/Mediterranean climate). Over the course of two years, they grow popular landscape selections under three irrigation levels—low, moderate, and high—based on local weather conditions. Only during the second year, when the plants have settled in and are fully established, does the real test of drought resilience begin: Irrigation is being reduced to 50%, but frequency varies (low, moderate, and high)
As UC Master Gardeners, we’d like to encourage planting CA native plants because they are better adapted to our climate, more drought resistant, water-wise, and require less maintenance. However, many of our gardens include ornamental plants, especially those popular with landscape professionals, municipalities, and nurseries.
California native plants have been somewhat underrepresented in these UCLPIT trials, and here is why:
- Many native plants have been excluded because they’re already known to do well with minimal or no summer watering. Including them in the trials might not provide much new information, especially when the goal is to test plants with unknown or uncertain drought performance. So yes, keep on planting those CA native plants!
- Launched in 2004 with California Native Plants, the original goal was to evaluate the water needs and performance of plants from the UC Davis Arboretum All-Stars list.
- The initial trial focused on 10 California native species exposed to four irrigation levels. Five species showed strong, consistent performance under low-water conditions. Encouraged by early results, researchers added 6 more native species to expand the study.
- Due to strong interest from the landscape and nursery industry, the trial broadened its scope in 2012 to include non-native ornamental plants.
- In partnership with other universities, UCLPIT launched the Climate Ready Plants program in 2020 to identify plants that not only perform well under today’s conditions but are also likely to thrive in a changing climate.
- UCLPIT primarily tests commercially available ornamental plants used in urban and suburban landscapes. These often include non-native plants that are widely marketed and installed in new developments, business parks, and civic spaces. While many native plants are excellent choices for sustainable landscapes, they haven’t always been widely used in mainstream commercial landscaping, which is what the trials have aimed to influence.
Plants that continue to flourish—showing strong growth, flowers, vigor, and visual appeal—on the lowest irrigation setting earn the coveted Blue Ribbon™ status (Plants scoring ≥4 on the low-water treatment). These are the water-wise heroes of the garden world.
With our long, dry summers and clay-heavy soils in Contra Costa County, choosing plants that can thrive with minimal watering isn’t just a smart choice, it’s essential. The UC Davis trials have already identified several top performers that not only save water but also add structure, texture, and year-round color to local gardens. Here is a link to the UC Davis Blue Ribbon List. Some standouts worth mentioning are:
- Muhlenbergia ‘Regal Mist’, a native ornamental grass whose soft pink plumes catch the autumn light,
- Heuchera maxima or Island alumroot, an attractive herbaceous perennial California native, even when not flowering,
- Lippia ‘ECOLOPIA2’ or Pink Kurapia® is the latest in this line of very low, vigorous groundcovers. With the same characteristically shorter internodes of New White Kurapia, Pink created a tight mass of small leaves on spreading stems. Lippia nodiflora ‘New White’ or Kurapia New White is a newer cultivar of a vigorous, low-growing plant marketed as a “utility groundcover” with white flowers.
- Rosa ‘Sprogreatpink’ or Pink Brick House. An outstanding performer on low irrigation in Davis earning the Blue Ribbon™ award. This is a dense, well-formed shrub with extremely clean, deep green foliage and a unique color of reddish-pink blooms which appear in abundance from April through at least October,
- Salvia microphylla or 'Hot Lips' is truly a plant worthy of the All-Stars name. It bloomed from March to December with really heavy bloom for the four months June through September. The best flowering and foliage appearance were in the 40 to 60% of ETo range, with only marginally higher relative growth on the 60% treatment.
Although every new plant is in high need of water until established, maintaining a water-smart garden doesn't mean giving up on beauty. Quite the opposite. When we select the right plants for our climate, we create landscapes that not only survive but truly thrive—with less maintenance, fewer pests, and a deeper connection to our local environment.
With resources like UCLPIT, we’re no longer guessing which plants are tough enough for Contra Costa summers. We have the data—and now, we have the inspiration too.
Visit uclpit.ucdavis.edu to explore the full list of trial results, find detailed irrigation scores, and see what’s blooming in this year’s trials. Because smart watering starts with smart planting—and your garden can be part of the solution.
Resources available on uclpit.ucdavis.edu :
- Plant Index: Full list of evaluated plants, irrigation classification, aesthetic scores (uclpit.ucdavis.edu).
- Reports: Annual results dating from 2008–2022 (downloadable PDFs) .
- Nuts & Bolts: In-depth methodology on layout, irrigation scheduling, ETo, etc. (uclpit.ucdavis.edu).
- History & Funding: Origins of the trial, grants, and research alliances (ucanr.edu).
Findings & Applications
- Blue Ribbon Plants
- Plants scoring ≥4 on the low-water treatment earn Blue Ribbon status. In 2021–22 NOAA highlights include Lomandra ‘Pom Pom Shorty’ and Rosa ‘Brick House Pink’ (plantsciences.ucdavis.edu).
- UC Davis List: https://uclpit.ucdavis.edu/UC_Davis_Blue_Ribbon_List
- Use in Regulations
Results feed into WUCOLS and serve landscape water budgets under California’s Model Water Efficient Landscape Ordinance (MWELO) (uclpit.ucdavis.edu). - Educational Outreach
Monthly/seasonal field-days open to professionals to rate plant aesthetics and discuss irrigation methods (uclpit.ucdavis.edu).
The Alarming Disappearance of Honeybees
by Stephen Guglielmana
with the assistance of David George
Have you been tracking the plight of commercial honeybee hives around the country this past year? It’s frightening. As a beekeeper and UC Master Gardener volunteer, I have been painfully aware of rising national honeybee hive collapse statistics. As you read future honeybee articles, the following information may help put the current situation into perspective.
Here's a quick timeline history of honeybees:
- 100-50 million years ago, Flowering plants started to evolve, and bees joined their evolution alongside them,
- 9000 BCE - Bees appear in Spanish cave paintings,
- 2800 BCE - Bees appear in hieroglyphs, and honey is found in tombs of that era,
- 1620s - European honeybees were brought to North America by immigrants,
- 1850s - Honeybees introduced to the West Coast,
- 1852 - Reverend Lorenzo Langstroth of Philadelphia patents the modern commercial beehive.
Honeybees are agricultural livestock and are protected by federal law. Stealing a bee colony can result in federal charges. They were brought to North America by European farmers along with the fruits and vegetables that honeybees are known to pollinate.
A good example of the critical relationship between honeybees and agriculture is the almond crop here in California. Each spring, 95% of the honeybee colonies in the USA are transported to California to pollinate almond flowers. Without the bees, almond trees might produce only about 10 lbs. of nuts, but about 100 lbs. per tree with pollinating bees. After almond trees bloom, beekeepers transport the hives to other fruit-growing areas to pollinate other crops, such as apples and peaches.
One of the current beekeeping problems is that these orchards and farms are all monocultures, without the diversity of flowers and pollen that bees need. About 20 years ago, the honeybee industry experienced its first colony collapse, sometimes referred to as the “death by a thousand cuts.” Researchers have found several possible causes for these collapses, and opinions differ on how to solve the problem. While these are beyond the scope of this article, it is worth noting that honeybee colonies have been declining at an average rate of about 30% per year ever since.
Until recently, beekeepers were able to quickly recover from lost colonies, but that may no longer be the case. Recovery is no longer guaranteed. The losses are outpacing what beekeepers can rebuild. This past winter, local beekeepers with 80-100 colonies reported that their hives are now experiencing 60-80% die-off (collapse). Beekeeper reports from the rest of the USA are just as alarming, indicating a 60-70% die-off rate this past year.
Early concerns point to extreme weather events as likely causes leading to malnutrition in hives. This troubling trend mirrors the recent trend in extreme firestorms, rains, and floods across North America. If this pattern persists, beehive collapse throughout North America this coming year will expand to the point where hive regeneration may not be possible.
How can you, as gardeners, help all of the pollinators out there?
- Start by planting a variety of pollen- and nectar-rich species! These include herbs, native flowering species, and other flowering varieties.
- Eliminate the use of insecticides, especially neonicotinoids and other deadly honeybee poisons, in your garden.
- And provide a water source for pollinators.
Despite the doom and gloom, your garden can still be a place of joy—and a lifeline for honeybees. By planting pollinator-friendly blooms, avoiding harmful chemicals, and letting a little wildness in, you’re not just gardening—you’re helping a struggling species survive. It’s a hopeful, hands-in-the-dirt way to make a difference. And the best part? It’s beautiful, rewarding, and surprisingly fun.
Resources
- UC Davis Bee Haven: A Hidden Gem
and a delightful place to explore, where you can experience the beauty of bees up close and discover the plants that help them thrive.
https://ucanr.edu/blog/bug-squad/article/uc-davis-bee-haven-hidden-gem
Watering Holes for Pollinators for Small Spaces Gardening
Even though you have limited space for gardening, you can do yourself and your neighbors a favor by providing a water source for honeybees, butterflies, and other threatened pollinators. Dry summer months are particularly difficult for bees, wasps, butterflies, and other pollinating insects to find fresh water. The more time spent searching for water is less time spent pollinating your container vegetables and visiting other pollen providers.
First, ensure that any water provided is refreshed regularly to avoid stagnation or mosquito breeding. You can do this either manually or with a slow automated drip system. Place the watering hole in a sunny and accessible location near your flowering plants. It can be placed at ground level or elevated to the level of your flower blossoms for better viewing. Here are some ideas for creating your own local “watering hole.”
- Shallow dishes with pebbles
Use a shallow dish or plate filled with fresh water and add clean pebbles or flat stones. This allows pollinators to land safely without the risk of drowning. - Repurpose a small birdbath by filling it with water and adding floating cork pieces or small islands made from natural materials to give pollinators resting spots.
- Create a small pollinator watering pond using a container or bowl. Add aquatic plants or moss to the surface to help filter the water and provide pollinator-friendly landing areas.
- Mix a solution in a shallow dish comprised of water with a tiny amount of raw sugar or honey added. This offers both water and a source of nourishment for honeybees and butterflies during hot, dry weather.
- Use a spray bottle or misting system to create damp zones on leaves or stones where pollinators can drink without needing deeper water.
If you find that undesirable insects, such as yellow jacket wasps or bumble bees are also being attracted, don’t worry. Yellow jackets, bumblebees, native bees, and small wasps also pollinate plants and play an essential role in healthy ecosystems. They help to contain aphid populations and can keep nearby oak tree leaves free from insect damage. Just stay out of their way while they visit your watering hole!
By providing these simple water sources, you’ll attract a vibrant community of pollinators, including honey bees and butterflies, enhancing the health of your patio garden and your neighborhood’s ecosystem.
Spring 2025 NtGB
Big Changes, Big Tomatoes, and Even Bigger Excitement!
We’ve got some juicy news—our website has officially moved to a brand-new platform! While we’re putting the finishing touches on things (including this very newsletter), everything is up and running. If you notice anything missing, don’t worry—we’re on it! Thanks for sticking with us through the transition.
Now, let’s dig into the good stuff! This spring, we’re gearing up for the Great Tomato Plant Sale (GTPS)—a gardener’s dream! Along with that, we’ve packed this issue with must-read articles on growing your own food, mastering irrigation, and keeping pesky pests in check in our Mediterranean climate.
Grab your gardening gloves, and let’s grow together!
Hedwig Van Den Broeck and Robin Mitchell, editors - Contact Us
"The garden suggests there might be a place where we can meet nature halfway.” – Michael Pollan
Great Tomato Plant Sale: Bringing You Summer Veggies Since 2012!
Spring is in the air! And we hope you are prepping your gardens for a season full of fresh, homegrown veggies. The Great Tomato Plant Sale (GTPS) is just a little over a week away. We can’t wait to help you find the perfect veggies for your garden.
We’ve got plenty of exciting varieties to choose from. Over our 3 county area sales, we have 75 varieties of tomatoes, 39 varieties of peppers, and 78 varieties of other veggies, including eggplant, summer and winter squash, cucumbers, beans, leafy greens, and more! There’s something for everyone!
Plan your shopping trip in advance by visiting our website [link] for detailed variety descriptions, printable shopping lists, and helpful articles on growing summer veggies . Please note that availability varies by location—be sure to check the county-specific shopping lists and the description lists to find exactly what you’re looking for.
As a reminder, the dates of our sales are:
- Our Garden, Walnut Creek
(at N. Wiget & Shadelands Dr.)- Saturday and Sunday, April 5 and 6, from 10 a.m. to 3 p.m.
*ADA-accessible station with all plant varieties will be available in the parking lot on Saturday and Sunday - Wednesdays, April 9 and 16, from 9 a.m. to 2 p.m.
- Saturday and Sunday, April 5 and 6, from 10 a.m. to 3 p.m.
- Rivertown Demonstration Garden, Antioch
(in the Contra Costa Event Park, 1201 W. 10th St.)- Saturday, April 12th, from 10 a.m. to 3 p.m.
- Richmond Civic Center Library
(325 Civic Center Plaza, Richmond)- Saturday, April 19th, from 10 a.m. to 3 p.m.
For safety reasons, pets are not allowed inside the sales area.
We are very much looking forward to seeing you and assisting you in any way we can. Our “Ask a Master Gardener” team will be on-site at each of the 3 county area sales to help answer your gardening questions. We will also have a speaker at Our Garden, Walnut Creek, who will talk about “Pro Tips for the Summer Garden” on both Saturday and Sunday, April 5 and 6, from noon to 1:00pm.
Spring Irrigation Startup
As the rainy season winds down and spring irrigation startup is steadily creeping toward us, it’s time to prepare your irrigation system for the busy season ahead. The following recommendations are meant to give you direction for ensuring your irrigation is in top condition when the time comes for it to be called to duty.
Irrigation Controller
Is your irrigation controller up to the task of automatically providing the correct amounts of water to your landscape? Or is it time for a new smart controller?
The water districts offer rebates as an incentive to switch to smart controllers. They’re smart because they collect real-time weather data to automatically adjust irrigation schedules. Similar to thermostats—but for water instead of heat—; these devices can save you a boatload of water when properly programmed.
If you think it might be time for an upgrade, visit your local professional irrigation store to learn more about the benefits and available options.
For a spring startup, the following actions are recommended for your irrigation controller:
● Make sure each station turns its zone on and off reliably.
● If the controller has a backup 9-volt battery, ensure it has enough charge to last one year.
● Verify that the time and date are set correctly.
● Set up a spring irrigation schedule if the controller lacks smart functionality.
● If using a smart controller, verify it has stable Wi-Fi or cellular connection, and that the app functions correctly.
● Plug any holes in the bottom of the casing if the controller is located outdoors. Insects that enter the controller seeking warmth and shelter can play havoc with the circuit board, while small mice can chew through the wires.
Sprinklers
The following instructions pertain only to standard pop-up sprinklers and do not cover long-range gear-driven sprinklers.
Turn on each sprinkler zone and inspect the sprinklers while they are running.
Look for any defects, as well as broken or worn parts.
● Flush the sprinkler zone. There are two methods:
○ Method #1: Purchase a sprinkler throat retention tool, like the one shown in the above photo, available at professional irrigation stores. First remove the nozzle as shown in the photo, then turn on the station. Let the water run for at least 30 seconds before turning the station off. The tool is essential for keeping the throat of the sprinkler elevated above the soil level, preventing dirt from entering when the water shuts off. As an alternative to purchasing this tool, you can use several tight-fitting rubber bands.
○ Method #2: Purchase a flushing cap for your brand of sprinkler at a professional irrigation store. The flushing cap allows water to shoot out of the top of the sprinkle, helping to flush out any debris from the pipes and sprinklers.
● Clean filters. Unscrew the sprinkler nozzle to find the filter beneath. A white one is shown in the photo above. Make sure every sprinkler has a filter screen beneath the nozzle
● Is it time to change out your inefficient sprinkler nozzles to efficient ones? If you don’t already have high-efficiency sprinkler nozzles like Hunter MP Rotators, Rain Bird R-Vans, Toro Precision Rotary nozzles, or similar, consider consulting your local professional irrigation store to learn about the switch. Studies show that sprinklers with efficient nozzles can reduce water usage by up to 20% because they distribute the water more evenly and at a rate that prevents wasteful runoff, helping you conserve water and reducing your utility bills.
● Check the nozzles
○ Adjust the ones that are spraying in the wrong direction
○ Replace any broken or mismatched nozzles.
○ Clear clogged nozzles. Replace nozzles that are clogged beyond repair.
● If the sprinklers are misting, replace sprinkler heads with newer models that include built-in pressure regulation. While you’re at it make sure the new sprinkler heads also have check valves preinstalled in them.
● Raise any sunken sprinklers and straighten those that are tilted.
Drip
The following instructions pertain to all types of drip systems:
● Turn on drip zones and observe and listen for any issues.
● Observe emitters and make sure they are working properly, replacing any clogged or malfunctioning ones.
● Fix any found kinks, leaks, or breaks in the tubing.
● Ensure that drip lines are placed on top of the soil and covered with mulch.
● Flush the tubing to remove any dirt or debris. If you can’t find a flush valve, create a flush point.
○ For black tubing, cut the tubing and install a tee fitting with a short piece of tubing folded over for flushing, as shown in the first photo below.
○ For brown emitterline tubing, cut the tubing and install a tee fitting with a short piece of tubing, an adaptor, and a cap, as shown in the second photo below.
Conclusion
By following the instructions outlined above, you’ll be well on your way to getting your irrigation controller, sprinklers, and drip systems in ship shape for the upcoming irrigation season. For quality parts and expert advice, visit your local professional irrigation store. Several great options are available throughout Contra Costa County. Take action now, and your garden will thank you with a healthy, efficient irrigation setup!
Irrigation Stores in Contra Costa County
As Master Gardener Volunteers, we cannot give recommendations on finding Irrigation Stores in Contra Costa County. A simple Google search for "professional irrigation stores in Contra Costa County” however, will give you recommendations for the areas of Brentwood, Concord, Pacheco, and Richmond!
Aphids in the Garden
Aphids can be a scourge in the garden. There are over 4,000 species of aphids in the world, but fortunately, only(!) about 250 species are attracted to the plants we grow in our gardens and landscapes.
Aphids are small, slow-moving insects that come in a variety of colors—green, yellow, brown, red, or black. They sometimes match the color of the plant they feed on, but not always. They have long legs and antennae and usually have a pair of cornicles (tube-like structures) sticking out of their hind end. No other insects have cornicles. Some adult aphids have wings—this can occur when populations are high or during spring and fall—that can allow them to disperse to other plants.
Aphid reproduction is interesting. Adult females can give birth to up to 12 live offspring each day without mating. During warm weather, many aphid species can grow from newborn nymph to reproductive adult in a week. No wonder it seems like they appear overnight. Watch this Deep Look video from PBS: https://www.youtube.com/watch?v=vrzalLssomg
Aphids are attracted to plants on which they can feed, particularly those experiencing active growth. During this early Spring season, they primarily target plants in our winter gardens, such as kale and broccoli, as well as ornamental landscape plants such as roses. Additionally, aphids are also attracted to the winter and spring weeds growing abundantly in many neighborhoods.
Aphids have sucking mouthparts, somewhat like little straws. They use them to suck sap (which is a plant's sugar source). What they excrete is commonly referred to as honeydew. Ants are attracted to this honeydew and will actively “farm” the aphids and protect them against natural predators.
Most plants, especially trees and shrubs, can survive just fine with low to moderate numbers of sap-feeding aphids. However, when aphid populations grow too large, they can cause noticeable damage, including yellowing leaves and stunted growth.
Aphids can also transmit viruses from plant to plant on many vegetable crops and ornamental plants. Symptoms can include mottled, yellow, or curled leaves, along with stunted growth.
Controlling aphids
Understanding their life cycle is key to their management. By checking plants twice a week while they are growing rapidly, you can catch infestations early. With small populations of wingless aphids, hosing them off with a strong stream of water works well. Once off the plants, aphids are unlikely to be able to return. You can also prune out the most infested parts. Make sure you also remove nearby weeds that can serve as a reservoir for new infestations.
Natural enemies are important for aphid control. Parasitic wasps lay eggs inside live aphids, causing them to turn into mummies. You can recognize these by light-colored aphid bodies with circular holes on top where the wasp has emerged. Lady beetles (especially the larvae), syrphid fly larvae, and green lacewings are voracious eaters of aphids. Explore the website! to discover more about natural enemies of pests.
If spraying with water is not effective enough, insecticidal soaps and oils are the best choices for most situations. These include petroleum-based horticultural oils or plant-derived oils such as neem or canola oil. These products kill primarily by smothering the aphids, so it is crucial to thoroughly coat the infested foliage. Soaps and oils kill only those aphids present on the day they are sprayed, so applications may need to be repeated. Although these products can kill some natural enemies that are present on the plant and hit by the spray, they don't leave a toxic residue.
The key to effective control is tackling aphids early—before their populations explode. Some species even cause leaves to curl around them, creating a natural shield that makes sprays and predators less effective. Acting fast can save your plants from serious damage!
Prevention
- When you purchase new plants, inspect them carefully.
- Don't over-fertilize. Excess fertilizers, especially too much nitrogen, can stimulate plants to put out lush new growth that will entice aphids to set up home.
- Excessive pruning can also stimulate plants to put out attractive new growth.
- Use a row cover, especially on seedlings and new plants. This will keep out aphids but also protect them from other pests.
- Control ants that can protect aphids.
For more information, check these websites:
https://ipm.ucanr.edu/PMG/PESTNOTES/pn7404.html#TABLE1
https://ipm.ucanr.edu/QT/aphidscard.html
Berries Anyone?
My “berry” favorite garden-grown treats in springtime are berries: plump, juicy blackberries, sweet red raspberries, healthy and organically grown strawberries, and pop-in-your-mouth blueberries. Regionally grown varieties ripen from April through July, making delicious toppings for cereal, ice cream, whipped cream, or—better yet—dipped in warm chocolate. Is your mouth watering yet?
Berries are not only delicious but also full of antioxidants, essential vitamins, and natural sugars. Don’t pay exorbitant supermarket prices for tasteless fruit. Grow your own!
When to plant
January and February are ideal for buying and planting bare-root deciduous berry varieties while plants are dormant. If you missed the window this year, mark your calendar for next winter; it’s worth the wait! Choose a sunny spot in raised beds or containers to limit the vine’s spread, and in a sand-clay soil mix with a good supply of organic matter. Parent plants will produce offshoots that root and grow into new plants themselves. Berry vines are perennial and resprout year after year from their original crowns or offshoots. They like regular water, some afternoon shade on hot days, and require simple but specialized pruning rules (read below). Already potted specimens can be planted through late spring.
Blackberries
Many varieties suitable for our area produce fruiting canes that grow 12 feet or more per year. The introduced Eurasian blackberry has naturalized throughout California, but produces small berries that sweeten only in the warmest locations. The Olallieberry, a highly regarded horticultural variety, was developed by Oregon State University to thrive in cooler coastal and inland valley locations along the Pacific Coast. It produces large, sweet berry clusters in abundance in late May through June along second-year canes. Canes sport nasty thorns, but many varieties—such as Marion blackberries, Loganberries, and Boysenberries—are thornless and mature later in July.
Allow new ground-sprouting blackberry canes, called “primocanes,” to grow long by twining them through a 5- to 6-foot-tall trellis during their first growing season. They may lose their leaves during cold weather, but the canes will be fine. Next spring, second-year canes, now called “floricanes, will produce white or pinkish clusters of flowers at each old leaf junction, followed by immature red fruits. (Remember that blackberries are red when they’re green!) Harvest berries when their black and shiny tough skins turn more dull and soft. After harvest, these floricanes will never produce fruit again. So, cut them back to the ground to force growing energy into developing new primocanes. Protect fruit during harvest season from birds and rodents with netting and hoop houses.
Strawberries
Strawberries are perennials, but individual plants only produce for several years, then their offspring take over. Strawberries are native to California and can be found in cool coastal locations and as a ground cover in redwood forests. But horticulturally sold varieties produce larger, sweeter fruit. With proper watering and care, they’ll spread by runners to fill your planting area. Strawberries bloom in early spring and their fruit ripens from late April through June, providing a delicious source of vitamin C and other essential nutrients.
Strawberries like sandy, well-drained soil, so plant them on raised mounds. Part shade is best for inland Contra Costa gardens, and use shade cloth to protect tender plants and fruit during hot spells. Use a commercial snail and slug bait that contains iron phosphate (a plant fertilizer), or build a perimeter sand barrier to keep damage from snails and slugs to a minimum. To improve fruit yield next harvest, cut each plant’s growth back to within an inch of the soil after harvest. Leaves will grow back from the crown to produce your next crop.
Raspberries
Black raspberries are native to Europe, and red raspberries are natives of North America. You can also enjoy golden and blue-red varieties. Annual canes in early spring grow straight up from the crown to 4 feet. New plants are produced by seeds from dropped fruit, so allow some spent berries to fall to the ground. Blooms and fruit appear in the first fall at the tips of new canes, with fruit maturing rapidly. The same canes produce clusters of blossoms again from side shoots next spring, with fruit ripening in May. Red raspberries change color from light pink to deep purple-red, blue-red, or golden when ripe, depending on variety.
After the spring harvest, canes will not produce fruit again. So, cut spent canes to the ground to promote the growth of new pop-up plants. Prickly hairs along canes can irritate skin, so wear gloves while working with them. Delicious ripe fruit contains the same antioxidants and vitamins as their blackberry cousins. Protect ripening berries from birds, western fence lizards, and rodents with bird netting and hoop houses.
Blueberries
Blueberries are native to cool northern American bogs but not California. Indigenous people gathered them for food for centuries before a biologist discovered in 1911 how to cultivate them successfully. The secret was that they love acidic (low pH) soil. Blueberries have been called a “superfood” because they are rich in antioxidants, vitamins, and trace minerals, offering more nutrients per ounce than any other fruit.
Most blueberry varieties grow up to 5-foot-tall canes and are deciduous (lose their leaves in winter), while newer horticultural compact varieties are compact and evergreen. Both types deliver delicious, healthy fruit, but tall-grown berries tend to be larger. Choose two or more different varieties to promote cross-pollination and maximum fruit production. Fruit ripens to a deep blue-black color from May through August.
Blueberries are difficult to grow in the ground in Contra Costa because of our dense clays and hot summer climate. Instead, start blueberries in containers, planter pots, or raised beds placed in full morning sun but afternoon shade. You can control their acidity and moisture needs in these containers. Experts say to pick off and discard all immature fruit for the first 2 years to promote vigorous and healthy roots. Add peat moss and forest products to the planter soil to lower the pH and supply regular water. A high-acid fertilizer such as “Camellia, Azalea, and Rhododendron Food” is recommended for application every 6-8 weeks during the growing season. Cut old production canes back after harvest. Protect your ripening blueberries from birds.
Every home garden should have a healthy and productive berry patch! You can do this!
For more pruning details, check out this UC ANR blog site: https://ucanr.edu/blogs/blogcore/postdetail.cfm?postnum=22578. And for information about the best blueberry varieties for Contra Costa gardens, read https://ucanr.edu/sites/ucmgnapa/files/27035.pdf .
Our ‘Bountiful Berries’ webinar will soon be posted on our YouTube channel.
Great Patio Container Tomatoes and Peppers for Small Spaces Gardening
This year’s Contra Costa County Master Gardeners Great Tomato Plant Sale supplies easy-to-grow and delicious tomato and pepper varieties for container gardening. Small spaces container tomatoes though require some specific best practices that you will find in a UC ANR article (Contra Costa is defined as Zone-C). Peppers have similar needs to tomatoes.
Patio containers are a different growing environment than in-ground beds. Overall sunlight and temperature reflection by your home’s exterior walls will warm your growing space up to ten degrees more than surrounding air temperatures. Containers also lose water more quickly due to heated container walls and porous soil mixtures inside. If you utilize drip irrigators, you should run at least 2 emitter lines to each plant in case an emitter clogs. Container plants need water applied more frequently than in-ground veggies, often in small increments each day during hot weather.
Both tomatoes and peppers form deeper root systems than other summertime vegetables. Your containers should be tall enough to hold at least 16 to 20 inches of potting soil. Support taller-growing tomato varieties with a small trellis or wire tomato cage. Taller, unglazed terra cotta pots have porous walls and can supply essential air into the potting soil. Grow bags are also popular with new gardeners since they are light and transportable, they self-regulate the soil temperatures, and cannot be overwatered, since they expel excess water through their fabric walls.
Many of the best container tomato varieties share the qualities of compactness and are “determinate,” which means the fruit tends to ripen all at once. For West County container gardens, our experience has shown that the best varieties for cooler, moister climates have shorter ripening durations (55-65 days.) Great options include Toy Boy, Gold Nugget, and Small Fry cherries. In East County, look for low water requirement varieties, higher heat requirements, and longer days for ripening, such as Better Bush Hybrid and Patio Hybrid. Central County patio gardeners have more flexibility and can grow most tomato varieties depending on their placement in shadier or sunnier parts of their space. Other good varieties for containers are Aurora, Baby Boomer, Black Russian, Black Sea Man, Bush Champion II, Italian Roma Bush, La Roma III, Legend, Lizzano, Siletz, Super Bush, and Washington Cherry. Review online descriptions to select types that best suit your space and needs.
Fun fact: Did you know that many pepper and chile varieties can thrive for years if moved to a protected indoor location during colder months? They produce best when soil is at least 70 degrees and daytime air temperatures are 75-85 degrees. Good chile pepper varieties for our climate include Aleppo, Garden Salsa, Habanero, Jalapeno, Paprika, Padron, Poblano, and Shishito. Good bell pepper varieties for Contra Costa patio gardens are Ace, Etiuda, Flavorburst, and Orange Bell. Here’s a link to a UC ANR article on growing great peppers in Northern California: https://sonomamg.ucanr.edu/Vegetable_of_the_Month/Peppers_in_a_drought/ .
With planning, proper care, and a bit of luck, you’ll be harvesting great container tomatoes and peppers all summer!
Galls on our Apple Trees
During a routine winter pruning of 15-year-old apple trees, an unsettling discovery was made—large, brown, hard, swollen lumps clinging to the branches., Even the espaliered apple trees in the front yard were not spared. These growths appeared concerning, almost as if they were harming the trees, but removing them immediately seemed risky. Would scraping them off cause further damage?
Consulting UC Integrated Pest Management (UC IPM) for expert guidance was the best course of action.. Lo and behold, a closer look revealed the culprit: the tiny woolly apple aphid (Eriosoma langligerum). At just 1/20 of an inch, these pests are easy to overlook, especially since they hide beneath a coating of white wax. Despite their size, they can cause harm by feeding on limbs, trunks, roots, and shoots, forming colonies in bark cracks and pruning wounds.
Woolly apple aphids rarely cause serious harm to the overall health of apple trees. However, their feeding leads to unsightly swollen, warty galls on the bark. While older trees are generally less affected by this invasion, these unsightly galls can still be a nuisance.
Unfortunately, the only real solution, is pruning the damaged branches. Since the damage is considered merely an "aesthetic issue," removal isn’t essential, but for those who prefer a cleaner look, cutting away the galls is the best option. The challenge arises when the damage appears on the main limbs, making removal more difficult. Some apple varieties are less susceptible to woolly apple aphids, offering an alternative for those looking to prevent future infestations. However, switching varieties means starting the espalier process from scratch—a daunting task for any gardener.
Moving forward, a more vigilant approach will be essential. Preventive measures like horticultural oil and insecticidal soap may curb further damage and keep these pests in check. Once the trees leaf out again in the coming months, these unsightly galls may no longer be visible, but their presence will still be felt. Staying proactive is the best defense against these hidden invaders, ensuring healthier trees for seasons to come.
Gardening in a Mediterranean Climate Zone
Did you know that we live and garden in a rare and unique climatic zone? The Mediterranean climate exists in only 2% of the world’s land mass, found in just five regions: the Mediterranean Basin, Chile, South Africa, California, and Australia. Despite being spread across different continents, these areas share a strikingly similar climate—mild, rainy winters and hot, dry summers.
What makes these 5 regions even more fascinating is their location. If you look at a globe, you’ll notice that two are in the Northern Hemisphere and three are in the Southern Hemisphere, all positioned midway between the equator, and the north and south poles. Each one sits on the west or southwest coast of a continent, where cold ocean currents help regulate temperatures. Additionally, subtropical high-pressure systems dominate, preventing summer rainfall and shaping the distinct weather patterns that define Mediterranean climates.
Understanding this unique climate is key to gardening successfully in our region. So, how does it impact the way plants grow—and what does it mean for gardeners? Let’s explore.
Plants that have adapted to dry summer climates have a lot in common. Many are drought-deciduous. They drop their leaves during periods of drought to conserve water—only to sprout fresh growth when moisture returns. Take California sagebrush (Artemisia californica), for example; it loses its leaves under stress but quickly grows new leaves when water is available again. Other plants, like Purple sage (Salvia leucophylla) respond a little differently by producing different types of leaves depending on the season. California lilacs grow thick, leathery sclerophyll leaves with fewer or smaller stomata to reduce water loss. If you’ve ever walked through the native section of a nursery, you may have noticed that many of these plants have upright, grayish green, or whitish coloring, or even hairy surfaces. These adaptations are designed to reflect sunlight and minimize heat stress, allowing the plants to thrive in hot, dry conditions.
In Plant Life in the Worlds’ Mediterranean Climates (University of California Press, published for the California Native Plant Society), Peter R. Dallman describes not only the unique characteristics of Mediterranean climates but also the diverse plant life that thrives in these dry, hot summers. He highlights species from chaparral, oak woodlands, and forest plants that are all well adapted to this rare 2% of the world’s landmass we belong to.
Dallman encourages us to work with, rather than against, the natural conditions of climate, microclimates, and soils. To truly understand and appreciate our Mediterranean climate he suggests exploring local open spaces throughout the seasons. A walk through Briones Regional Park, state parks, or nearby open spaces offers a firsthand look at the resilient plants that have adapted to our Mediterranean climate—perhaps even inspiring ideas for how to incorporate them into our own landscapes.
References:
Calscape, California Native Plant Society
Mediterranean Garden by UC Master Gardener Volunteers of Contra Costa County
Plant Adaptations to Mediterranean Climates, webinar by Dawn Kooyumjian
Winter 2025
As we step into a fresh new year, let’s take a moment to celebrate the magic of gardening and how it connects us to the rhythms of nature. Each season brings its own unique gifts, and winter—often underrated—is no exception. Our winter collection of articles is here to spark your creativity, provide practical advice, and inspire you to embrace the beauty and potential of this quieter season.
So, let’s bundle up and dive into the joys of winter gardening! Discover the wonders of detaining precious rainfall to nurture your garden instead of letting it wash away. Explore how to create cozy habitats for wildlife braving the chilly months and learn how to protect our magnificent local oaks. Plus, prepare to be amazed by the hidden universe beneath our feet as plants in our sometimes messy gardens quietly work their magic, even while appearing dormant or wilted.
Feeling the winter chill and not quite ready to head outdoors? No problem! Why not try something new? Growing microgreens is a fun and easy way to bring fresh, delicious veggies to your table—and let’s be honest, it’s way more exciting than scrubbing dirt off your gardening tools!
With shorter days and longer nights, you’ve got the perfect excuse to catch up on reading. Dive into our blog for informative articles, plan a fire-safe garden for the future, or explore our website. There’s no shortage of inspiration to keep you dreaming and planning until spring arrives.
Here’s to a new year filled with growth, learning, and the joy of cultivating harmony with nature. Let’s make it our best gardening year yet!
Hedwig Van Den Broeck and Robin Mitchell, editors - Contact Us
"Anyone who thinks that gardening begins in the spring and ends in the fall is missing the best part of the whole year.
For gardening begins in January with the dream." — Josephine Nuese
Protecting Our Local Oaks
By David George
Loss of Natural Habitat
The availability of water is key to these oak varieties and is also one of their threats. They adapt to dry conditions but cannot tolerate wet soil which can cause root rot, especially in summer months. To protect them in your garden, keep irrigated water to a minimum under tree canopies (“drip lines”), remove excess soil or mulch from their root crowns, plant low-water-use landscaping under them, such as California natives and succulents, or leave the tree’s drip line area unlandscaped.
Diseases
Sudden oak death (SOD) is caused by an introduced non-native pathogen, Phytopthora ramorum. It has grabbed headlines by killing over a million oaks in large tracts throughout coastal central and northern California and has now spread to coastal Oregon also. Bay laurel trees, tanoaks, rhododendrons, and camellias are common host plants for P. ramorum (they become infected but survive), so remove those species near your oak tree and also avoid planting cultivars of these species near oaks. Don’t aid the pathogen’s spread by relocating or harvesting limbs for firewood from host trees within affected regions.
Mistletoe (Phoradendron flavescens) is a hemiparasitic plant that grows on a wide variety of host trees but primarily infects stressed oak trees in our local region. Hemiparasitic means it creates its own food through photosynthesis but obtains water and nutrients from the host tree. Over many years, this theft can cause an oak to lose vitality and eventually kill it. Mistletoe is toxic to humans, especially its berries. To combat mistletoe, make sure the oak has sufficient (but not too much) water and full sunshine. If you can reach it, periodically prune back mistletoe plants to the branch bark to slow its growth and reduce its damage, or remove the infected limb at the trunk.
Pests
Oak bark and ambrosia beetles attack oaks and certain other broadleaf trees including California buckeyes and tanbark oaks. Like fir tree borers, the adults drill small holes in the bark to lay eggs in or near a tree’s vascular system. Larvae feed on vascular tissue and eventually cut off the flow of water and nutrients to the tree. Adult beetles (dark and about the size of rice grains) chew their way out through the bark and leave more holes. Call a professional if you see sap oozing from small holes in the bark as they can treat the tree and prevent the tree from dying.
The glass-winged sharpshooter is a large leafhopper that feeds on an oak tree’s fluids and nutrients. The pest by itself does not kill oaks, but it can introduce and spread a pathogenic bacterium called Xylella fastidiosa. X. fastidiosa can cause bacterial leaf scorch in oaks. If you notice leaves that look to be scorched by heat but without a heat wave, call a professional arborist to diagnose the pathogen.
Climate Change
Is our region becoming warmer and wetter over time? Many non-native pathogens and pests thrive in warm wet climates, which creates new challenges for local oaks. In the past, frost and freezing temperatures helped kill many disease spores and pests before they could cause real damage to oaks, while dry weather retarded the spread of wet soil pathogens. As these natural defenses diminish, time will tell whether our local oaks are resilient and adaptable enough to survive. The urgency to protect our local oaks has never been greater.
Follow these links for more information about native oak tree care and threats:
How to Manage Pests in Gardens and Landscapes: Oak
https://ipm.ucanr.edu/PMG/GARDEN/PLANTS/oak.html
Oak Tree Management and Pest Resources
https://ucanr.edu/sites/gsobinfo/resources/oak_tree_management_and_pest_resources/
Search results for "Oaks" from UCANR
https://anrcatalog.ucanr.edu/Items.aspx?search=oaks
California Oak Mortality Task Force
https://www.suddenoakdeath.org/about-california-oak-mortality-task-force/
Landscaping for Fire Safety in Zone 2
by Pam Schroeder and Robin Harper
Unfortunately, living with the threat of wildfire is a fact of life for Californians. While we cannot control wildfire, we can help minimize its potential destruction by practicing fire-safe strategies that harden the landscape by reducing the vulnerability of your home and property to wildfire.
Hardening the Landscape
Creating a beautiful and functional landscape as well as a fire-protected property can be accomplished using the concept of Defensible Zones. Your property can be viewed as 3 Defensible Zones each with its own unique characteristics. Zone 0 (0-5 feet from the house) and Zone 1(5-30 feet from the house) have been covered in prior issues of “News to Grow By”. In the event you missed those articles the links are here:
Understanding Defensible Zone 0
Understanding Defensible Space Zone 1
For an illustration of all 3 zones and information on creating defensible space:
Introduction to Home Landscaping for Fire Safety
https://ucanr.edu/sites/fire/Preparedness/Landscaping/DefensibleSpace/
Zone 2, the Reduced Fuel zone
Zone 2 covers the outermost area of your property and represents the furthest reach of your responsibility. It is defined as 30-100 feet out from the buildings, structures, and decks of your home or up to your property line.
The goal is to reduce the fuel load (anything flammable) in this zone to slow down or stop the approach of a potential fire before it ever gets to your home. Fuel is anything that will burn including dead vegetation, downed branches, overgrown areas, low-hanging trees, flammable plants, furniture and wooden fencing.
Keeping this area clear of dead material, spacing plants properly, reducing density (both horizontally and vertically), and adding hardscape will help eliminate fuel load and help slow or stop a wildfire from spreading across your property.
Where to Start
Before creating an action plan for firescaping, start by familiarizing yourself with the fire codes and ordinances specific to your fire district, as these standards vary and are enforced by local authorities.
Walk your property in zone 2 from 30-100 feet out from your house, then create a strategy, and make an action plan:
Create a Strategy
Walk around your property and identify problem areas to include in your plan
- Note the sloped areas on your property (see below for more details)
- Identify plants that need to be removed
- Be aware of the dead vegetation on your property
- Identify areas that may need new or additional irrigation
Make a Plan
Create a written plan that incorporates:
- Fire-safe planting and spacing (both vertical and horizontal)
- A list of plants/trees that need to be removed on sloped areas
- Areas where annual grasses have dried out
- What fire-safe plants can replace those that are to be removed
- Where you might want to add hardscape
- Irrigation to keep plants and trees from drying out
Take Action
Time to execute your plan:
- Remove all trees, plants, and vegetation that you have identified above
- Trim up low-hanging branches and thin out overgrown trees especially where there is undergrowth on the ground
- Think about hiring an expert for help with tree removal and/or above-roof pruning of branches
- Add plants that are fire-safe to your new fire-scaping plan and plant in an island format
- Trim all annual grasses to 3 inches or down to bare soil
- Make liberal use of hardscaping (rocks, cement, gravel, rock walls, boulders, etc.)
Recognize the Impact of Slope
In a hilly area, fire will travel faster, and flames will shoot higher uphill; therefore it is important to add 10 feet of additional space between trees for every 10% increase in slope. This extra space can help keep the fire from laddering from tree to tree up the hill.
Remove Flammable Plants
Fire-prone plants are plants/trees that:
- Have leaves that are dry due to low moisture content and are small, fine, or needle-like. Examples are Cypress and Juniper
- Have natural aromatic or resinous oils. An example is rosemary which is highly flammable
Plants that produce a lot of debris increase fire danger as well. For example, eucalyptus trees have bark that is loose and papery, which creates a lot of debris making these trees very dangerous.
Mulch Strategically
Mulch plays an important role in your landscape. Besides looking good it provides many benefits including:
- water retention
- soil temperature control
- weed inhibition
- soil erosion prevention
Keep in mind that some mulches can also be a highly combustible material in your landscape. The bigger and heavier the pieces the better. But remember, with enough heat, it all burns.
Maintenance - the final element in a fire-safe landscape
Be diligent in your maintenance efforts to keep your property fire-safe.
Ongoing:
- Remove dead plants, leaves, and branches
- Remove vines from trees and fences
- Compost or remove all debris
Annually:
- Thin vegetation and remove weeds or cut weeds back to 3 inches
- Cut back woody plants
- Ensure sufficient space between shrubs, house, outbuildings, and trees
Every few years:
- Cut back vines, groundcovers
- Prune tree branches to 10’ above ground and 10” above roof
Conclusion
This concludes our series on Home Landscaping for Fire Safety. By following the series guidelines, you can dramatically reduce the risk of fire spreading, creating a safer, more resilient landscape that not only protects your home but also strengthens the safety of your entire community. Fire safety starts with you—every action you take has the power to make a life-saving difference.
More Firewise information:
About the Fire Network
https://ucanr.edu/sites/fire/Home_430/
Creating a defensible space
https://ucanr.edu/sites/fire/Preparedness/Landscaping/DefensibleSpace/
CalFire information, including creating checklists
https://readyforwildfire.org/
More information on fire-safe planting
https://ucanr.edu/sites/fire/Preparedness/Landscaping/Plant_choice/
UCANR.edu information on Mulch
UCANR Fire Network: Maintenance of Trees
Growing Microgreens
by David George
What are Microgreens?
Getting Started
Seed packets can be purchased in garden centers or online. A word of advice: buy organic (untreated) seeds and check packet expiration dates. You will need one or more shallow 1-2” growing trays with bottom holes for water drainage and absorption. Or you can use sealed hydroponic trays with a fine mesh separating seeds on top from a water basin. You will also need a spray bottle for tap water spritzes, sterilized scissors for harvest, a location with 6+ hours per day of indirect light (or a grow lamp), and a tray cover for the first week or so. Aluminum foil works well for this.
Growing Technique
Harvest time varies by plant type but generally is about 2 weeks after germination when seedlings are 2-4” tall, and starter leaves are fully formed and green. Use scissors to clip seedlings just above soil level and wrap them in paper towels (without washing them) and they’re ready to eat, but they can be refrigerated for up to a week. Compost the remaining plant material and throw out the old growing medium. Sanitize reusable trays in a dishwasher or hot soapy water.
Good Choices to Get Started
Microgreens can spice up morning eggs, salads, pasta, taco salads, spring rolls, or other entrees. They add freshness, taste, color, variety, and interest to any meal.
Link to webinar: Growing Microgreens, by Andrea Salzman
https://www.youtube.com/watch?v=QHq968jFyA0
Short video demonstration of Growing Microgreens, by Andrea Salzman (3:32 mins.)
What are Our Perennials Doing in Winter?
by Cynthia Engers
It’s clear that with the sun low in the sky, shorter days, and cooler temperatures, plant growth has slowed, almost to a stop. Most of the plants are going dormant and will be in full dormancy by January. What is going on? We know they’re not dead, but is anything happening below the soil, if not above it?
Dormancy, which in our area can also occur in summer, is a means for plants to withstand unfavorable conditions, such as drought or cold. The plants enter a period of minimal activity – most of which happens underground.
Preparation for dormancy starts well before winter arrives. When the average temperature falls and the sun moves lower in the sky, hormones such as abscisic acid trigger a slowing of photosynthesis and respiration. Plant enzymes that drive metabolism work poorly in cooler temperatures and growth stops. We all enjoy the beauty of fall color in leaves – but what we primarily see with slowed photosynthesis is the result of the absence of chlorophyll in the leaves which masks carotenoids responsible for yellow and orange colors. The slow growth of the plant also leads to excess sugars in the leaves which produce anthocyanins that create red and orange colors.
"Green, yellow, and orange colors are always present in leaves, but chlorophyll – the green pigment responsible for photosynthesis – is so dominant during most of the year that it masks out the other colors," says Igor Lacan, UC Cooperative Extension Urban Forestry Advisor.
Because plant growth has slowed, any remaining leaves producing carbohydrates via photosynthesis route the carbohydrates to the plant’s storage areas; the stem and especially the roots. These “sinks” will provide the minimal energy for the plant to get through the winter and will provide the energy to resume growth in the spring before the plant has new leaves to generate new carbohydrates and energy. Cool-season vegetable gardeners benefit from this mechanism when they harvest their carrots, beets, and radishes.
But our dormant plants are even more clever than that. Particularly needed in climates colder than ours, perennials also have mechanisms to protect themselves from freezing temperatures. Individual plant cells, especially in roots, accumulate sugars and salts which decrease the freezing point of the cells. In addition, water moves from within plant cells into the spaces around them, thus protecting the actual cells from freezing (though ice crystals may form between cells.)
Do all plants have these mechanisms to survive the winter? No, they don’t. Annuals funnel all their surplus energy into seed production rather than storing it in the roots for the upcoming season. And plants like tomatoes, which are technically perennials in tropical climates, lack the mechanisms to store sufficient salts, sugars, and certain proteins within the cells to protect them from freezing.
Winter months can actually benefit plants that require chill hours
On average, Northern California receives between 800 and 1500 chill hours each winter which is ideal for our famous fruit and nut production. On the other hand, as many home gardeners have discovered, this is not enough chill time for various other plants and bulbs, particularly hybrid tulips, which require up to 2500 chill hours. It also explains why apples, cherries, plums, and peaches grow more readily in Northern California than in Southern California.
What else is happening to our plants in the winter?
Soil microbes are especially active in the fall. However, like the perennial plants themselves, microbes living in the soil generally just slow down in winter. During winter here in Contra Costa County, the soil maintains a more constant temperature than the air and is unlikely to freeze beyond the surface, so our soil denizens can continue their work, albeit at a slower pace. In addition, organic mulch and cover crops provide a sort of blanket for the cool soil, further facilitating microbial activity.
While a complete discussion of the relationship between plant roots and organic matter is beyond the scope of this article, it is pertinent to know that many of the beneficial soil microorganisms associated with plant roots, such as bacteria and fungi, synthesize plant hormones. One of these, abscisic acid noted above, is vital for managing plant dormancy.
In conclusion, it is fair to say that, although our plants may appear inert in the winter, they are still very busy executing their life functions during this season. We just have to look a little deeper to understand how!
References:
Where do fall colors come from? - Green Blog - ANR Blogs
Home Page - Healthy Soils for a Healthy California
California Master Gardener Handbook
University of California Agriculture and Natural Resources
Dormancy: A Key to Winter Survival, University of New Hampshire Master Gardeners
Microbes in Your Soil
By Veda Scherer, University of California Cooperative Extension Master Gardener of Calaveras County
Detaining the Rain
How much of the rain that falls on your property is “just passing through?” Does it hit the roof, driveway, walkways, and other impermeable surfaces, flowing directly into the gutter storm drains and onward into the bay or the delta? Allowing this “liquid gold” to just flow away and not reap its benefits is like being offered a buffet meal and not putting anything on your plate.
This article is the third of a three-part series of articles. The goal is to convince you that enough rain falls in Contra Costa County to sustain your landscape either well into the dry season, or all the way through it, depending on where you live in the county and how much water your landscape requires.
The central theme and goals of these three articles is the following:
- Capture rainwater passively using the landscape itself as a container (“Planting the Rain: A Guide for Passive Rainwater Harvesting”, fall issue of News to Grow By.) *
- Hold onto captured water as long as possible by putting a “lid” of mulch on the landscape “container” (“The Magic of Mulch”, summer issue of News to Grow By and webinar available on our YouTube channel.) *
- Capture roof water in barrels, tanks, or cisterns for use if/when the landscape “container” is empty (“Detaining the Rain”, discussed in this article).
(*) The links to these articles and the webinar can be found at the end of this article.
The focus of this article is on capturing and storing rainwater in barrels, tanks, and cisterns. Unlike passive storage, this method requires a bit of planning, designing, purchasing components, and careful installation. It’s particularly useful for properties on a slope where water naturally runs downhill when not actively detained.
Rainwater harvesting does sound cool. But other than being cool, why should we do it? Let’s begin by addressing why we should even care about putting forth the effort to capture and store rainwater in the first place.
In the past several years we have been experiencing wild swings in our climate between drought and deluge. Furthermore, the droughts are getting longer and drier and the deluges are getting fiercer. Each end of this scale carries consequences that have us scrambling to deal with either the lack of or the overabundance of water.
Drought is a pervasive reality in California. The following graphic shows the state’s drought profile from the Drought Monitor website https://droughtmonitor.unl.edu/Maps/MapArchive.aspx
for most of this century (2001-2021). The graphics show a snapshot of the level of drought in November for each of the indicated years.
Here is a guide to the color-coding of the graphics:
Yellow: Abnormally dry
Beige: Moderate drought
Orange: Severe drought
Red: Extreme drought
Dark brown: Exceptional drought
The important thing to note is that in all but 5 years out of the first 21 years in this century (2005, 2006, 2010, 2011, 2017), California was in some level of drought. That’s 76% of the time!
That’s one end of the scale. At the other end, we have experienced bumper crops of rainfall in the past two winters, with deluge in the form of atmospheric rivers wreaking havoc by causing flooding, landslides, fallen trees, property damage, and other storm-driven consequences.
Capturing rainwater is a solution to both drought and deluge. During drought, stored water can keep our gardens alive and thriving when the drinking water supply is diminished and/or restricted. During a deluge, it helps to reduce the overwhelm of our stormwater management systems and protects against the calamities caused by floods. In both cases, rainwater harvesting reaps and stores a precious resource essential to all life.
When we’re talking about creative ways to provide water to your landscape during the dry season (generally May through October) it’s a great idea to establish just how much water your landscape needs to not only survive but to thrive. How much water does your landscape require during the dry season? It’s best to think of this number in terms of inches. Rainfall is measured in inches. Likewise, plant water requirement is measured in inches. And when we’re talking about inches of water, this pertains to any size of the area of your property. It could be a few plants or the whole property. We only need to convert to gallons once we start trapping water in containers. So let’s keep it simple and talk inches for now.
The tables below show the plant water requirement in inches per month during the dry season for representative cities in the three climatic regions of our county. The top table is for moderate-water plants, and the bottom table is for low-water plants.
Below is the amount of rainfall that these cities get historically. The data was acquired from the US climate data website https://www.usclimatedata.com/climate/california/united-states/3174.
Average annual rainfall
Richmond: 24.9 inches
Concord: 16.5 inches
Brentwood 13.2 inches
Comparing the annual rainfall with the amount of water required by the landscape, we can see that both Concord and Richmond get enough rainfall to provide for low-water and moderate-water plantings all the way through the dry season. The only shortfall above is that Brentwood’s annual rainfall comes up short by almost five inches of rain for moderate-water plantings (13.2 as opposed to 18).
Now we can start talking in gallons. One inch of rain falling on 1,000 square feet of roof will yield 620 gallons. Here is the formula for calculating rainwater yield off a roof:
Gallons of rainwater = Inches of rain x Roof square footage x 0.62
Common sizes of rain barrels range from 50 to 90 gallons. So storage space is gobbled up quickly when using rain barrels. It would take more than 12 fifty-gallon barrels to store one inch of rain from a 1,000 square-foot roof (620 gallons 50 gallons per barrel = 12.4 barrels). Slimline tanks are taller and narrower, and sit up against a building to conserve space. They hold around 200 to 300 gallons. So you would need at least two of those to store one inch of rain from a 1,000-square-foot roof.
Sometimes, water districts offer rebates on rain barrels, but currently, neither EBMUD nor Contra Costa Water District offers them. The cost of rain barrels and tanks ranges from $1 to $3 per gallon of capacity. Permits may also be required for their installation in certain cities and counties. Check with your local agency to get information on codes and regulations. If the barrel or tank requires a concrete base to sit on, or that it be strapped to a building for stability, you’ll need to factor in the cost of hiring a professional to do the work. Additionally, consider the tasks of modifying the rain gutters and downspouts, excluding debris from the storage containers, and distributing the water from the barrels to your landscape.
Given the complexity and cost of watering landscapes with rainwater captured off a roof and stored in barrels, tanks, and cisterns, I recommend prioritizing passive rainwater harvesting using the landscape itself first. This method leverages the free water that falls from the sky most efficiently. Then, if you’re so inclined, look into also providing extra water storage in the form of barrels, tanks, or cisterns. Remember, when it rains, your landscape is getting the water it requires—and much more. So that should be the container you think about first. The water is already being captured and stored in the landscape without any actions on your part. The trick is to hold onto it as long as possible. You can do that with a generous layer of mulch.
In conclusion, detaining the rain by whatever means you choose is a great idea. In times of drought, it provides water when it is being restricted or is unavailable. In times of deluge, it helps relieve the extensive damage done by torrential rainfall. In both cases, it reduces the strain on the public drinking water supply during the dry months and lowers your water bills. Below are links to extensive free information on rainwater-harvesting systems, the articles mentioned above, and more.
SF Public Utilities Commission (SFPUC) Rainwater Harvesting Manual
https://www.sfpuc.gov/sites/default/files/learning/RWH_Manual_Final-APR2018.pdf
Bay Area Stormwater Management Agencies Association (BASMAA) Rain Barrel Fact Sheet
https://www.ebmud.com/application/files/6915/8992/7018/BASMAA_Rain_Harvesting_Fact_Sheet.pdf
Newsletter article: “Planting the Rain: A Guide for Passive Rainwater Harvesting.” https://ccmg.ucanr.edu/News_to_Grow_By/?story=2816
Newsletter article: “The Magic of Mulch” https://ccmg.ucanr.edu/News_to_Grow_By/?story=2768
Webinar: “The Magic of Mulch: Water Conservation at its Best” https://www.youtube.com/watch?v=W28fWlgypwY&t=21s
A captivating 27-minute documentary on the work of Brad Lancaster, Rainwater Harvesting Guru
https://www.youtube.com/watch?v=iIYoU2PTPLk
Winter at 'Our Garden'
by Joie Spinelli
“Anyone who thinks gardening begins in the spring and ends in the fall is missing the best part of the whole year;
for gardening begins in January with a dream.” ~ Josephine Nuese
Thanks to 'Our Garden' leadership’s implementation of the nourishing composting-in-place practice these last few years, our composting crew is still able to produce close to 5 cubic yards of compost. That compost was made from shredding all the shrubbery and pollinator plants surrounding the grounds, as well as oak tree cuttings, trimmings from our productive vineyard and orchard, and the September through November harvesting of tomatoes, peppers, and brassicas.
“Don’t think the garden loses its ecstasy in winter.
It’s quiet but the roots are down there riotous.” ~ Rumi
Composting in place, especially with the designated cover crops, does create a soil sponge of activity which enriches the diverse soil microbiome, creating a deeper passage of roots, a highway for nutrient activity. All to improve soil health, enhance water infiltration, and reduce or mitigate soil compaction.
UC Master Gardener volunteer John Fike’s voice echoes all this ‘riotous’ activity beneath our feet in an online webinar where he identifies that in one teaspoon of soil, there are 4 billion bacteria, 400 million actinomycetes, millions of fungi, nematodes, and algae, all competing, interacting, recycling and enriching ‘The Soil Beneath our Feet’, alive and riotous indeed!
"Nature Does Not Hurry, Yet Everything Is Accomplished." ~ Lao Tzu
Each year, our composting efforts create an additional blanket for each garden bed when using the composting-in-place method. Compost is most effective when made from the very site to which it is applied, using the local inoculum to enhance the protective immunity provided by native microorganisms. Nature creates the compost — we simply provide the space and do the work to support it.
We always communicate with what 'Our Garden' surroundings offer each week. In mid-December, it was a leaf gathering. We filled the 2 bins with leaves from the fruit trees in the orchard and another with generous oak leaf droppings around the garden gates, a practice we repeated till year’s end. We need that carbon material year-round for composting, mulching, and enriching the ground beneath our feet.
All our demonstration gardens in West County, East County, and 'Our Garden' in Central County are masterfully led by knowledgeable UC Master Gardener volunteers of Contra Costa County with the mission to extend research-based knowledge and information on home horticulture, pest management, and sustainable landscaping practices to the residents of our community.
In seed time learn, in harvest teach, in winter enjoy. ~ William Blake
Creating a Winter Habitat for Wildlife by Providing Food and Shelter
Winter in Contra Costa County tends to be mild, but it is still important to think about supporting wildlife in our urban and suburban gardens during this season. The term “wildlife” can have different meanings, in the context of this article however, it refers to birds, bees, butterflies, reptiles, amphibians, insects, but not necessarily mammals, especially those that are considered pests. Mammals, such as squirrels, mice, rats, deer, and raccoons, thrive in our urban environments because their populations aren’t naturally controlled by their predators. Creating a habitat for that wildlife is generally not advisable as it can disrupt our gardens and communities.
With that context in mind, the primary habitat needs for winter wildlife are shelter and food. While many articles about wildlife habitat also mention water as a key element, providing water for wildlife can be problematic since it needs to be cleaned and refilled often to prevent the spread of disease. Additionally, because winter is our rainy season, water should be generally available for wildlife, unless there is a drought.
Both food and shelter are best provided through native plants, which the native wildlife have evolved with and are adapted to.
Shelter
Many insects are dormant during our winter. For example, many native bees spend the winter sheltering underground, or in dead plant material, (such as leaf-cutter bees.) https://ucanr.edu/sites/ccpestmanagement/files/237336.pdf. This is why it’s important to leave some ground bare for ground-nesting bees.
For birds, it is important to have shrubs and trees which provide shelter from both weather and predators. Evergreen, dense shrubs and trees will provide the best protection.
Food
You can provide food for wildlife with native plants, which naturally produce nectar, pollen, seeds, and fruit, rather than relying on artificial feeding stations to provide that service.
Most native plants provide food for birds, depending on their diet. Letting plants go to seed in the fall will provide food for seed-loving birds into the winter. Leaving leaves on the ground (see the article “Messy is Good for the Planet” in this newsletter), which provide habitat for various stages of insects, will be consumed by insect-eating birds. And berry-producing plants will provide food for many different birds.
The western population of the Monarch butterfly spend their winters on the California coast, and their needs during that time are not milkweed, because that is food for their caterpillars, and the butterflies should be in reproductive diapause (i.e., not producing caterpillars) when overwintering. What they need most is nectar from plants that bloom in the winter.
Native plants that provide shelter and food
Many plants native to Contra Costa County offer both food and shelter for wildlife in the winter. As discussed in the article Winter Blooms for Garden Pollinators, several shrubs and small trees can provide both shelter and food.
These include:
- Manzanita (Arctostaphylos manzanita): Their winter blossoms provide nectar for Monarch butterflies, native bumble bees, and hummingbirds; their berries are food for birds; their dense foliage provides shelter for birds.
- California Lilac (Ceanothus): winter and early spring blossoms provide pollen and nectar for bees and other insects; their berry-like fruits provide food for birds; their dense foliage provides shelter
- Toyon (Heteromeles arbutifolia): Their bright red fruits mature in fall and winter and provide food for many bird species
- Silktassel (Garrya elliptica): Coast silktassel flowers in winter and early spring, providing pollen and nectar for native bees and butterflies; later the small berry-like fruits provide food for birds and other wildlife
You can use Calscape, the web-based native plant database developed by the California Native Plant Society, to filter for plants that bloom in the winter, are wildlife-friendly, and are local to a specific area.
Resources
Winter Blooms for Garden Pollinators
https://ccmg.ucanr.edu/News_to_Grow_By/?story=2705
Plant Native Shrubs Now for Winter and Spring Bloom
https://ccmg.ucanr.edu/News_to_Grow_By/?story=2664
Winter Gardens for the Birds
https://ccmg.ucanr.edu/News_to_Grow_By/?story=2663
Creating a Wildlife Habitat
https://ccmg.ucanr.edu/News_to_Grow_By/?story=2461
California Native Bees
https://files.constantcontact.com/c2115e3d101/cf28e3ea-97b4-4111-af36-12a27317389d.pdf
Gardening for Butterflies
https://files.constantcontact.com/c2115e3d101/b67fe1b6-e9ce-428f-8602-a37a20b37052.pdf
Gardening Odds & Ends
by Susan Heckly
Bermuda buttercup (Oxalis pes-caprae) has become a tenacious and frustrating weed throughout California. From November through April, bright yellow flowers on leafless stalks and green shamrock-like leaves pop up in many of our landscapes. While it was brought from South Africa as an ornamental plant, it escaped cultivation on its route to being a chronic nuisance. It competes with other plants and is very difficult to control. In contrast, it is a rare and endangered plant in its home range.
Bermuda buttercup develops from underground bulbs that produce a single vertical stem. A loose rosette of leaves will appear at soil level after the first rain. Small, whitish bulblets develop on the stem, and new bulbs form underground. Each plant can produce about a dozen small bulbs each year that easily detach from the plant and will increase the plant’s spread quickly.
A couple of our favorite vertebrate pests (gophers and voles) consider oxalis bulbs to be a yummy food source and can spread the bulbs to new locations as they carry them back to their underground dens. Western scrub jays also relish oxalis bulbs and can be seen carrying them to new locations to plant.
Hand pulling can provide control if the entire plant is removed, including the underground rhizome and bulb. It’s difficult to find all the bulbs without sifting the soil very carefully. Repeatedly removing the tops of the plants will eventually deplete the bulb’s resources, but it can take years to be successful. It’s important to remove the tops of the plants before they flower and form new bulbs.
It is difficult to smother Bermuda buttercup with thick mulch or even weed block cloth because it is a strong plant. If cardboard covered with a thick layer of mulch is used to try to smother the weed, continued vigilance in monitoring and pulling new growth will be needed in subsequent years. In one garden, weed cloth was laid under a brick walkway. The following winter, Bermuda buttercup pushed its way up through the weed cloth between the bricks. This made removing the plants even more difficult because the plants were being held in place by the weed cloth.
Several herbicides will effectively kill the tops of the plants, but will not kill the bulbs, so regrowth will occur.
Whatever method you choose to combat a Bermuda buttercup invasion, you will need to be persistent and prepared to continue in subsequent years.
For more information about managing Bermuda buttercup, see this web page: https://ipm.ucanr.edu/PMG/PESTNOTES/pn7444.html
Read other articles on our Blog, and check the top FAQs provided by our Help Desk as well as the Checklist of Winter Gardening and Landscape Tasks
Messy is Good for the Planet
by Pamela Austin
"Every leaf speaks bliss to me, fluttering from the autumn tree." - Emily Brontë
The leaves that drop in the fall are an asset to your garden, they are helpful to insects, pollinators, invertebrates, microorganisms, and the soil.
Fallen leaves contain fifty to seventy percent of the nutrients that trees have absorbed from the earth. Why let all those valuable nutrients be hauled away? Leaves are truly a gift to gardeners—so why not put them right back to work in your landscape?
These are the ways fallen leaves benefit wildlife.
Habitat
Leaves, fallen branches, flower stems, and dried seed pods provide a habitat for insects and invertebrates. The availability of overwintering habitat is crucial in determining the survival and population levels of native bees and beneficial insects. It can also provide abundant food for songbirds, butterflies, wasps, moths, fireflies, and ground beetles. Salamanders find protection from predators and weather in leaf litter and brush piles that help the soil remain moist. Butterflies lay their eggs on fallen leaves, while hollow-cut stems offer refuge to insect larvae, pupae, or overwintering adults. Many of these insects are essential pollinators and come spring, they will be beneficial to your garden flowers. Caterpillars that hatch in the spring provide food for baby birds.
If you must tidy up your yard, gently move leaves to garden beds or around the base of trees.
Compost
Leaf mold is a soil amendment made from decomposed leaves of deciduous trees and shrubs. It is a fungal-driven decomposition process. It improves soil structure, making it easier for plant roots to access oxygen, water, and nutrients. Leaf mold is created by allowing leaves to decompose on their own, without other organic matter.
Natural “composters” such as millipedes and worms break down organic matter, in this case, fallen leaves, into its basic elements, enriching the soil. Additionally, composting boosts the activity of earthworms and other natural soil organisms that promote plant growth. These organisms surface to feed and then return to the soil, where they continue to nourish plants in the spring.
Although low in essential nitrogen, fallen leaves still contain small amounts of all the nutrients plants need and are a valuable source of soil-improving organic matter like calcium, magnesium, nitrogen, and phosphorus.
Pound for pound, the leaves of most trees contain twice as many minerals as manure. For example, the mineral content of a sugar maple leaf is over five percent and even common pine needles have two and a half percent of their weight in calcium, magnesium, nitrogen, and phosphorus, along with other trace elements.
Sending leaves to the landfill is a waste of valuable natural resources. By composting leaves instead, we can recycle these organic materials back into the environment.
Mulch
Using the leaves that fall in your garden can save you from buying mulch. Mulching suppresses weeds, retains moisture, and boosts nutrition. Roughly 70% of native bees nest in bare soil, such as digger bees and mining bees, which create burrows in exposed, sandy, or well-drained areas. Other native bees, like bumblebees, often prefer dense vegetation, where they can nest in abandoned rodent burrows or among thick grass and plant roots.
Mulch can protect the roots of your plants from the cold and shade the soil to keep plant roots cooler. Two to four inches of mulch is all you need.
Leave the leaves as they are. It isn’t necessary to chop them up in the fall as this practice risks destroying habitat for insects and eggs.
Conclusion
By supporting nature’s ecosystem, you're helping both wildlife and human communities thrive. So, sit back, relax, and let nature work its magic in your garden.
Resources
Turn Fallen Leaves into Compost
University of California Agriculture and Natural Resources
https://ucanr.edu/blogs/blogcore/postdetail.cfm?postnum=29186
Leave the Leaves to Help Pollinators
https://campusgrown.ucdavis.edu/blog/leave-leaves-help-pollinators
Permission to Leave the Leaves
https://ucanr.edu/blogs/blogcore/postdetail.cfm?postnum=60894