The Gardener's Gold: A Comprehensive Guide to Growing Potatoes on the Central Coast
The Gardener’s Gold: A Comprehensive Guide to Growing Potatoes on the Central Coast
There is a specific kind of magic in reaching into the earth and pulling out a handful of smooth, firm potatoes. Often called "underground gold," potatoes are one of the most rewarding crops for a home gardener. Whether you have an acre of land or a single fabric pot on a balcony, you can grow a harvest that puts grocery store spuds to shame.
From the Andes to Your Backyard: A Brief History
The humble potato (Solanum tuberosum) did not begin its journey in Idaho or Ireland. It was first domesticated by the Inca Indians in the high Andes of Peru and Bolivia nearly 10,000 years ago. Spanish explorers eventually brought them to Europe in the 16th century, where they were initially met with suspicion. Because they are members of the Nightshade family, many people feared they were poisonous. Today, they are a global staple and the world’s fourth-largest food crop, proving the ancient Incas were certainly ahead of their time.
The Importance of Certified Disease-Free Seed
Potatoes are prone to several soil-borne diseases that can devastate a garden for years. Late Blight—the culprit behind the Irish Potato Famine—along with Common Scab and Verticillium Wilt, are the primary threats. While it is tempting to plant a sprouted potato from your pantry, doing so is a significant risk. Grocery store potatoes are often treated with growth inhibitors and may carry latent diseases. You should always purchase Certified Disease-Free seed potatoes, which have been professionally inspected to ensure they aren't carrying pathogens into your clean garden soil.
Timing Your Harvest: Santa Cruz and Monterey
For gardeners in Santa Cruz and Monterey, the primary planting season runs from February through April. Weather permitting, St. Patick’s Day is a good date to target for planting potatoes. This spring planting takes advantage of the tail end of the rainy season and leads to a late spring or summer harvest. Because our coastal winters are so mild, many local gardeners also enjoy a second season by planting in August or early September for a holiday harvest, IF you can find seed potatoes at that time of year.
What Potatoes Crave: Soil and pH
Potatoes are "heavy feeders" that are a bit picky about their environment. They require loose, well-draining soil to expand freely. If your soil is heavy clay, the tubers will likely be misshapen or prone to rot. They also prefer a slightly acidic pH between 5.0 and 6.0. This acidity is a natural defense, as it helps prevent the development of Scab, a disease that causes unsightly rough patches on the skin.
California Sources for Seed Potatoes
If you are looking for high-quality seed in the Golden State, you have excellent options. Peaceful Valley Farm & Garden Supply in Grass Valley is a premier source for organic varieties. Locally, the San Lorenzo Garden Center and other independent nurseries in Santa Cruz and Monterey counties typically stock certified seed potatoes starting in mid-winter.
The Pre-Game: Chitting and Rotation
Before you plant, you can "chit" your potatoes by placing them in a cool, bright spot with the "eyes" facing up for two to four weeks. This encourages sturdy green sprouts that give the plants a head start. Equally important is crop rotation. You should never plant potatoes in the same spot where you recently grew tomatoes, peppers, or eggplants, as these relatives share the same pests. A three-to-four-year rotation cycle is the best way to keep your soil healthy and productive.
Deep Dive: Mastering the Container Method
Growing in containers is the ultimate "hack" for California gardeners dealing with limited space, heavy clay, or invasive gophers. The most popular choice for this is the fabric grow bag (10 to 15 gallons). Fabric bags are superior because they provide excellent drainage and "air-prune" the roots, preventing the plant from becoming root-bound.
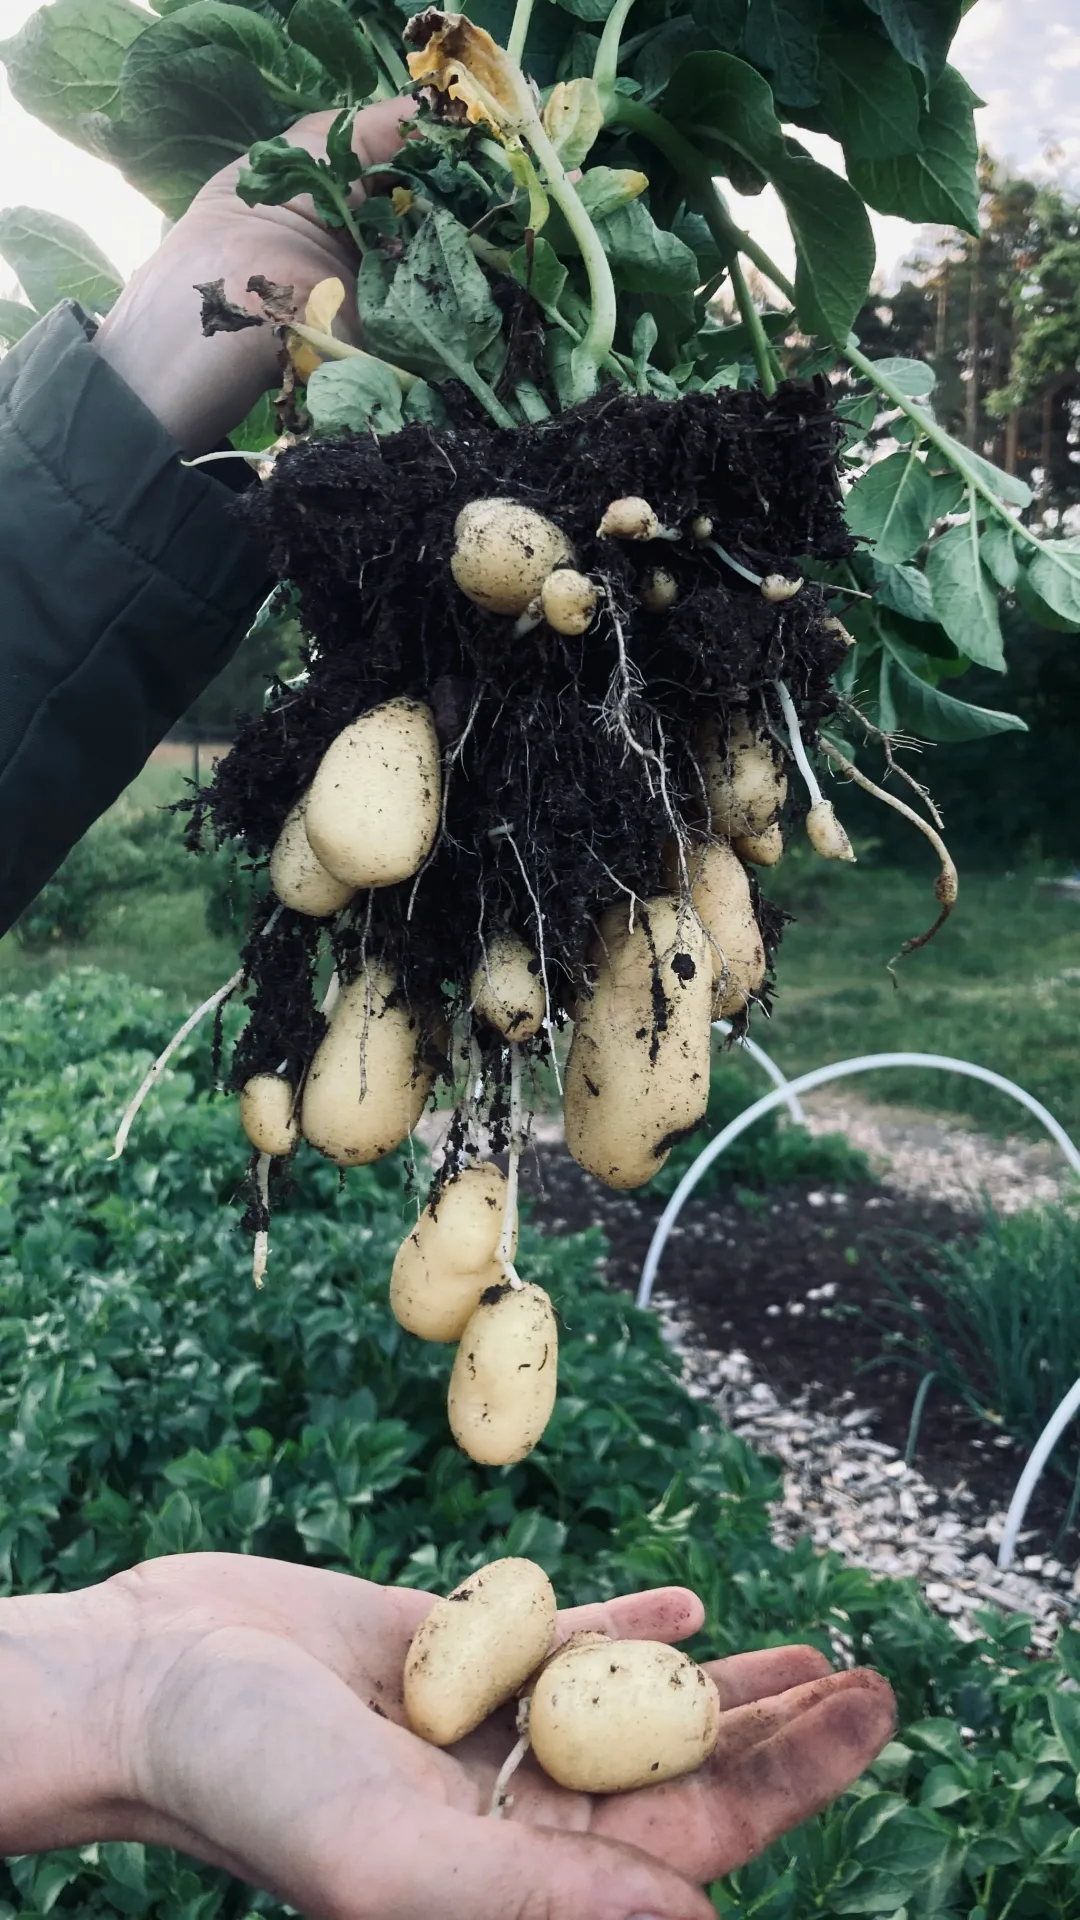
The process begins with just four to six inches of high-quality potting mix enriched with compost at the bottom of the container. Place two or three seed potatoes on the soil surface and cover them with another three inches of soil and water. As the green leafy stems grow upward, you continue to add soil—a process called hilling—until the soil reaches the top of the container. This technique forces the plant to grow more tubers along the buried stem. When it’s time to harvest just tip the bag over on it’s side.
Planting Alternatives: Trenches and Straw
For those with traditional garden plots, the trench method remains the standard. You dig a trench six inches deep, place the seeds twelve inches apart, and cover them with three inches of soil. Much like the container method, you must hill more soil around the stem as the plant grows to ensure the developing tubers are never exposed to sunlight, which turns them green and toxic.
If you prefer an even cleaner harvest, planting in straw is a fantastic alternative. Simply place the seeds on top of loosened soil and cover them with six to eight inches of clean, weed-free straw. The tubers grow right in the straw, staying clean and remaining very easy to grab by hand once they reach maturity. Make sure you keep them watered.
Care and Feeding: Water and Fertilizer
Consistent moisture is the secret to a high yield. Container-grown potatoes dry out much faster than those in the ground, so you may need to water them more frequently during our dry California summers. Keep the soil damp but never soggy, especially when the plant begins flowering. Use a balanced organic fertilizer at the time of planting. Avoid high-nitrogen fertilizers late in the season, as they produce massive leaves but tiny potatoes. Instead, focus on fertilizers higher in Phosphorus and Potassium.
Harvesting, Curing, and Storage
New potatoes can be harvested two to three weeks after the plant finishes flowering. For storage potatoes, wait until the foliage has completely died back and turned brown, then leave them in the ground for another two weeks to allow the skins to toughen up.
After digging them up, brush off the loose dirt and let them cure in a dark, well-ventilated area for about ten days. For long-term storage, move them to a dark, cool spot around 40°F. Never store potatoes in the refrigerator, as the cold turns the starch into sugar, which ruins the flavor.
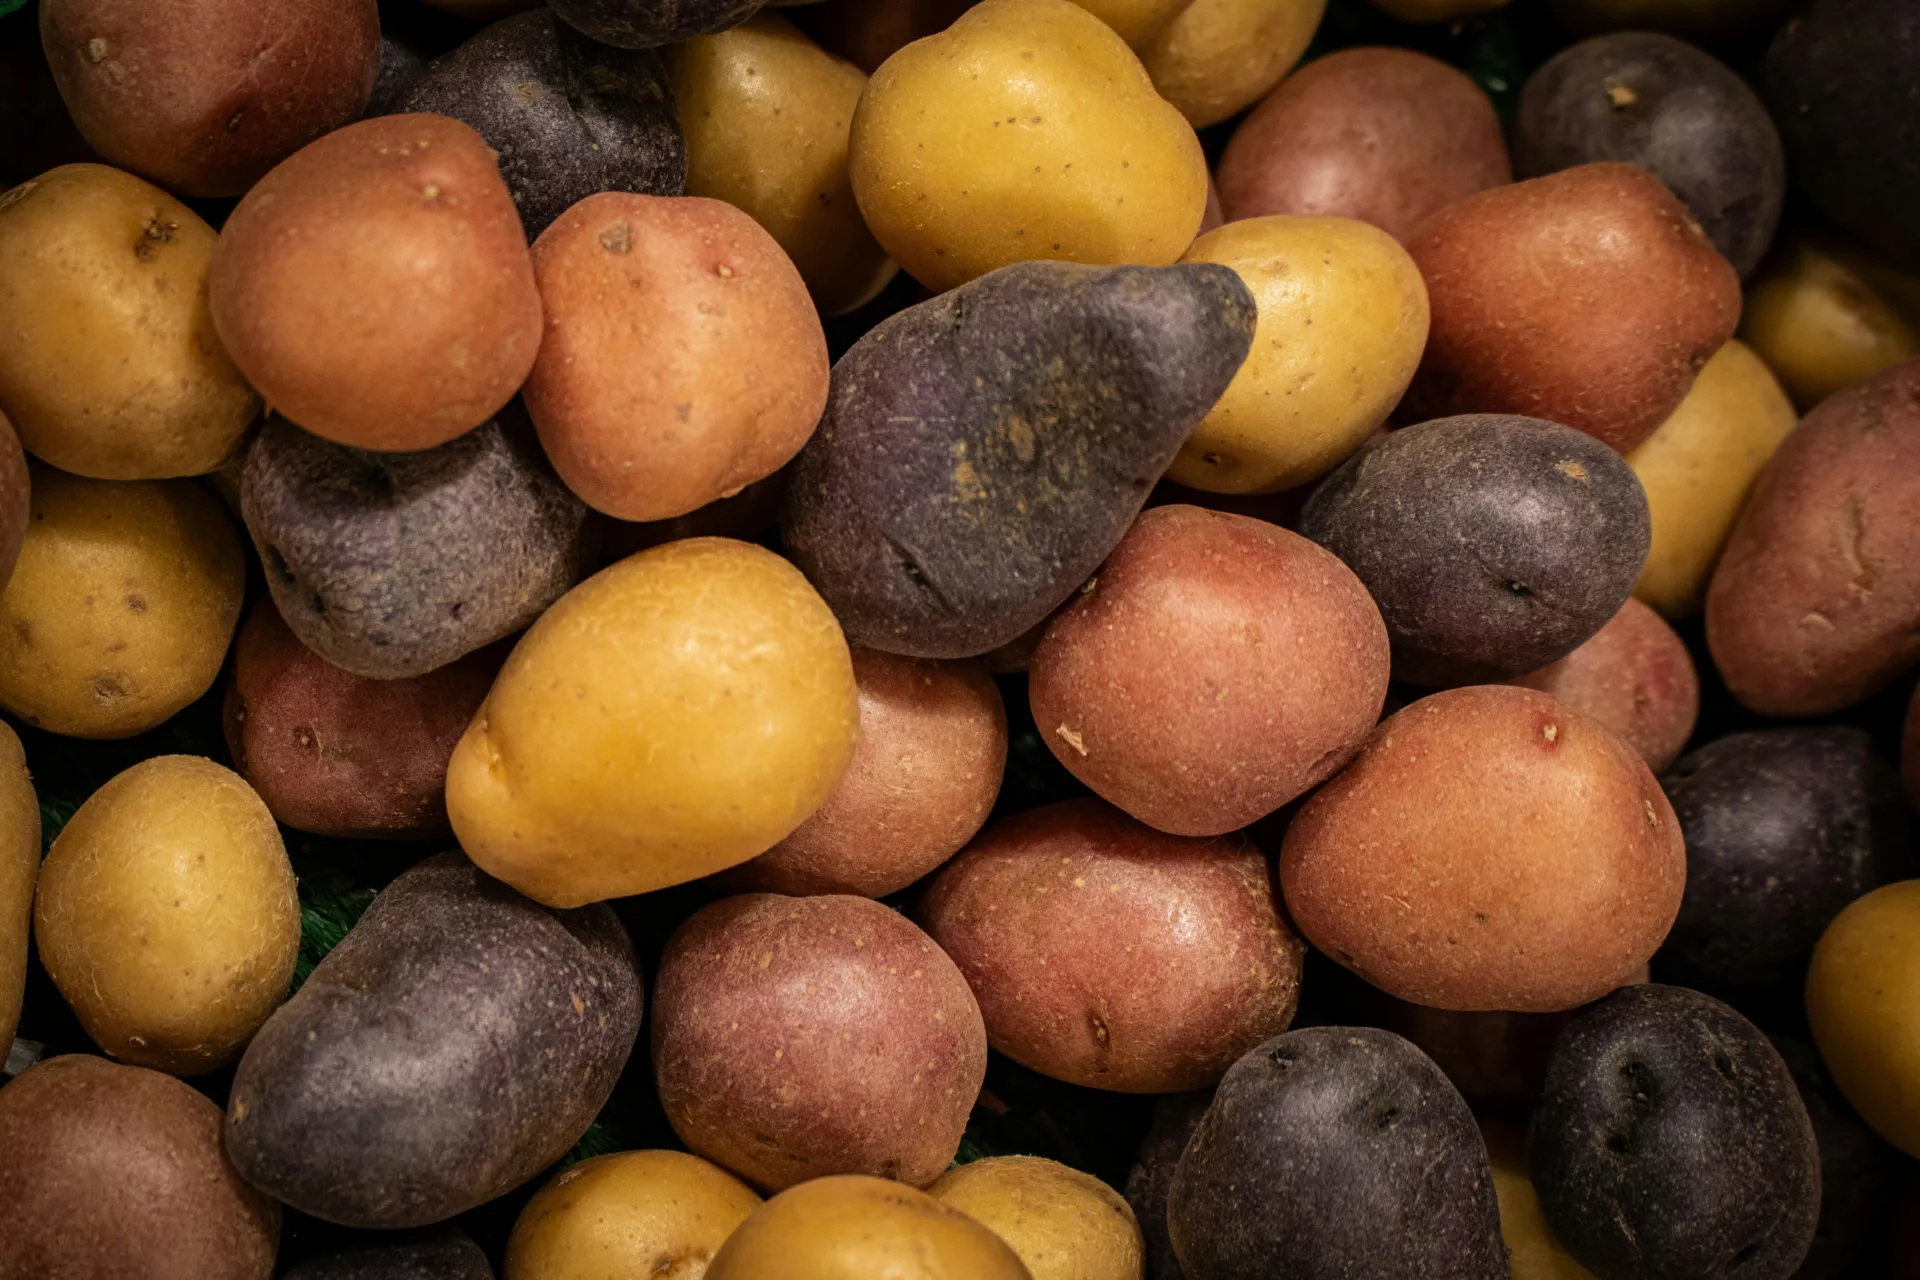
A Rainbow of Potatoes: Varieties and Qualities
- Russet: Classic starchy potatoes with rough brown skin. Best for baking, mashing, and making crispy fries.
- Yellow (Yukon Gold): All-purpose heroes with a naturally buttery flavor. Versatile enough for roasting or smashing.
- White: These have thin, delicate skins and hold their shape remarkably well, making them excellent for potato salads.
- Red (Red Pontiac): Waxy potatoes with low starch. Their firm texture means they won't fall apart in soups.
- Purple and Blue: Packed with antioxidants, these have an earthy, nutty flavor and vibrant color.
- Fingerling: Small, elongated potatoes prized for their firm, waxy texture and complex flavor.
In the Kitchen: Three Must-Try Recipes
1. Old-Fashioned Chocolate Potato Cake
Using mashed potatoes in a cake might sound strange, but it achieves an incredibly moist, dense crumb.
The Method: Cream 1 cup butter and 2 cups sugar. Add 4 eggs, then fold in 1 cup of cold, unseasoned mashed potatoes and 2 squares of melted unsweetened chocolate. Sift in 2 cups flour, 2 tsp baking powder, and 1 tsp cinnamon, alternating with 1/2 cup milk. Bake at 350°F for 45–50 minutes.
2. Fermented "Probiotic" Potato Fries
Fermenting potatoes creates a complex, sourdough-like tang and reduces sugars for a crispier fry.
The Method: Slice potatoes into fries and submerge in a 2% salt brine (1 tbsp sea salt per 4 cups water). Let sit at room temperature for 2–3 days. Drain, pat dry, and fry.
3. Creamy Avocado & Green Goddess Potato Salad
This vegan recipe replaces heavy mayo with the healthy fats of California avocados, creating a rich, silky dressing that pairs perfectly with home-grown Red or White potatoes.
The Method: Boil 2 lbs of cubed waxy potatoes until tender and let them cool. In a blender, combine 1 ripe avocado, 1/4 cup olive oil, the juice of 2 limes, 1 clove of garlic, and a large handful of fresh cilantro and parsley. Blend until smooth and creamy. Toss the cooled potatoes with the dressing and fold in extra diced avocado, halved cherry tomatoes, and sliced green onions for a bright, nutrient-dense summer side.