Media
Media refers to any image, document, or video. Images and documents can be uploaded to Drupal. Images can be displayed in various ways on your site. Documents can be linked to and downloaded and viewed by visitors. Streaming videos, such as videos on YouTube, can be referenced. All these media files are in what is called the "Media Library".
The media library provides the ability to reuse a single image across multiple locations. Should you need to update or replace the media, you can now go directly to the entity in your Media Library, replace that one file, and have it update every location where that piece of media is being used.
Currently, the media file types that can be used:
- Images: png, gif, jpg, jpeg
- SVG: svg
- Documents: txt, rtf, doc, docx, ppt, pptx, xls, xlsx, pdf, odf, odg, odp, ods, odt, fodt, fods, fodp, fodg, key, numbers, pages, zip
- Remote Video: Example, links from YouTube or Vimeo
Public Media
Public Media refers to shared assets, such as hero images or logos, provided by Strategic Communications. These can be used by any UC ANR group to maintain visual consistency. Public Media is accessible to all users, simplifying content alignment across groups.
Permissions and Visibility
- Group-Specific Media: Content added within the group and limited to the group only.
- Public Media: Accessible UC ANR-wide, available across all groups.
Permissions for adding or editing media are determined by user roles.
Two Methods Adding/Editing Media
There are two methods to add media to your group:
- Media Tab
- Adding within Content Types
Adding Media Library from a Group
- Login to IWP and click My Accoun
- Choose the group you want to add media.
- On the group page, click Media at the top.

- Click Add New Media to select the media type (e.g., document, image, remote video).
- Once you’ve filled in the required fields, click Save to confirm.
Adding Media Library within Content
To add images, documents, or videos within any content type or group content editor in Drupal, use the following steps to insert media:
- Position your cursor in the editor where you want the media.
- Click on the Insert Media icon in the toolbar. This opens the Media Library, allowing you to browse existing media or upload new items.

- Choose the type of media you want to upload (e.g., image, document, remote video).
- Click Choose File to upload from your computer
- Enter a required
- Complete any additional fields, such as alternate text for accessibility, and apply relevant tags to help organize the media.
- In the Media Library, choose the desired media item (image, document, or video) by clicking on it. A blue bounding box and a check mark will appear around the selected item.
- Click Insert Selected to place it within the content at the cursor's position.
- Once configured, confirm the settings, and the media will appear where your cursor was positioned in the content editor.
- If you’ve uploaded new media, it will also appear under the Media tab for future use after saving your changes.
Media Types
Documents/Images/SVG
For documents and images:
- Click Choose File to select a file from your computer.
- Enter a name (required) to help editors search for it in the Media Library.
- Media item will be added to your Group’s Media Library.
- Check Published if you want the file accessible to visitors.
Documents: This document had two fields: title and description(body).
Images/SVG: These media types has two fields: title and alt text.
Remote Video
For externally managed videos:
- Enter the full URL from the video service in the required field.
- Ensure Published is checked to allow visitor access.
Setting Focal Point
The Focal Point informs Drupal that a specific part of the image is most important. There can only be one focal point can be updated later when editing the media item.
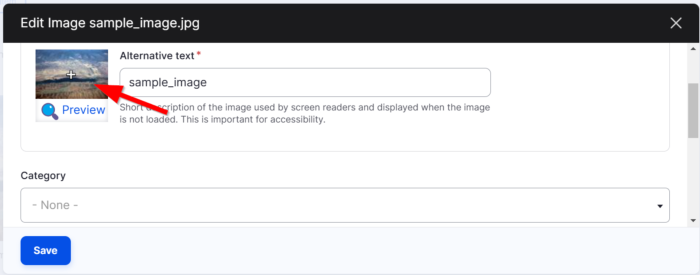
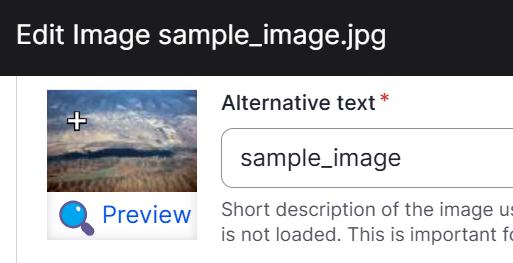
- After selecting an image, a crosshair (focal point) appears in the center, indicating the primary focus of the image for cropping and scaling.

- Click or Drag the crosshair to the desired focal area to ensure the most important part of the image remains visible when cropped or resized.

- Click the Preview link, to see how the image will look at various sizes (e.g., Hero, Card, Large Square 480x480).

Editing Media on Content Editor
- To edit the properties of an existing image, first click on the image in the WYSIWYG to activate the image properties menu
- The Image Properties bar will float above or below the image and include the following property setting options:

- Add a Caption: Add a caption below the image, which will display with a blue line underneath.
- Enter a Link URL: Add a link URL if you want the media to be clickable.
- Edit Alternate Text: Ensure accessibility by providing or overriding alternate text for screen readers.
- Assign Category: Classify the media within categories, like "Heroes," "Library," or "Logos."
- Set Image Size: Adjust image size from options like default, extra large, extra small, large, medium, or small.
- Change Alignment: Adjust image alignment to Left, Right, Center, or Justified. Left or Right alignment will wrap text around the image.
- By default, the Caption checkbox won't be set. So use the Edit media option to enable it. Once enabled, you can choose to edit it from the regular content View. Please note your caption changes on the page will not affect the original caption saved in your Media Library.
Using Media Library within Content
To insert images, documents, or videos within any content type or group content editor in Drupal, use the following steps to access the Media Browser and select or upload new media:
- Position your cursor in the editor where you want the media.
- Click on the Media Browser icon in the toolbar. This opens the Media Library, allowing you to browse existing media or upload new items.
- Locate media by entering its name or description in the search bar. Use tags like "Heroes," "Library," or "Logos" to organize media and the sort feature.

- In the Media Library, choose the desired media item (image, document, or video) by clicking on it. A blue bounding box and a check mark will appear around the selected item.
- Click Insert Selected to place it within the content at the cursor's position.
- Once configured, confirm the settings, and the media will appear where your cursor was positioned in the content editor.
- If you’ve uploaded new media, it will also appear under the Media tab for future use after saving your changes.
Using Media Tab for An Embedded Link
To embed an image or document link directly from the Media Library into the content editor, follow these steps:
- Go to the Media tab on your group's page.
- Locate the media item you wish to embed and click Edit to open its editing page.
- On the editing page, click the Title of the media item. The title should appear underlined, indicating it’s a clickable link. This will open the media item in a new browser tab or window.
- In the new tab or window, copy the URL path of the media item.
- Then navigate to the content and content editor that you would like to embed your media in.
- Position the cursor where you want to place the embedded media and paste the link.
- Then save the content to confirm your changes.
Renaming Media
To rename a media item, follow these steps:
Via the Media Tab:
- Navigate to the Media tab in your group.
- Locate the media item and click on it to access the Edit
- Click on the Rename option to update the file name.
- Enter the new name and save your changes.
Via Content Editor:
- In the content editor, click on the media item to open Image Properties.
- Select the Edit link in the properties bar. This will open the media item in a new tab with its Edit
- Click Rename and update the file name as needed.
- Save your changes to confirm.
Replacing and Updating Media

To edit an existing media item in your group:
- Navigate to the Media tab on the group page.
- Click on the Media tab at the top of the group page to view all available media items.
- Locate the media item you want to edit, and click on it to open the editing interface.
- Choose a new file to overwrite the current one by clicking
- After removing the old file, click the Choose File button to upload a new media file.
- Once all changes are complete, click Save to confirm the updates.
Important: When replacing media, ensure the file type remains consistent (e.g., .pdf to .pdf).
Before replacing, verify the group associations in the sidebar to see which groups use the media.
Adding a Primary Image to Content

Primary images are prominent visual elements for specific content types.
- Within content editing, locate the Primary Image
- Choose an image from your device or select from the Media Library.
- Add descriptive text for accessibility and SEO.
- When ready, click Save to publish the image.
Viewing Media Group Associations
Each media item in the Media Library can be associated with multiple groups, and you can view these associations directly on the media’s edit page.
To check which groups a media item belongs to:
- Go to the Media tab on the group page.
- Locate the media item you’re interested in, then click on it to open its Edit
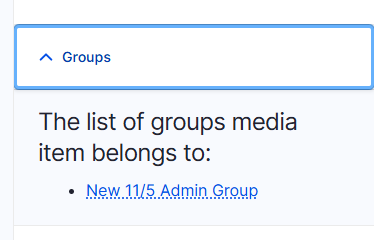
- On the Edit page sidebar, look for the section titled “Groups”.
- It will display: "The list of groups media item belongs to:" with group links

- Each group associated with the media item will be listed as a link in this section.
- Click on any group link to navigate directly to that group's page.
Deleting a Media
Before deleting a media item, verify its group associations to ensure it is not actively used elsewhere. If the media is still in use, it is recommended to unpublish it rather than delete it.
- Navigate to the Media tab on the group page.
- Select the media item to delete and confirm changes by clicking Save.


