By Mahina Gannet and Jeanette Alosi, Butte County Master Gardeners, May 31, 2013
If you plan to travel this summer, now might be a good time to install an automatic watering system. Doing so can ensure that your plants will not be under-watered or over-watered in your absence.
An effective irrigation system will supply the right amount of water to each plant resulting in water savings and more healthy plants. It will reduce weeds and help prevent pest and disease problems from occurring.
Drip irrigation is the tool that can help you minimize water wastage and maximize water’s benefits to your garden. Drip watering is the frequent, slow application of water to soil through emitters or micro-sprinklers. Drip irrigation works well for vegetable gardens, ornamental and fruit trees, shrubs, vines, and outdoor container plants. Even without an automatic sprinkler system installed, a drip system can be set up using a standard garden hose attached to the main drip line.
Installation of a basic, simple drip system is quite straightforward, and easily within the grasp of most home gardeners. It goes together much like a tubular erector set, all snapping together. Main one-half-inch (1/2”) or five-eighths inch (5/8”) polyethylene tubing line connects to your water source (if you’re on well water, you need a filter on the water source). Drip emitters, microsprinklers, or ¼” spaghetti tubing with emitters can be installed off the main line using barbed connector fittings that poke into the main lines. Solid spaghetti tubing can also be attached to the main line with an emitter attached at the other end to provide water directly to the plant. Alternatively, main line poly tubing can be purchased with in-line emitters pre-installed inside the tubing. Both the main poly tubing line or the in-line emitter tubing can be snaked through your beds or circled around shrubs and trees to deliver water directly to your plants.
With a drip irrigation system in place, water will be delivered a) directly to the plants of your choice and b) directly to the roots of those plants. These two simple factors can lead to fewer unwanted weeds in the garden and help reduce plant diseases.
The second consideration for smart watering is consistency. An automatic watering system is extremely consistent because it runs on a set schedule.
The timing and amount of water you deliver depends on the plants to be watered and the soil type. Depending upon your soil’s density, water will move quickly or slowly through it. For example, water poured through sand will move very quickly because sand is loose rather than dense or compact. But water poured through clay will trickle very slowly. Consider the plant’s whole root structure within your particular type of soil. An effective water system will deliver water to the entire root structure. The goal is to water for deep, strong roots that that aren’t waterlogged.
This is where math becomes useful. Drip irrigation emitters release a certain amount of water per hour. You can calculate how much water you are delivering by employing simple multiplication and division; with that number, you can decide how long you need to run your irrigation. Decide on the amount of water required by the plants each watering cycle, calculate the amount of time needed to deliver that amount (gallons per hour per emitter x total number of hours = total gallons per emitter) and water for that amount of time.
Watering is an active relationship that requires constant adjustments. You may need to tinker with your system to make seasonal changes, fix broken pieces, and make adjustments for better efficiency.
While drip irrigation is a good way to achieve efficient watering, it is not absolutely necessary. What is necessary is analyzing your own plants and determining how to best meet their needs given your personal situation. If you are a gardener who travels frequently, implementing a reliable automatic watering system will reassure you that your plants will remain happy, well watered, and growing until you return.
A very helpful publication on this subject is the University of California Agriculture and Natural Resources (UC ANR) Publication 21579, “Drip Irrigation in the Home Landscape.”
By Michael-Anne Foley, Butte County Master Gardener, May 17, 2013

The two primary climate zone maps used in the United States are the USDA plant hardiness zones and the Sunset zone guide. Most (but not all) mail-order plant catalogs indicate the appropriate USDA zones for their plants, while many nurseries in the West use the Sunset system. Since nurseries often source at least some of their plants from big commercial growers, at the same nursery you might find some plants labeled with their USDA hardiness zones, and others labeled with their Sunset zones. It is not surprising, then, that people often find the whole subject of plant-appropriate climate zones confusing.
The USDA plant hardiness map divides North America into 11 hardiness zones. Zone 1 is the coldest; zone 11 is the warmest. When you order plants from catalogs or read general garden books, you need to know your USDA zone in order to be able to interpret references correctly.
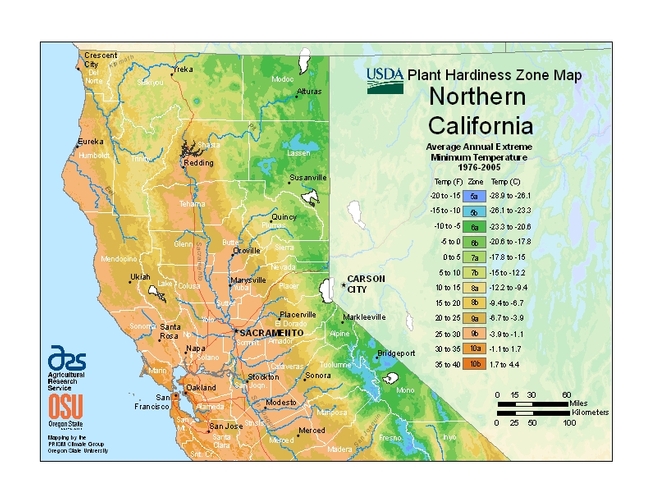
The 2012 USDA Plant Hardiness Zone Map compiled by the USDA and Oregon State University is based on the annual average minimum winter temperature over a 30-year period, and is divided into zones of 10 degrees each, further sub-divided into “a” and “b” zones of 5 degrees. Since 1990, the zone boundaries have shifted in many areas. Zones on this new 2012 map are generally 5 degrees Fahrenheit (a half zone) warmer than those indicated on the previous map. This data was accumulated over the 30-year period before 2005; the new zone map based on this information was released in January of 2012.
Now, for the first time, the USDA map is available as an interactive GIS-based map, for which a broadband Internet connection is recommended, and also as static images for those with slower Internet access. Users may also simply type in a ZIP Code and find the hardiness zone for that area. For example, using the USDA Hardiness Zone map, Chico, Oroville and Paradise are all located within Zone 9a (minimum winter temperatures of 20-25 degrees Fahrenheit). Although this is a useful plant hardiness index it has some important drawbacks: for example, it puts the Olympic rain forest into a zone with parts of the Sonoran Desert.
Gardeners in the western United States are sometimes confused when confronted with these 11 Hardiness Zones created by the USDA. A more useful index is the 24-zone climate system published in the Sunset Western Garden Book in collaboration with the University of California. The Sunset climate zone map for gardening was devised in the mid-20th century for thirteen western states. It has been expanded to include areas across the U.S., providing a more useful alternative to the USDA zone system.
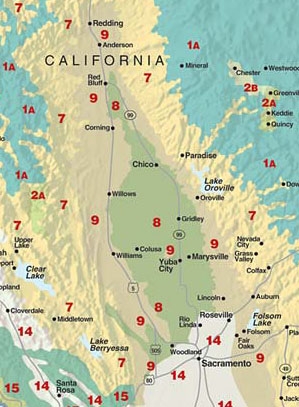
The greater precision of the Sunset system is evident in our local area: Chico is in Sunset zone 8, Paradise is in Sunset zone 7, and Oroville is in Sunset zone 9. Because the Sunset zone maps are more precise than the USDA’s, they are considered the standard references for gardeners in the West. So, when you purchase plants for your zone, be sure you are using the right zone map! Sunset’s zones 7 and 8 are much warmer than the USDA zones 7 and 8; mixing up the systems might well result in planting the wrong plant in the wrong place.
And keep in mind that even within a city, a neighborhood, or a street, microclimates can affect how plants grow. For example, planting tender citrus against a wall that absorbs daytime heat places it in a micro-climate that is warmer than a more exposed area. The zones are a guide and a good starting point, but you still need to determine for yourself what will and won't work in your garden.
Resources:
http://planthardiness.ars.usda.gov/PHZMWeb/
http://www.sunset.com/garden/climate-zones/sunset-climate-zone-northern-california-00418000067169/
http://ucanr.edu/sites/gardenweb/Your_Climate_Zone/
By Ken Hodge, Randy Swett, and Eve Werner, Butte County Master Gardeners, May 3, 2013

If you haven’t grown tomatoes before, the best way to start is to narrow down the possibilities by determining the uses for your tomatoes: slicing tomatoes are used on sandwiches and hamburgers; small, sweet cherry-sized tomatoes are perfect for salads and immediate gratification right off the vine; spicier-tasting tomatoes add a kick to salsa; paste tomatoes are best for canning and cooking because they have fewer seeds and less juice; and some varieties are well-suited for sun-drying.
Good slicing tomatoes that do well in our climate include the Beaverlodge Slicer, Aussie, Dinner Plate, Giant Belgium, Aunt Ginney's Purple, Marianna' Peace, Good Old Fashion Red, Momotaro, and Rainbow. Cherry tomatoes include Sugar Lump, Isis Candy, Sun Gold, Black Cherry and White Currant, in addition to the more commonly sold (but nonetheless delicious) Sweet Million and Hundred Million. La Roma & San Marzano make great salsa & are good for shish kebabs. Amish Paste, Costoluto Genovese, San Marzano Ridorta and Red Pear make excellent tomato sauce. Some of the lesser known, interesting & tasty large tomatoes are Pineapple, Marianna's Peace, Kellogg's Breakfast & Brandywine. Pachino & Princepe Borghese are good for making sun-dried tomatoes.
Another characteristic that may influence your choice of tomato plants is whether they are determinate or indeterminate. A determinate tomato plant stops growing when it sets fruit. Their compact size and bushy growth make determinate tomatoes good choices for containers & small space gardening. And if you plan on canning or freezing tomatoes for later use, determinates will be most convenient because they ripen all their fruit at once in a relatively short period. Good examples of determinate tomatoes are La Roma and Beaverlodge Slicer.
Indeterminate tomato varieties (also known as “vining” tomatoes) grow, bloom, and produce fruit continuously until killed by frost, providing a steady supply of ripe fruit throughout the season. With indeterminate tomatoes you will see blossoms, green tomatoes, and ripe tomatoes commingling on a single plant. Indeterminate varieties grow big – six to ten feet tall in the Sacramento Valley. For example, the aforementioned White Currant cherry tomato grows rapidly and spreads extensively in ideal (sunny) conditions. But indeterminate plants can be pruned and staked or caged to control their size and shape. Sturdy supports with wire mesh cylinders or panels will promote healthy growth and reduce damage from pests and sunburn. Don’t prune a determinate tomato much or your harvest will be reduced.
Most tomatoes are indeterminate, especially the interesting heirloom tomatoes which have become more available in the past few years. The strict lines between determinate and indeterminate may become looser with advances in plant breeding (just as the distinctions between floribunda and hybrid tea roses have become less defined). For example, Celebrity is considered a semi-determinate tomato, because it ripens over a broader season than true determinate tomatoes.
There are many tomato varieties to choose from: selecting tomatoes best suited to your eating plans will enhance your gardening (and dining) experience.
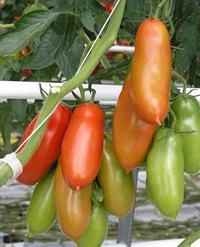
Photo: San Marzano Tomatoes
By Cindy Weiner, Butte County Master Gardener, April 12, 2013
Have you ever felt overwhelmed by the selection of plants at the nursery? Or bought a plant that looked great at the nursery, but did poorly (or died) in your yard? Spring is here and it’s tempting to rush out and buy new plants for the garden. But don’t be too hasty! Choosing the right plant for a particular location requires some homework. The time you spend beforehand will pay off by greatly reducing plant "failures."
First, consider the function you want the plant to perform in the garden. Do you want it to provide shade or act as a windbreak or hedge? Will it be a focal point? Would you like colorful flowers? These decisions help narrow your choices at the nursery.
Next, consider the environment of the site. Many factors in your yard affect how a plant grows. Is the soil heavy or does it drain quickly? Is the site in full sun or shaded? Does it get blazing afternoon sun? Is it exposed to reflected heat from a patio or wall? How much water will it get from existing (or planned) irrigation?
When selecting a plant, carefully consider the specifics of the site. Look at the plants growing nearby and think about how you want the new plant to blend in, in terms of size, color and texture. Will the plant be under power lines or by a fence or pool? These elements can affect your plant choice. Tall shrubs or small trees planted under power lines will require frequent pruning. A large plant can grow into your neighbor's space or drop litter into a pool.
After thoroughly analyzing the planting site, think about the characteristics of the desired plant. Do you want a tree, a shrub, a low-growing perennial, or simply annual color? Evergreen or deciduous? What height and width should it be at maturity? You don't want it to outgrow the available space. What water requirements should it have to match the surrounding plants? It's much easier to plan appropriate irrigation to keep plants healthy if plants growing in the same area have the same water needs.
There will still be a large number of possible choices, so you'll need to narrow your selection more. Consider choosing natives or other plants with lower water needs, since they are well adapted to our climate, and many attract beneficial insects. Talk to your neighbors, and look at their garden successes. Call the Master Gardener hotline for advice (530-538-7201.) Visit a nursery to look at their plants, examine the labels, and ask employees for suggestions. The labels have information about eventual plant size and temperature tolerances.
Check to make sure the plant is suitable for our climate. Choose plants appropriate for your USDA Hardiness Zone (these are based on winter minimum temperatures in an area) OR refer to the Sunset Western Garden Book's plant climate zones, which also take other factors, such as heat, humidity, wind, and length of the growing season, into consideration. In Sunset's system, Paradise is in Zone 7, Chico and the valley floor are in Zone 8, and the Oroville foothills are in Zone 9. There are gardening books and online sources with good plant suggestions for these zones. The Sunset Western Garden Book describes 9000 plants that grow in the West and also has lists of appropriate plants for specific situations. The UC Davis Arboretum publishes a list of 100 Arboretum All-Stars, easy-to-grow plants that do well in our valley climate. Arboretum All-Stars can be found at:
http://arboretum.ucdavis.edu/arboretum_all_stars.aspx
Doing your homework to choose the right plant will improve survival and make your plant selections more satisfying.
By Jeanette Alosi, Butte County Master Gardener. March 15, 2013

Scales are insects that suck plant fluids by inserting a tiny straw-like mouthpart into various parts of a plant. Scales are very small, and when they are doing their damage (in the larval stage) they are wingless and have no distinguishable body parts. Unlike aphids, for example, scales are slow moving or immobile.
The damage of a scale infestation depends upon the type of scale, the species of plant, environmental factors, and the proximity and numbers of natural enemies.
The two common scale families are soft and armored scales. Soft scales may be smooth, cottony, or waxy. They are usually about one-eighth to one-quarter-inch in diameter, and round to oval in shape. They feed on fluid-conducting phloem plant tissue and excrete honeydew. Common soft scales are black scale, brown soft scale, cottony cushion scale, and European fruit lecanium scale.
Armored scales are tinier than soft scales (less than one-eighth-inch) with a flattened, removable scale cover. They do not excrete honeydew. Common armored scales include California red scale (on citrus) and San Jose scale.
There are many other species of scales and scale look-alikes. It is important to identify the scale family in order to determine the most effective control methods.
Most female scales produce eggs without mating. The eggs hatch into crawlers (also known as first instar nymphs). Crawlers, about the size of a typed period, are usually pale yellow to orange. After a few days, they establish themselves on a nearby feeding site and rarely move again. Once they become firmly attached to a feeding site, scales will grow through several larval stages during their lifetime (although their appearance will not radically change) before becoming adults. Most soft scales produce one generation a year. Armored scales produce several generations a year.
Scale damage is dependent upon the level of infestation. In addition to yellowing leaves, plants affected by scales may experience premature leaf drop and discolored blemishes on fruit, leaves or twigs. If heavily infested with armored scales, twig dieback may also occur. The main problem with soft scales is the secretion of sugary honeydew which attracts ants and encourages the growth of black sooty mold. Soft scales rarely kill trees and shrubs but can reduce plant vigor, while recurrent infestations of armored scales can cause twig and branch dieback.
In most cases, scales are controlled by natural enemies, especially parasitic wasps. A parasitized scale will appear darker than normal. Other natural enemies include lady beetles (“lady bugs”), lacewings and mites. Because ants feed on the honeydew secreted by scales, they will protect the scales from their natural enemies. Controlling ants will therefore help to decrease the scale population. Beware of using broad-based insecticides because they kill beneficial insects and scale parasites indiscriminately, as well as the scales and ants.
Cultural practices to control scales include pruning to improve air movement and light penetration into dense canopies, and selection of plants that are less prone to scale infestation. Because scales tend to be host-specific, replace problem plants with plants less attractive to scales. Planting flowering plants near scale infestations will aid in attracting natural enemies.
For limited scale infestations, prune out heavily infested branches. Pruning to open up the tree canopy will expose scales to the hot sun, increasing their mortality.
Heavy infestations may require the use of horticultural oil during the dormant season or when the crawlers (nymphs) are active during the growing season (late winter to early summer). Read the label carefully when mixing with water, as horticultural oils may damage plants under certain conditions. To smother (and destroy) the scales, affected areas including the undersides of leaves must be thoroughly coated with the horticultural oil spray. On larger ornamental shade trees (non-fruit-bearing), a soil-applied systemic insecticide might be considered.
For more information, see “Scales, Pest Notes Publication 7408,” at
http://www.ipm.ucdavis.edu/PMG/PESTNOTES/pn7408.html
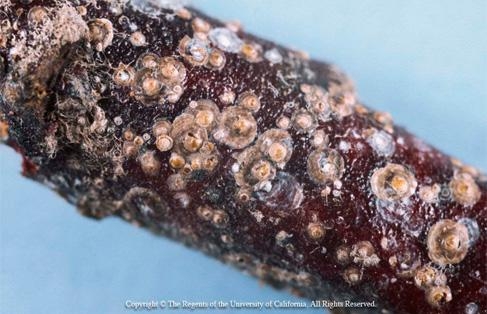
Photo: San Jose scale on peach branch


