- Author: Judy Quan
Container gardening is enticing. We love the option to grow plants where space and sunlight might otherwise limit our choices. Most perennials, shrubs and trees are better off planted in the ground, but, with care, we can maintain our larger woody plants in containers.
Container plants need more monitoring
We must carefully monitor and nurture our container plants since nutrients and water are confined to what is available in the container. Woody plants such as trees and shrubs need larger containers and more care over the years since they have larger root systems than most annuals and perennials.
The importance of repotting
The periodic repotting of container plants is an important aspect of care that is often neglected. Over time, as plants mature, plants naturally produce more leaves above ground and more roots below ground. Most container plants tend to become root-bound, meaning the roots outgrow the container, and the roots overlap each other, often circling the bottom of the container and growing back up its sides. Being root-bound results in stunted growth and poor plant health. The organic portion of the potting soil slowly decomposes over time and compacts, losing pore space, air space and drainage space.
When to repot
Generally, containers should be repotted every two to three years.
Signs that indicate the need for repotting:
- Surface/drainage hole roots
- Sunken soil level
- Plant seems too big for pot
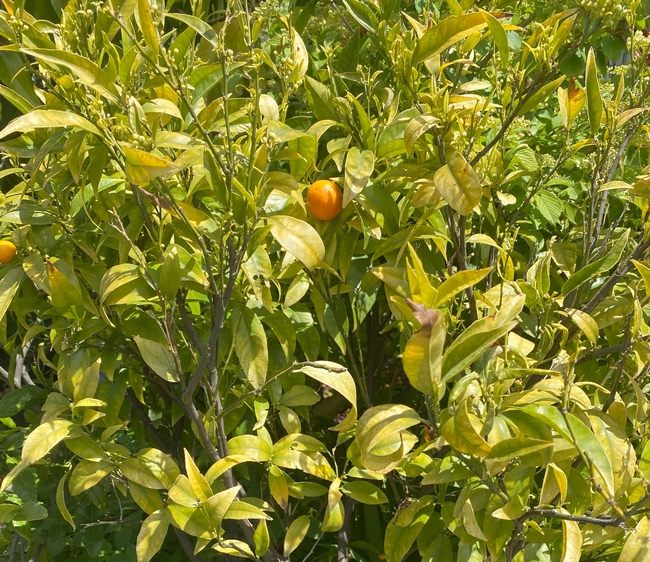
- Discolored or yellowing leaves
- Frequent wilting
Container selection and preparation
It is important to have the right size container. You need enough space for roots, and enough room for soil for hydration, thermal insulation and fertility.
Managing large containers
Selection of container, usually you need half wine barrel size to accommodate a larger plant like a tree or a shrub. TIP: Having a plant caddy with quality wheels that turn easily can make the job of moving the barrel and the plant ball much easier. There are plant caddies that are built to deal with the weight of a fully loaded half barrel filled with potting soil and a tree or shrub. Plant caddies are also helpful to monitor drainage.
Adequate drainage
Make sure that there are adequate drainage holes in the bottom of the container. No need to add rocks or gravel as they can interfere with proper drainage and take valuable depth from soil. To stop soil from leaking out, a mesh screen works well. Avoid sealing the hole.
Plan to elevate the wine barrel to provide air space so that wood will have a chance to dry out underneath.
Potting soil (not garden soil) and potting soil mix recipes
Plants in containers do not do well using ordinary garden soil, especially clay soil; they need a more porous soil mixture to thrive.
If you are buying potting soil, remember you get what you pay for. Consider getting potting soil from your local nursery. Another way to get quality potting is to mix your own. Here are links to some recipes: Soil Mixes for Container Gardening by UC Master Gardeners of Napa County
It is good practice to refresh containers with additional new potting soil or to replace all the potting soil with new potting soil. Prepare the potting soil that you are planning to use. If you are using old and new potting soil, mix the two. If you add compost, mix well with the potting soil. Never exceed 1/3 of the mix when adding compost.
Fertilizer
Mix in some slow-release 16-16-16 fertilizer. The slow release is recommended since plants in containers need to be watered more frequently than those in the ground, and nutrients are lost as the water drains out of the container.
During the growing season, apply a water-soluble fertilizer every 2 to 3 weeks, supplementing the slow-release fertilizer.
Whatever fertilizer you use, be sure to follow the directions on the label.
Getting the plant out of the container easily and safely

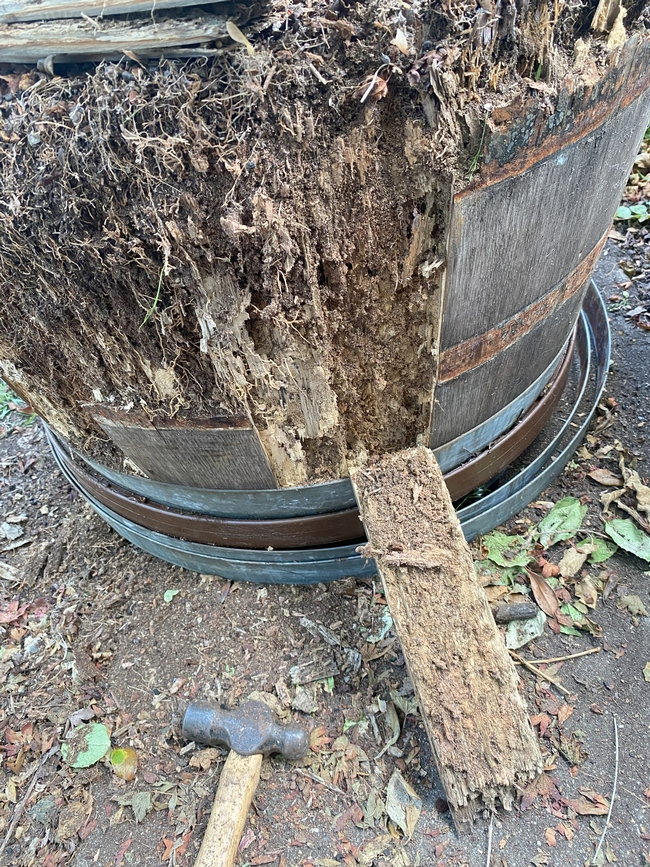
Break down sides of a worn-out wooden barrel by tapping on metal rings and they should just drop down allowing you to take out the wooden slats, exposing the root ball.
Readying plant for transplanting
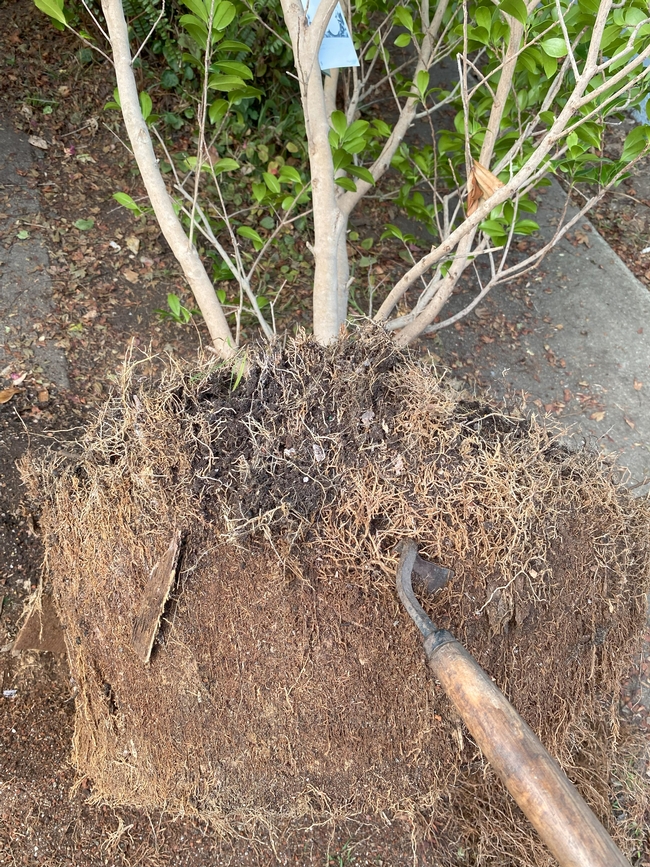
 Camellia's extremely matted roots being loosened with garden tool - photo courtesy of Judy Quan 2024

Inspect and trim root mats, circling roots, tangled roots
Remove any diseased or damaged roots. When the plant is out of the container, gently separate the roots.
If the plant is root-bound, slice off outer 1/2 inch of roots including soil and root mats. Trim circling roots and any roots growing upward. Make sure not to remove more than 1/3 of the roots.
Transplant plant to new container
Fill by mounding potting soil for ease in root placement
Begin filling the container with potting soil. Build a mound in the center. Roots should be placed around the outer edge in a lateral, radial, slightly downward manner.
Place the plant on top of the soil mound, arranging roots away from the stem. Try to help roots avoid circling and being tangled with one another. Spread the roots apart as much as you can.
Position root crown in new container
Identify the plant's root crown. The crown is located where the first lateral roots start to appear. Estimate the location of the crown when it is planted in the container so it is at or slightly above the soil level. Positioning the root crown is especially important for trees since below soil level placement may lead to crown rot diseases. Crown Rot in the Garden - UCANR Pest Note
Be sure to keep track of the crown and keep it above the soil level as you are adding potting soil. Avoid packing the soil down. You can gently pat the soil just enough to remove big air pockets
Next, after transplanting into container
Gently water your plant.
Check by feeling the soil to make sure that the root ball is moist. When the root ball has dried out, it may be difficult to re-wet the root ball. A very thorough soaking may be necessary more than once. When you are finished, you can add some mulch.
Re-Check Soil Moisture and Soil Level Over the Next Few Days.
Check the top 2-3 inches of potting mix in the container for moisture over the next few days since it may be drier than you anticipate. You may need to add some additional potting soil once the soil has settled more.
Schedule frequent ongoing soil moisture checks
When it is dry, the plant needs water. Plants need more frequent watering when in smaller containers, higher temperatures, higher wind, and direct sun. Mature plants are more likely to need frequent, perhaps daily, watering in warm or hot weather., especially if located near heat-retaining hardscapes such as concrete, rocks, bricks, pavers, or stone.
When repotting is NOT enough, transplant to in-ground
Sometimes we realize that our plants are not thriving in their containers, no matter what we have done, and we need to plant them in the ground. Follow the same steps of separating the roots, and cutting and removing the roots mats that are at the bottom of the container. The holes should be wider than the root ball so that the roots can radiate out. Large rooted plants should be arranged so the roots are not tangled or only on one side. Remember, however the roots are placed, that is how they stay and grow. Repotting or transplanting plants in-ground often results in happier, healthier plants.
Resources:
Container Planting by Oregon State Master Gardeners Clackamas County (PDF)
Outdoor Container Flower Gardening by UC Master Gardeners of San Joaquin
Planting Landscape Trees - UCANR (PDF)
Repot Your Plants by UC Master Gardeners of Napa County (potting soil mix recipes included)
Repotting and Fertilizing Houseplants by University of Arkansas Cooperative Extension
Repotting Basics - Tips to Ensure Vitality in Woody Contain Plants, University of Georgia
Healthy Garden Tips -- Soil Mixes for Container Gardening by UC Master Gardeners of Napa County
Tips For Beginners: How to Transplant a Container-Grown Plant, Virginia Tech
Alameda County Master Gardeners Help Desk:
This blog post is brought to you by the Help Desk of the UC Master Gardeners of Alameda County.
Have a gardening question? We'll help. You can reach us by:
- Emailing acmg@ucanr.edu. Please include a photo of the problem, if you can, plus your name, phone number, city and a description of the problem.
- Using our online form.
- By phone, during our office hours, 10 am to noon Wednesday and 11 am to 1 pm Thursday: 510-670-5645. At other times, please leave a message and we'll return your call during our office hours.
- In person at our Hayward office, during our office hours, only by appointment.


