Posts Tagged: succulent
Repotting the Potted Indoor Aloe
Advice for the Home Gardener From the Contra Costa Master Gardeners' Help Desk
Client's Questions & Concerns:
Client called in and also sent email with picture asking whether her aloe needed repotting. Plant appeared to be in original 4" pot. She also wanted to know why the plant was drooping.
Response from the CCMG Help Desk
You want to choose a pot that is wider and deeper than the current plant, with space for the plant to grow. The new pot can be plastic or clay/ceramic. Given the top-heavy nature of an aloe you may want to use a clay or ceramic pot. Any pot you select should have one or more drainage holes in the bottom. You can use commercial cactus mix as your planting medium.
Before planting, lightly cover the drainage holes with a piece of clay or a screen. Note: Do not place pebbles or multiple layers of clay pieces in the bottom of the pot "to improve drainage". Recent research has shown that the pebbles do not improve drainage; they just limit the space for the roots.
To repot, remove the plant from the current pot, clearing away the old soil from the roots. I noticed that you have a "pup" in the corner of the current pot. You will want to cut the pup from the main plant. You can plant it separately if you want. Place the plant(s) in the new pots with the cactus mix. The main plant can be planted with the lowest leaves at the soil level, i.e., with the bare stem buried. Allow the plant(s) to rest out of direct sunlight without water for the first week or two after repotting. This allows time for roots that may have been damaged in the transplanting process to heal.
There are several environmental factors that could be causing the drooping problem. One is water. Aloes should be watered approximately once a week through the growing season (spring to fall). Aloes need less water during the winter, but you do need to make sure that it gets enough water to avoid shriveling. You especially want to make sure that the plant does not fully dry out once you start watering it this winter after the transplant waiting period is over. However, you should let it dry out the top 1-2" between waterings (you can stick your finger and/or popsicle stick to check, etc.).
A second factor is fertilization. The plant looks like it had some sudden new growth. Like many houseplants, aloes do well with regularly applied diluted fertilizer during the growing season, with no fertilizer during the dormant (winter) season.
A third factor is light. Your plant may need additional light. A west or south facing window is best. Care must be used when introducing additional light or moving the plant to a brighter location. The plant should be introduced to the additional light gradually to avoid scorching.
For more information on repotting and growing succulents and cactus see: http://www.csssj.org/welcome_visitors/basic_culture.html.
For specific information on aloes, see: http://homeguides.sfgate.com/plant-aloe-vera-container-80791.html and
for indoor succulents http://homeguides.sfgate.com/indoor-potted-succulents-dying-80564.html.
And for a view of Aloes and other succulents in a garden setting (with some in pots as well in the nursery), you should visit The Ruth Bancroft Garden in Walnut Creek. This is a world-class garden utiliizing succulents and other water-aving plants in settings that can be inspiration for your home and garden.
Good luck with your aloe.
Please let us know if you have further questions.
Contra Costa Master Gardeners Help Desk
Note: The Contra Costa Master Gardener Help Desk is available year-round to answer your gardening questions. Except for a few holidays, we're open every week, Monday through Thursday for walk-ins from 9:00 am to Noon at 75 Santa Barbara Road, 2d Floor, Pleasant Hill, CA 94523. We can also be reached via telephone: (925) 646-6586, email: ccmg@ucanr.edu, or on the web at http://ccmg.ucanr.edu/Ask_Us/
Succulent Boxes
In 2012, the Solano Master Gardeners held a class to make succulent boxes. We brought succulents from home and planted them in pre-made wooded boxes. The boxes had been constructed by volunteer Master Gardeners (or their husbands) who were gifted with building skills. The boxes were 6x6x3.5 inches, had a hardboard backing and ½ inch wire mesh on top. Everyone attending filled their boxes with soil, shared succulents and inserted them into the small spaces in the wire mesh. The group was loud and excited. It was a fun-filled, sharing, learning experience.
I came home so excited and mentioned to my husband that I wanted to make another succulent box BUT on a grander scale. Being the inventive and frugal person he is, he found a picture frame our neighbor had thrown in the trash, discovered some left over cement board in our garage and a yellowed piece of plastic lathe that was left over from building our patio. With those materials and a few screws, he created a succulent wall planter, 16x30x3 inches. He spray painted it ‘John Deere’ green so it would blend into the garden. It took awhile to fill each small opening in the lathe with the succulent cuttings I had been snipping from our garden. He placed two eye-hooks on each end of the box and hung it from the fence where two eye-bolts had been placed. This system makes rotating the box simple and keeps the soil inside from ‘slumping’. The first of each month, the box is taken down, placed across the top of our wheel barrow and watered thoroughly. We leave it flat for approximately an hour for the water to saturate the soil. Then it is hung in the opposite direction (using the eye-hooks on the opposite end).
This large succulent wall survived the winter with some minor frost damage. I did not cover it or provide protection last winter. This winter I plan to protect it with frost cloth or move the box into the garage. The frost damaged succulents were removed and NOT replaced. The plants not damaged have grown significantly and now cover the empty holes in the lathe.
The box has turned into a traveling planter, being a display item at the Dixon May Fair. When it returned home, it was not placed in the initial hanging spot. It presently hangs against the garden cottage wall next to the covered patio. It makes quite a statement as you walk down the brick pathway to enter the backyard garden.
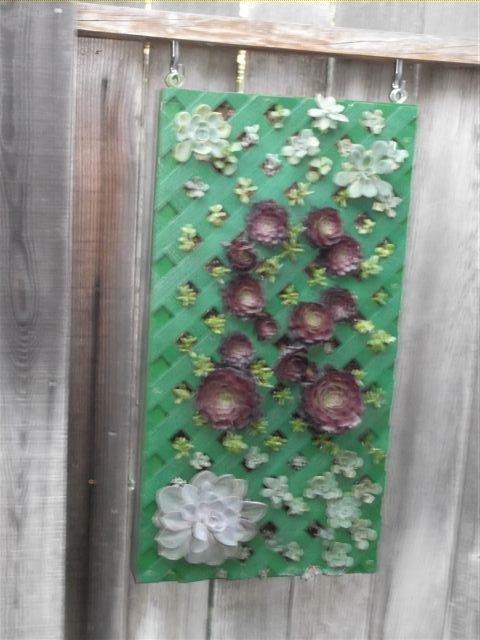
Sorry, picture a little blurry, but it's the start of the succulent box. (photos by Sharon Rico)
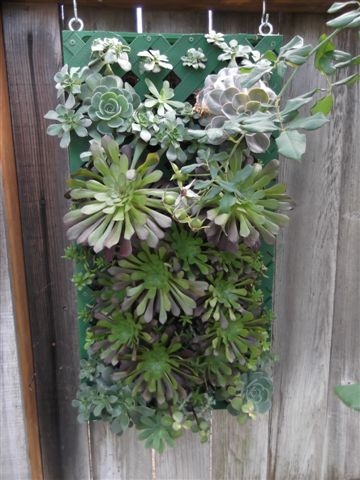
Succulents maturing in the box.
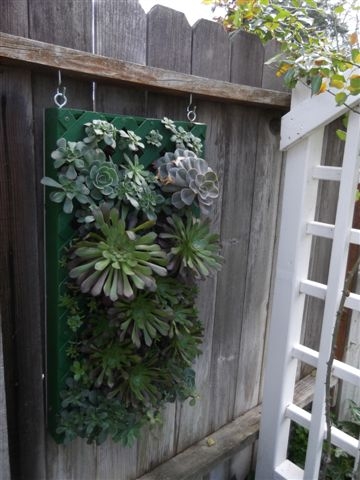
The final product is pretty nice.
Waiting to Bloom
So the other day we were in the San Francisco for lunch and a walk around. As we were leaving the Embarcadero there was this little flower shop that had a few potted plants outside. Well you know that no Master Gardener can walk past a stand of plants or vegetation without at least taking a 5 minute look-see.
I walked inside first. The tiny cramped shop was humid and there were canaries in cages singing away. The cut flowers were beautiful. From the ordinary daisy to exotic orchids. There were a lot of flowers crammed into this dark little place.
I stepped back out into the sunlight to peruse the potted plants, thinking I could take home a living souvenir from our day. Well, the frugal part of Master Gardener caught up with me- $8.50 for a polka dot plant in a 4 inch pot! I just picked one up for a filler at Walmart for $2.50.
Then there was a row of African Violets. But wait, these had a tag hanging over them. “Waiting to Bloom--$4.50”. They honestly didn’t look much different than the others that were bloomed. There was also a succulent in a 4” pot for $8.99 that while healthy, was still only half the size of one at a local garden center.
At this point, I finally had had enough of searching for my living souvenir and decided to head on my way with just some photos. Just as I ran out of room on my photo card, I looked down and at my feet was a large group of chopped-off orchids. There were two leaves and a piece of stem. I now know where all those pretty cut ones inside had come from. The sign read Phalaenopsis $3.00…Waiting to Bloom.

Pricey polka dot plant. (photos by Patricia Brantley)
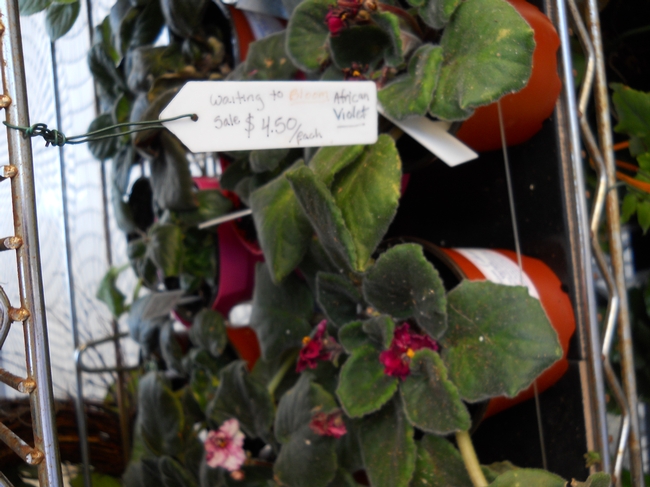
Tag on African violet.
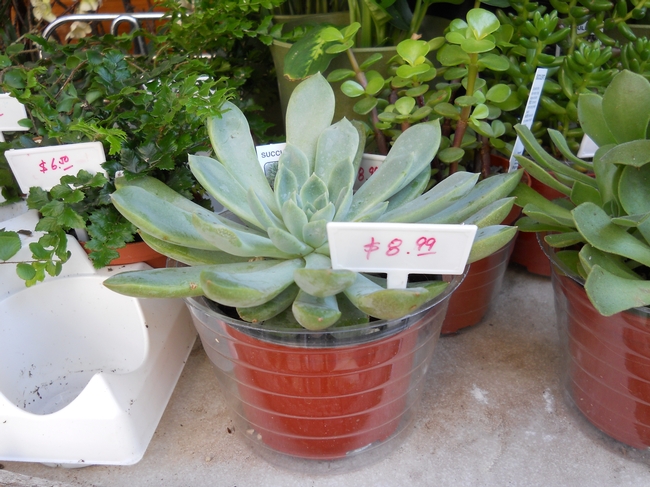
Expensive succulent.
Starfish Flower
A few years ago at one of our plant exchanges, a couple brought in a tray of what looked like pretty ordinary succulents. Appearances can be deceiving though. They explained that these were Stapelia. Stapelia have about 30-40species in the genus and are originally from South Africa. Globally they are known as starfish flower but apparently in Africa they are called carrion flower. They can range from a few inches to a few feet in height. Their flowers can range from a two centimeters to sixteen inches across. All but one have flowers that smell like dead meat to attract flies that are the plants' pollinators.
Always attracted to the bizarre, at least in the plant world, I took one home. It grew like gangbusters, initially on my shaded patio and then inside for the winter. It seemed happy, but no flowers. Recently I moved it to another room and suddenly I had a bud. It took several days to open and sure enough it looked like a delicate starfish. The first night I did not detect a smell. The second night though it hit me like gangbusters. It smelled just about what you would think it would smell like. I only noticed the scent for a few days and only if I got near the plant. Next the "legs" on the starfish flower started to fold up backwards and what it looks like now is a cute button.
Looking as the Internet, I think it may be Stapelia lepida, but I'm not sure. I can't wait to see what happens next. The resources say it may form a pod and over a year form seed. Apparently the plant can be fairly easily propagated from stem cuttings if you let them callus over as well as grown from seed. The biggest problems with the plant seems to be problems with over-watering and with mealy bugs.
I think it's pretty cool.
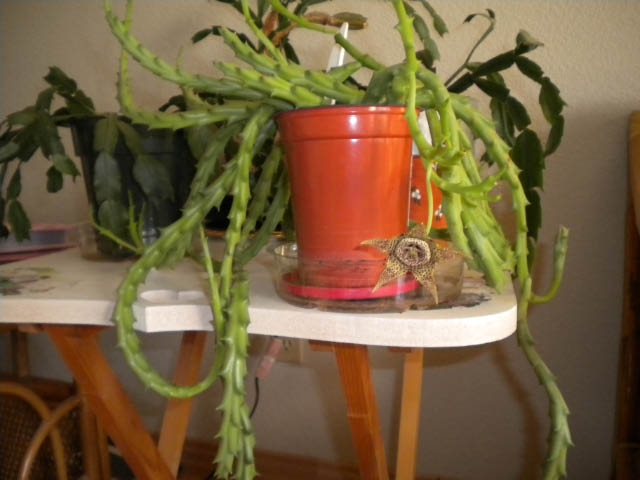
Stapelia plant. (photos by Karen Metz)
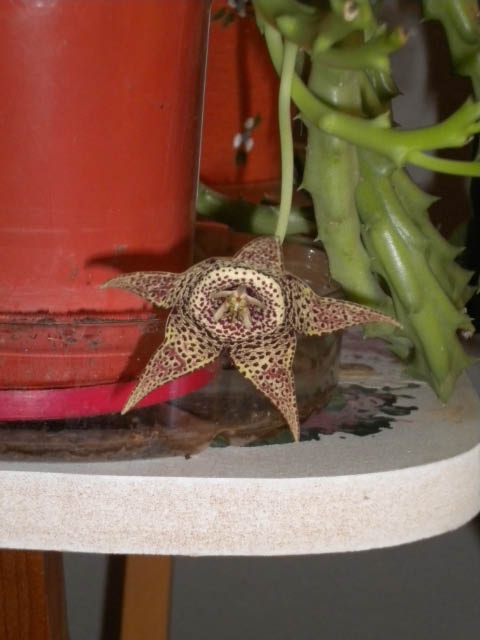
Starfish flower.
Euphorbias-Plants of Interest
Have any euphorbias growing at your house? You know those strange prickly, very leggy things with few leaves and maybe red or orange flowers. Euphorbia milii or Crown of Thorns probably came zipping to mind at that description. Many folks think euphorbias are only that! No so; many euphorbias are indeed prickly, but others are smooth, fleshy stemmed plants with the occasional tufts of small leaves.
Many euphorbias are listed as succulents while other varieties are not. Some are cactus-like while others such as the Christmas poinsettia, Euphorbia pulcherrima, can grow leggy up to 10 feet or taller. A number of euphorbias have a group of brightly colored bracts which are commonly referred to as the flowers; the true flowers are inconspicuous – the “flowers” of the poinsettias which we love for the showiness of flower and size are merely the bracts.
Euphorbia milii are one of my favorite house plants. If we lived in the San Diego area, these plants would be living outside in rich, porous soil in containers or in the ground itself either trained on a trellis or small frame work. The most common bract colors are red, orange, and pink. If you are lucky, you can find colors of white and pink with an orange splash. Talking with the owner of the Great Petaluma Desert some years back, I was amazed to find that he was able to propagate all colors of the crown of thorns –except the white. For some strange reason, that particular plant is very difficult to start from cuttings.
Say you are interested in euphorbias but don’t care to get full of scratches. Never fear, there are plenty of species of the family ready to call your garden home! How about Euphorbia obesa or baseball plant. Considered a succulent, it is a house plant or indoor/outdoor container plant. A solid, fleshy, gray-green sphere or short cylinder growing to 8 inches in height, with brownish striping and brown dots that resemble the stitching on a baseball. The only requirements for growth are good drainage, bright light, warmth, no sudden temperature changes, and keeping watering to a minimum. Believe me about the watering, too much and the thing keels over as though shot! I had to kill off 2 of them before getting the message.
Growing any euphorbia in the house successfully means understanding the light and temperature requirements of these plants. Grow them almost anywhere in the house and they will survive; put them in a window where there is sunlight, but no real direct sun and where they are near a window with no coverings between the plants at night. This is because they want warm days and cold nights, just like their native lands such as India and various parts of Africa.
When looking for euphorbias in the succulent section of your favorite nursery, check the plants carefully. If you don’t check, you may grab cacti in error. How to tell the difference when the desired plant has thorns? Look closely as the thorn attachment area; if you see a pad-like area (called an areole) that looks fuzzy with a number of thorns coming out, you’re holding a cactus. No pad and 1 or 2 thorns emerging at the same place, you have a euphorbia.
Go to a cactus and succulent sale or show to see the variety and wonder of the euphorbia world. I dare you to walk away empty-handed; I know I can’t!
