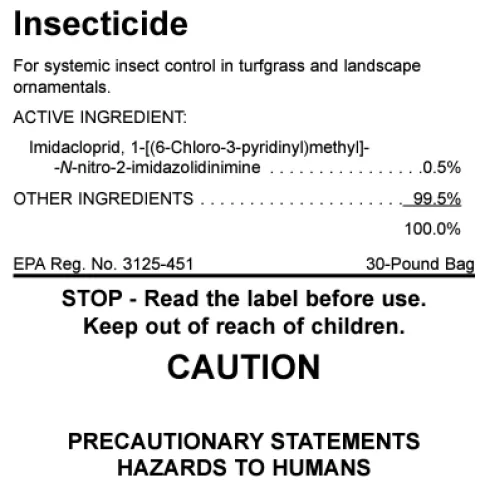
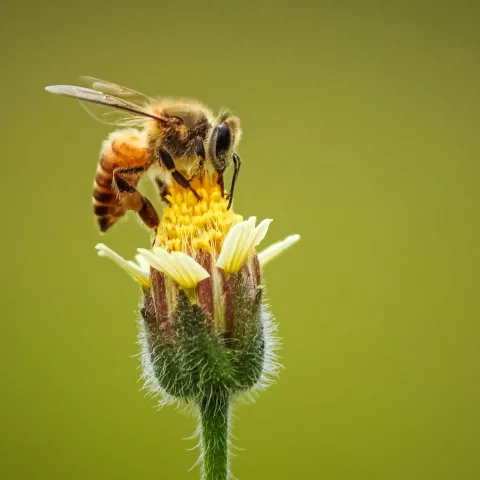
- Author: Ali Williams
- Editor: Maggie Mah
- Editor: Cynthia Nations
enticing and the task seems simple enough: just lay it on the soil, cover with an attractive layer
of mulch and the foul demon weeds that lie in wait will wither and die in the darkness. At last,
you will be free from the tyranny of weeding! Hang on--there's more you should know about
this stuff! Although the promise of a neat, easy to maintain landscape may be hard to resist, the
reality isn't quite what it's cracked up to be, and you may end up doing more harm than good.
scale agriculture operations and to provide stability for structures such as retaining walls. Weed
Manufacturers claim that the materials are permeable, help to retain moisture, prevent weeds
from growing, and can therefore reduce the need for chemical herbicides.
Does it work? Landscape fabric does help to suppress weeds, but the effect is only temporary.
When freshly laid down, fewer weeds will appear on the surface because seeds that are already
opportunistically seek tiny holes in the fabric and utilize pinpoints of light to sprout through the
fabric-mulch layer and emerge triumphantly on the surface. You might admire their tenacity
before pulling them out but unfortunately, the tough fabric covering makes it difficult to get at
the root--a crucial aspect in the battle against weeds. Most likely, a bigger hole has also been
created in the process, making it easier for more weeds to germinate.
Is it permeable? Landscape or “weed blocking” fabric is made of tightly woven fiber, usually
polyester or plastic, both of which are derived from petroleum. There are different grades and
thicknesses, which will have correspondingly different degrees of permeability. Initially, they
are somewhat porous, allowing a certain amount of water and air to move through the fabric.
Unfortunately, permeability decreases in short order as the small holes that create porosity
gradually become clogged with dirt and debris. This is where the trouble starts.
What goes on below the surface? While not visible to the naked eye, healthy soil teems with
billions of beneficial organisms that depend on the movement of water and vital gases (oxygen,
carbon dioxide) between the atmosphere and the soil. As permeability decreases, these
components become more and more restricted. Deprived of oxygen, carbon dioxide and water,
soil microorganisms die off, leading to a downward cycle. Natural processes start to shut down
and plants start to appear less and less healthy. Once uncovered, the degraded soil may appear
cracked, compacted, and will very likely smell rotten. This is because the natural process of
decomposition has been interrupted and the healthy microbial community has died off.
Rooting for roots. Plants that are surrounded by increasingly clogged landscape material have a
hard time, too. Vegetation that is planted in good, properly irrigated soil grows deep roots in
the process of seeking out nutrients and moisture. This leads to healthy plants that are more
resilient to stress. Conversely, plants that are surrounded by a cover of landscape fabric (which
can be bone dry even after a deep, soaking rain) soon spread their roots out closer to the
surface. Eventually, roots may appear at the edge of the landscape fabric but despite a
gardener's best efforts, plants in this scenario will not do well.
Mulch: always good? Landscape fabric is often topped with a layer of organic mulch such as
wood chips. Although mulch is normally a very good thing and a top dressing of it certainly
looks more attractive than naked landscape fabric, it can't do what it does when it is in direct
contact with the native soil and becomes counterproductive. Why? Instead of the usual process
of decomposing and adding valuable organic matter to the soil, the mulch particles just break
down on top of the fabric and add more particulates to clog things up even more.
Still in the weeds? If you are determined to get the upper hand in the battle against weeds,
consider sheet mulching and other beneficial practices that will minimize time and effort and,
at the same time, help your garden to thrive.

- Author: Anne Marie Tsolinas
- Editor: Maggie Mah
- Editor: Cynthia Nations
It's the New Year and a gardener's thoughts naturally turn to planning new and interesting plants. For those of
us living on California's Central Coast, the mild climate and long growing season supports a wide variety of
vegetation. But beware: there are some plants that should be avoided because introducing them to your
landscape can have consequences that go far beyond filling an empty spot in your flower bed. Apart from
poison ivy and other classic plant “no-no's,” the plants that should be on your radar are known as “invasive
plant species.” So, whether you're planning a large landscaping project or a simple garden refresh, here's what
you need to know.
What is an “invasive” plant?
Invasive plants are usually not native to a particular region but once introduced, they become established very
quickly. If allowed to proliferate, they will out-compete the existing vegetation and ultimately, disrupt the
natural ecosystem. A dramatic example of “invasives” taking over can be seen in California's iconic “golden”
summer landscape. Prior to European settlement, the hills would have been green year-round with deep-
rooted perennial native grasses dotting the open ranges. The aggressive annual grasses and weeds that
accompanied the introduction of livestock quickly took over and today, only 1% of California's native grasses
remain.
What's the difference between “invasive plants” and “weeds”?
Although they are vexing and you might think of them as invasive, there's an important difference between
common garden weeds and plants that are truly and destructively invasive. Your typical weed actually requires
what is known as “human disturbance” to establish and persist. “Disturbance” means conventional gardening
activities like soil tillage, fertilizing, irrigation, etc. Invasive plants (whether they are introduced intentionally or
not) do not need any help from humans and readily escape from cultivated areas, infesting all kinds of habitats
including wildlands, rangelands, and even waterways.
What do invasive plants do to a natural habitat?
Invasive plants disrupt an ecosystem by out-competing other plants, thereby reducing the ability of natives and
other non-invasive plants to survive. This change creates a “domino effect,” impacting every organism that has
evolved in the pre-invasive habitat including birds, insects, and other wildlife who rely on native plants for
shelter and food.
Where do “invasive“ plants come from?
According to the California Invasive Plant Council, about 37% of the species listed on the CIPC Inventory were
introduced accidentally through contaminated seed or carried along on equipment, vehicles, animals, human
shoes, etc. The remaining 63% were intentionally introduced and of those, nearly 80% came via the nursery
industry for use in ornamental landscaping. We now know the harm that invasives can cause, but ironically, it
is also easy to understand why so many of them have become popular: they tend to be attractive, and they
grow very well!
Although many invasive plant species that were introduced in California are no longer sold, others are still
available, and their impacts can be seen on a grand scale. Of these, Pampas Grass (Cortaderia selloana or Cortaderia jubata) is the poster child. This spectacular South American native was brought to Santa Barbara and introduced commercially as an ornamental in the late 1800's. Extremely hardy and fast growing, with massive clumps up to 13 feet tall, stands of Pampas Grass can be seen along the entire length of California's coastal areas. The plant's sharp leaf blades can be harmful to animals and humans, rendering it undesirable as wildlife shelter or food source. It's also quite flammable.
The list of invasive plants that are still sold in California goes on. Among the varieties of highest concern and
that are known to be invasive in our coastal region are these: Green Fountain Grass (Pennistem setaceum);
Mexican Feathergrass (Stipa/Nassella tenuissimo) Water Hyacinth (Eichornia crassipe); Yellow Water Iris (Iris
pseudoacorus); Highway Iceplant (Carpobrotus edulis) and Periwinkle (Vinca major).
Why it matters
Invasive plants cause harm to the environment, the economy and even human health. Fast growing woody
invasives create higher fuel loads, causing fires to burn with greater intensity. Invasive aquatic plants clog
waterways and block livestock from gaining access to water. According to the California Invasive Plant Council,
the state's annual expenditures on control, monitoring and outreach to address the issue of invasive plants
total more than $82 million dollars. The actual environmental cost is much more difficult to determine but
researchers at Cornell University estimate that the damage done by invasive plants in the U.S. costs over $120
billion each year.
Although it is one of the most bio-diverse places in the world, California has limited and diminishing
untouched natural habitats and over 30% of its native species are threatened. In many areas of San Mateo
County, housing developments are adjacent to large areas of open space, which makes them especially
vulnerable to “invasion” by problematic plants. By choosing non-invasive plants for your garden, you will help
to protect these sensitive areas.
Resources
--Plant Right: an organization partnering with retail nurseries to prevent the spread of invasive plants sold in
California. Plant Right identifies alternative garden plants that are comparably beautiful and provide the same
utility as invasive plants. http://www.plantright.org
--California Native Plant Society: https://calscape.org
--Cal-IPC website: www.cal-ipc.org

- Author: Cynthia Nations
- Editor: Maggie Mah
It's December and ‘tis the season to…think about blackberries! Our cool northern California coastal areas provide the perfect climate for growing sweet, flavorful blackberries. So take a break from the holiday rush and get going on summer's delicious crop. Here's how to have a bountiful harvest.
About Blackberries
There are a number of hybrids and also thorny and thornless varieties but, ultimately, there are two basic types of blackberries: trailing (with canes that are not self-supporting) or erect (with stiff, arching canes that are somewhat self-supporting.) Both types benefit from a trellis support and all varieties have similar growing requirements. To do their best, blackberries (also known as caneberries, bushberries and dewberries) need to be in a location that receives partial sun and in soil that is slightly acidic with a pH of about 6 to 6.5. Ensure that the soil is rich in organic matter and topped with a layer of organic mulch. Plants will need regular irrigation during the growing season so carefully check the soil at the base of the plant to determine if watering is sufficient. Root areas should be cool and moist but not wet and should not be allowed to dry out. Once established, apply compost or manure in late fall or early winter to allow rain to leach excess salts and as soon as the plants begin to put forth new growth in early spring, apply an organic granular fertilizer (20-20-20) around the base of the plants. This will provide the nitrogen needed for vigorous growth and fruit production.
How and What to Prune
A blackberry plant can live for many years but fruit grows only on the short lateral shoots of two-year-old canes (“floricanes”)which then die back after berry production is over. In spring, you can “tip prune” to force the canes to branch out and create more lateral shoots for fruit to grow on. Use sharp, clean pruning shears and cut to about 24 inches. If the canes are shorter than 24 inches, prune the top inch of the cane. In the fall, after fruiting is complete, prune to remove diseased, dead and spent canes by cutting to ground level. This will encourage the plant to produce more first year canes (“primocanes”), which will mean more fruit-producing canes the following year. If you already have blackberry vines, prune them now.
How and When to Plant
December and January are good months to plant dormant blackberries, but potted vines can also be planted in spring or summer. For bare root plants, trim the dead roots and dig a planting hole just large enough to accommodate the roots. Cover the roots with soil and press firmly to remove air pockets. Water thoroughly to settle the soil. After planting, cover the soil with mulch. Blackberry cultivars can be spread 3 to 4 feet apart in the row with 8 to 10 feet between rows. Cut the canes on newly set plants to 6 inches at planting time.
When to Pick
Blackberries do not continue to ripen once they are picked so it's important to pick fruit at the peak of flavor and sweetness. Since different varieties ripen at different times, you can extend your berry season by planting a few different kinds. Erect blackberry cultivars include: Black Satin, Cherokee, Cheyenne, Chester, Darro, Hull Thornless, Shawnee, and Triple Crown. Trailing blackberry cultivars include: Boysen, Kotata, Logan, Marion, Ollalie, and Silvan. (More information: https://ucanr.edu/sites/gardenweb/Berries/?uid=4&ds=466).
Troubleshooting
Purchasing certified disease-free plants from a nursery is a good practice. Although it is easy to propagate your own berry plants from canes, plants derived from another garden or grown near wild blackberry bushes could introduce unwanted diseases. If your blackberry plant looks healthy and blooms, but grows misshapen fruit or no fruit at all, chances are that your blackberry plants are affected by a blackberry disease. If you have more than one variety, one type may fruit while another, susceptible variety may not. On the coast, Anthracnose is a common fungal disease that tends to attack plants when the weather is cool and wet. The fungus can be spotted when the blackberry fruit starts to ripen but then wilts or turns brown.
If you decide to use a fungicide, it's important to determine if a fungus is indeed the culprit. Since symptoms could be due to something other than a fungus, using a fungicide might be a waste of money and do more harm than good. Contact the UC Master Gardeners Helpline (Phone: (650) 276-7430; Email: mgsmsf@ucanr.edu), to provide information and a photo of the problem. The Helpline will help determine if using a fungicide is necessary and, if so, what types of safe fungicides are best to use.
Insects (aphids, cutworms, thrips, mites, etc.) can also cause fruiting problems with blackberry plants. Check the bush carefully, particularly the undersides of leaves to see if the plant has unwanted pests. It is important to first identify the pest before determining the treatment. Sometimes the treatment could be as simple as hosing off aphids or spraying the pests with soapy water. Detailed information about blackberry diseases, pests, and treatments can be found here: http://ipm.ucanr.edu/PMG/GARDEN/FRUIT/blackberries.html
Cynthia Nations is a UC Master Gardener who continues to experiment with different blackberry cultivars coast side. This article was edited by UC Master Gardener, Maggie Mah.

- Author: Cynthia Nations
- Editor: Maggie Mah
Our northern California coastal climate allows us to grow vegetables all year round. In contrast to many parts of the country, where gardens and gardeners are in hibernation, fall is also one of the best times to start winter planting and get a head start on spring planting. Many local nurseries offer seedlings and, as many people discovered during the pandemic, germinating your own plants from seeds is rewarding, inexpensive and fun. What's more, there is a dizzying variety of seeds to choose from. Now, many modern day seed aficionados are using a technique known as “soil blocking,” a simple and effective method of starting seeds that was used by the Aztecs more than 2000 years ago.
Although the Aztecs used cubes of nutrient-rich mud to grow their seedlings, modern day soil blocks are composed of potting soil and other ingredients that are compressed into cubes of various sizes. The cube functions as both the container and the soil for starting and growing seedlings, eliminating the need for plastic cell packs or peat pots. Seedlings develop a stronger root system because more oxygen is available to the roots when the growing medium is not surrounded by a barrier, as it would be in a pot. Once the roots reach the edge of the block, they are “air-pruned,” a natural process that temporarily slows down root growth. This not only prevents a plant from becoming root bound but, once it is transplanted, allows it to become established more quickly because there is less disruption to the roots and therefore, less potential for transplant shock. A final advantage to soil blocks (and something to which every gardener who has mangled a plant getting it out of a pot can relate) is that when seedlings are ready, all you need to do is dig a hole and plant--far less stressful for all concerned!
Soil Blocking: What you'll need:
Different combinations of ingredients can be used as long as the mixture holds together when mixed with water. Here are two options:
Option 1: 1 part peat moss or coco coir + 1 part pearlite or vermiculite + 1 part compost.
Option 2: 1 ½ *bucket peat moss or coco coir, ¼ C. garden lime, 1 bucket perlite, 1 C. all-purpose organic granular fertilizer, ½ bucket garden soil+ 1 bucket finished compost
*2.5 gallon bucket
--A large container to hold your potting mix
--Warm water (tap is OK)
-- Soil Blocker tool: spring-loaded device that compresses the soil mixture into blocks and forms an indentation on top to plant the seed. The best size tool for most seeds makes 4-2” X 2” X 2” cubes at a time. --Garden seeding tray lined with cardboard or paper
--Labeling tape, spoon, tweezers
The following steps are for a 2-inch soil blocker that produces four soil blocks at once.
How to make soil blocks:
- Combine the pre-made mix or your own mix with water, and store until you are ready to use.
- Line your container with cardboard or paper; you will be watering from the bottom, and this will help absorb the water.
- When you are ready to make your soil blocks, scoop out the soil mix into a container. Add water and mix; the soil should have the consistency of peanut butter. You can also add water and let it sit for a while to increase absorption.
- To make the blocks, pile the soil mix into a mound that is about double the height of the soil blocker. Then plunge the soil block maker into the mixture. Twisting as you plunge helps compress the soil.
Ensure the cubes are compressed and filled tightly.
- Scrape off the bottom of the soil block maker with a straight edge and set the blocker in your seedling tray. Release the soil blocks by pushing down on the handle and lifting the blocker. The blocks should be firm. If the blocks crumble, add more water to the mix. If they slide out easily and fail to hold their shape, add more dry mix.
- Plant your seeds directly in the depressions created by the soil blocker. Label the soil blocks using tape on the outside of the tray. We a soup spoon and tweezers to facilitate this step. Ensure you follow the directions on the seed packet. Some seeds do well if you soak them before planting.
- Water the blocks from the bottom up or mist. Do not water from the top; it will erode the block.
- After seeding, the seeds are covered with a bit of peat moss. This step helps germination. Ensure you follow the directions for seed depth.
- Soil blocks are easy to move around and organize. If a block fails to germinate, you can remove it from the tray. It is easy to know when it's time to transplant the seedling or pot up into larger containers because you will see the roots when they reach the edge of the block.
Seed germination is a great way to experiment and learn more about gardening. As you learn and refine your materials and techniques, you'll find that soil blocking leads to healthy transplants and a thriving garden. For more information, check out the following resources: Seed blocking: The New Organic Grower (1995), Eliot Coleman.
YouTube Seed Blocking: https://www.youtube.com/watch?v=xLbAkqau_MI
Cynthia Nations is a San Mateo/San Francisco UC Master Gardener who recently purchased a soil blocker and is currently germinating broccoli, spinach, and lettuce seedlings. This article was edited by Maggie Mah, a SM/SF UC Master Gardener.

- Author: Jamie Chan
- Editor: Cynthia Nations
- Editor: Maggie Mah
With Halloween just around the corner, it's a good time to think about doing something a little different with your garden. How about adding drama and seasonal color with dark and mysterious plants? Here are five fascinating varieties that look exotic and also do well in our cooler coastal climate. They are sure to spark curiosity and conversation!
A Note about USDA Hardiness Zones:
All of the plants listed below have alphanumeric designations which correspond to the USDA Hardiness Zones. Each zone represents the average minimum temperature and the suitability of plants for a particular area. The lower the number, the colder the area is likely to be. Coastal areas of Northern and Central California fall into 2 zones: 9b (slightly inland) is hardy to 25-30°F and 10a (closest to the coast) is hardy to 30-35°F.
The Black Bat Flower (Tacca chantrieri)
This bizarre yet beautiful member of the yam family has wing-shaped bracts (specialized leaves) and seed pods that resemble bat faces. As an understory plant native to the forests of Asia and Australia, this unusual plant prefers mostly shade and moist, well-drained soil. It grows best in semi-tropical environments (USDA Zones 9b-11.) Black Bat flowers do not last long after they are cut so forgo the vase and enjoy them as a dramatic feature in the garden. The plant will provide large, ample blossoms beginning in late spring and continuing through early fall.
Hellebore (Helleborus, several species)
Hellebores are evergreen members of the ranunculus family with thick, dramatic, pest resistant leaves. One of the earliest bloomers, their flowers range in color from soft pink to almost black. This herbaceous perennial is happy in a wide range of climates (USDA zones 3-9) and appreciates shade in summer and sun in winter so a spot near deciduous plants might be ideal. After blooming, the foliage remains attractive into the summer and make eye-catching mass plantings in summer shaded areas. Like many other common landscape plants, be aware that Helleborus niger and Helleborus orientalis are toxic. But this just adds to that spooky reputation - beautiful and deadly!
Witch Hazel (Hamamelis, spp. - several species)
Witch hazel is a small perennial tree or large shrub which produces yellow threadlike flowers in early spring or late fall. The leaves, bark and twigs contain polyphenols and essential oils which are extracted and used in various preparations to soothe irritated skin. The plant does well in cooler areas (USDA zones 3-9) and is hardy down to 0° F but prefers full to part sun. While this plant does not seem to attract witches of any kind, the branches were often used in the past as divining rods. One thing you can be sure of: it will be a fragrant showstopper in your fall and winter landscape.
Corpse flower or Voodoo flower (Amorphophallus, several species)
This member of the philodendron family gets its name from the large “spathe” or shroud-like flower that emits a putrid odor when it blooms to attract pollinating insects, including flies. Also called Devil's Tongue, Dragon's Plant and Snake Palm, these perennial tubers are native to subtropical areas of Asia and generally do best in partial shade in USDA zones 7-10. Although most are grown for their spectacular looks, the starchy tuber of one variety (A. konjac) is processed into a kind of flour and used to make noodles and fruit jellies. Many species can grow indoors as a houseplant and then brought outside during the summer months as a potted feature in the garden. Beware – you may clear a room when these spooky plants bloom!
Pitcher Plant (Sarracenia spp. - several species)
A native to North America that grows ideally in USDA zones 6–8, the carnivorous pitcher plant loves boggy, waterlogged locations and can easily be identified by their rosette of modified leaves which form “pitchers.” While dramatic to the human eye, the pitcher shape acts as a container which holds water, attracting insects which drown and are eventually digested by the plant. These spooky herbaceous perennials prefer full sun, slightly acid soil and consistently moist conditions. In spring, each mature purple pitcher plant produces a single 3-inch flower, which starts as a downward "nodding" head and eventually reveals yellowish, pollen-bearing stamens.
These are just a few examples of some of the “spooky” plants to explore. While you are deciding, leave space in the garden for garlic—its powers to ward off vampires are legendary.
More about USDA zones: https://planthardiness.ars.usda.gov
Images from Pixabay.com
Jamie Chan is a SM/SF UC Master Gardener and the current Director of Programs and Partnerships at The Gardens of Golden Gate Park. She is a native San Franciscan who loves to garden while tending chickens and honeybees in her foggy urban backyard. The article was edited by UC Master Gardeners Cynthia Nations and Maggie Mah.
