- Author: Help Desk Team
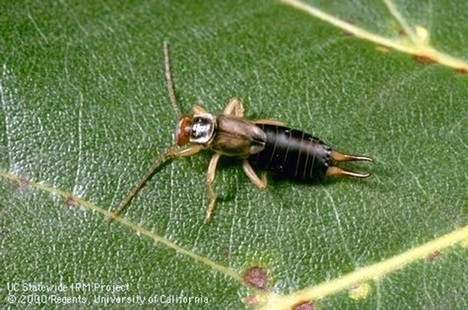
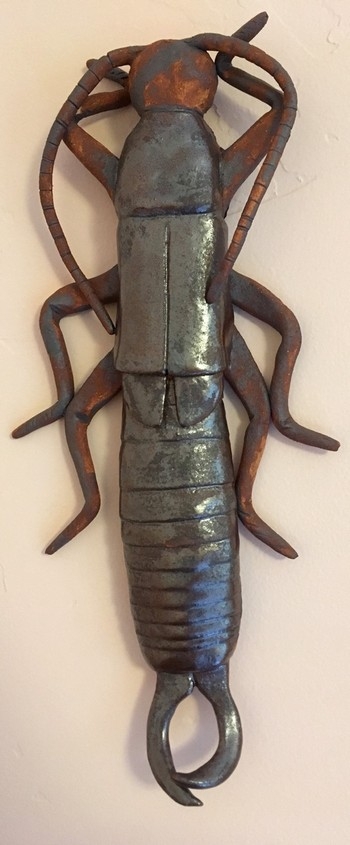
Earwigs are one of the most common pests in our gardens. There is a lot to learn about them besides knowing how to prevent the damage they cause.
Fun facts about earwigs:
- Their name probably comes from myths surrounding these insects:
- They sometimes enter peoples' ears when they are sleeping and they sometimes burrow into the brain
- The forceps appendages at their rear ends look like tools to puncture ears for earrings
- The expanded wings of earwigs have the shape of human ears
- The common and abundant earwigs in our gardens weren't even in California 100 years ago.
- Roald Dahl, author of children's books, has a character in George's Marvelous Medicine that urges the grandson to eat a ‘big fat earwig' and tells him how to do it so it wouldn't grab his tongue with the ‘sharp nippers on its back end.
- Roald Dahl also mentions earwigs in James and the Giant Peach where the characters find an earwig inside the giant peach.
- Under their hard, shiny wing covers, they have remarkably large and complex flight wings that spring from folded to flight without muscles. (These wings expand to 10 times larger than when folded.)
- Female earwigs watch over their eggs and newly hatched young, protecting them and keeping them clean until they are old enough to fend for themselves.
Did you know?
- Earwigs are important predators of aphids, mites, nematodes, and other small insects and their eggs.
- Research from Washington State University shows earwigs can be beneficial in apple and pear trees, eating pests but doing minimal damage to the crop.
- They also feed on fungi and decaying plant material.
- They are food for other animals, including birds and lizards.
Tips to control earwigs in your garden:
- Remove their hiding places. Earwigs thrive in dark and moist areas during the day, coming out to feed at night.
- Clean up debris, leaf piles, and decaying plant matter
- Trap them by placing numerous traps throughout your yard.
- Use empty tuna or cat food cans with ½ inch of vegetable oil and a smelly substance such as fish oil or bacon grease. Place these in your garden bed with the top of the can level with the soil. In the morning, dispose of the trapped earwigs.
- Roll up damp newspaper, secure with rubber bands, and place in your garden bed. Next morning, collect them and shake the earwigs into a pail of soapy water.
- Baits such as SluggoPlus can be used, but often they are not effective if the earwigs have other attractive food sources like your tasty garden.
For more information about earwigs, please visit these links:
https://ipm.ucanr.edu/PMG/PESTNOTES/pn74102.html
Ode to an Earwig https://ucanr.edu/blogs/blogcore/postdetail.cfm?postnum=51351
Earwigs in California (published 1975): https://essig.berkeley.edu/documents/cis/cis20.pdf
Washington State University study: https://www.mdpi.com/2075-4450/14/12/906
Help Desk of the UC Master Gardeners of Contra Costa County (SEH)
- Author: Help Desk Team
Are you a gardener with questions? Are you a beginning gardener just getting started? Do you want to know more about how to troubleshoot problems in your garden? Some of the topics addressed in our classes and material cover what, when, and how to plant, how to prepare the soil, and maintenance of your plants, including pruning.
The Contra Costa Master Gardener website (https://ccmg.ucanr.edu/) has links to information about both edible gardening and landscape gardening. We also offer a program called Vegetable Gardening for Beginners if you are interested in growing vegetables: https://ccmg.ucanr.edu/GrowingGardeners/
This is the handbook for this class: https://ucanr.edu/sites/ccmg/files/292083.pdf
There are many resources online through the University of California that can provide you with good information about specific pests and diseases, including the following:
• Home, garden, turf, and landscape pests: https://ipm.ucanr.edu/PMG/menu.homegarden.html
• UC California Garden Web: https://cagardenweb.ucanr.edu/
These are the books the Master Gardeners use for training and reference:
• The California Master Gardener Handbook: https://anrcatalog.ucanr.edu/Details.aspx?itemNo=3382
• Abiotic Disorders of Landscape Plants: https://anrcatalog.ucanr.edu/Items.aspx?search=abiotic%20disorders%20of%20landscape%20plants
• Pests of Landscape Trees and Shrubs: https://anrcatalog.ucanr.edu/Items.aspx?search=pests%20of%20landscape%20trees%20and%20shrubs
• Pests of Garden and Small Farm: https://anrcatalog.ucanr.edu/Items.aspx?search=pests%20of%20the%20garden%20and%20small%20farm
The UC Master Gardener volunteers of Contra Costa County are actively involved in bringing you educational programming. We partner with the Contra Costa County Library to present topics that will help you grow a healthy, thriving and sustainable garden. See the upcoming and past webinars here: https://ccmg.ucanr.edu/Webinars_and_Programming_/
You can find a schedule of in-person talks at libraries, at our Walnut Creek demonstration garden, and when Master Gardeners will have tables at Farmers Markets where you can ask questions at this link:
https://ccmg.ucanr.edu/Find_Us/Find_Us_by_Location/
You can also find past webinars as well as short, single-topic videos on a wide range of gardening topics on the Contra Costa Master Gardener Program YouTube channel: https://www.youtube.com/@CoCoMGUC
Still have questions? Send an email to the Contra Costa Master Gardener Program Help Desk: ccmg@ucanr.edu
• Include your name, phone number, and city.
• A description of the problem, including the name of the plant, when the problem began, and cultural history such as water, fertilizing, pruning, pesticides, etc.
• Photographs are very helpful. Include photos of the problem parts, but also photos of the whole plant.
Help Desk of the UC Master Gardeners of Contra Costa County (SEH)

- Author: Help Desk Team
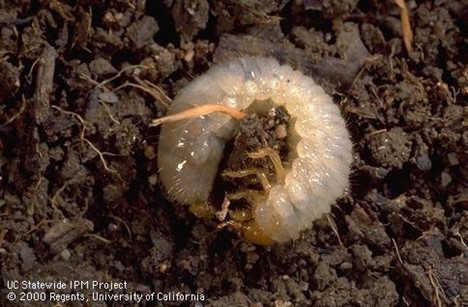
It's Spring, and many gardeners are turning with anticipation to their vegetable gardening beds and thinking about summertime harvesting and feasting. If you're one of them, you may find an unexpected surprise of white grubs just below the surface when you start to prepare your soil for planting.
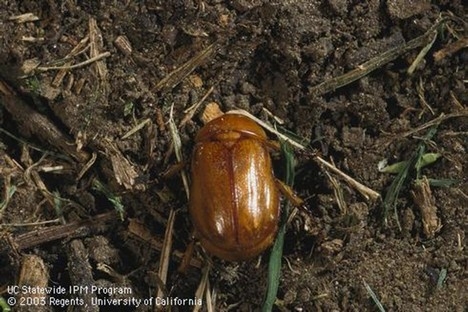
Although we typically think of grubs as being specific to lawns, where their root feeding can cause brown patches, they also show up in vegetable beds. Most of what we call grubs are the larvae of the Masked Chafer beetle. They are whitish with brown heads and legs, and when fully grown are about 3/4” long and c-shaped. This time of year they are just starting to migrate upward in the soil from about 8” deep where they have overwintered.
Unless there is a significant infestation, the best control for grubs is to handpick them from the bed as soon as you see them and leave them for the birds to find. If there are too many for hand-picking, another option is to apply beneficial nematodes (Heterorhabditis bacteriophora), which are tiny parasitic roundworms that enter the grub's body and kill it within a few days. Beneficial nematodes are often available at local nurseries.
Beneficial nematodes should be applied in the summer and early fall when the grubs are young, and are most effective when applied to soil that is over 60°F. The nematodes move through moist (not soggy) soil, so it's important to irrigate both before and after application. A second application about two weeks after the first will help with successful control. Keep in mind that beneficial nematodes are killed by light and heat, so it can be a good idea to apply them in the cooler, evening hours.
For more information on beneficial nematodes and how to apply them in your vegetable beds, please see our Pest Note at https://ipm.ucanr.edu/TOOLS/TURF/PESTS/innem.html
Help Desk of the UC Master Gardeners of Contra Costa County (RDH)
- Author: Help Desk Team
Living with the threat of wildfire is an unfortunate fact of life for Californians. While we cannot control wildfire, we can help minimize its destruction by practicing fire safe strategies which harden the landscape by reducing the vulnerability of your home and property to wildfire.
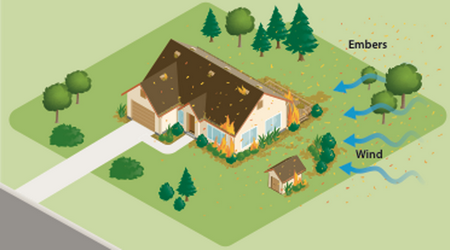
In recent years, we have seen many fires that have affected homes that are not even close to an open space. A single spark which is called a firebrand or flying ember can travel miles in the wind making us all vulnerable.
Hardening the landscape
Creating a beautiful and functional landscape as well as a fire adapted property can be accomplished using the concept of Defensible Zones. Your property can be viewed as 3 defensible zones and when done properly, it makes your home and property less prone to fire. In these zones, we look for places to prevent ignition, slow fire down, and improve firefighter access.
The Zones are:
Zone 0: Ignition Zone
0-5 feet from home.
Zone 1: Firebreak Zone
5-30 feet from home.
Zone 2: Reduced Fuel Zone
30-100 feet from home or to your property line.
Zone 0: Ignition Zone: 0–5 feet
This zone is the most important one. The first 5 feet from your home are critical to the safety of your home and family. Those 5 feet should be clear of anything that will burn. This includes plants, shrubs, overhanging trees, and mulch. Remove all flammable hazards that are within this critical zone including stacks of wood, propane tanks, wooden chairs, benches, dead vegetation, leaves or cobwebs under the eaves or in rain gutters, and wooden fences. It is important to eliminate any material that could be ignited by a flying ember. Also make sure to remove tree branches that overhang the roof.
Zone 1: Firebreak Zone: 5–30 feet
In this zone, the primary goal is to stop a fire from spreading. We want to use space (separation) to create areas that “break” or slow the path of any fire. Hedges and wooden fences are of special concern, as they can channel flames toward the house. Strategically created space between shrubs, trees, plants, and anything else that might burn will create a fuel break that will make it harder for flames to spread on the ground from plant to plant and to your home. Prune and thin, remove plants and separate layers of vegetation, for example by removing lower tree branches, so that a fire cannot “ladder”, or climb up shrubs to trees to your home/roof. Incorporate fire-safe hardscape materials throughout this area like stone, gravel, cement, metal fences, water features and pathways.
Zone 2: Reduced Fuel Zone 30–100 feet
We want to REDUCE THE FUEL in this zone all the way around your home. Fuel is anything that will burn including dead vegetation, downed branches, overgrown areas, low hanging trees, flammable plants and wooden fencing. Keeping this area clear of dead material and adding hardscape will eliminate fuel and help stop fire from spreading across your property. It will also help improve firefighter access to your property.
For more information on defensible space:
https://ucanr.edu/sites/fire/Preparedness/Landscaping/DefensibleSpace/
How to Start: Develop a Strategy for each zone
• Identify problem areas
• Minimize slope risk
• Target plants for removal
• Add plants that are fire resistant
• Plant in an island format
• Make liberal use of hardscaping (rocks, cement, gravel, rock walls, boulders, etc.)
• Include irrigation to keep plants and trees from becoming unsafe
Slope:
In a hilly area, fire will travel faster and flames will shoot higher, therefore it is important to add 10 feet of additional space between trees for every 10% increase in slope. This additional space can help keep the fire from laddering from tree to tree up the hill.
Use Fire Resistant Plants:
The most important thing is to plant the right plant in the right place. This maxim is true for growing conditions and also for fire safety. Remember that all plants can burn so placement is the most important factor. Fire resistant plants share the following characteristics:
Leaves: High moisture content, fleshy and large or coarse like you see in succulents and cactus.
Trees: Deciduous: their thin moist leaves shrivel up when there is fire or extreme heat so don't help ladder into the canopy. Also look for trees and shrubs that have an open and airy structure, allowing for more air circulation and are less likely to harbor dead organic material at the center. Drought tolerant or native to California are the best options.
Remove Flammable Plants and Weeds
Here are good clues for identifying Fire PRONE plants:
Leaves: low moisture content/dry, small, fine or needle like cypress and juniper
Oils: Aromatic, resinous like rosemary and eucalyptus. Decorative hedges and large plants, such as bamboo and conifers including cedars and firs.
Trees: plants that produce a lot of debris increase fire danger. Eucalyptus trees have bark that is loose or papery which creates a lot of debris making these trees very dangerous.
Weeds: All weeds that are higher than 3” are highly flammable and need to be removed.
For more information on fire safe planting: https://ucanr.edu/sites/fire/Preparedness/Landscaping/Plant_choice/
Mulch:
Mulch plays an important role in your landscapes. Besides looking great it provides many benefits:
• water retention,
• soil temperature control
• weed inhibition
• helps prevent soil erosion
BUT…mulch can be highly combustible material in your landscape. The bigger and heavier the pieces the better. But remember it all burns. It is important NOT to have any flammable mulch within 5 feet of your house and other structures.
See more mulch information about mulch and flammability at this link:
https://ucanr.edu/sites/fire/Preparedness/Landscaping/Mulch/
Maintenance: The final element in a fire safe landscape
Be diligent in your maintenance habits in order to keep your property firesafe as follows:
Ongoing:
• Remove weeds, dead plants, leaves and branches.
• Remove vines from trees and fences.
• Compost or remove all debris.
Annually:
• Thin vegetation and cut weeds to 3.”
• Cut back woody plants.
• Ensure sufficient space between shrubs, house and trees.
Every few years:
• Cut back vines, groundcovers.
• Prune tree branches to 10' above ground and above roof.
See more information on maintenance here: https://ucanr.edu/sites/fire/Preparedness/Landscaping/Trees/
Community resources: Firewise: National Fire Protection Association
Firewise is a nationally recognized program for bringing homeowners together to improve the safety of the neighborhood. They offer guidelines, training, and certification.
More information on Firewise here:
https://www.nfpa.org/Education-and-Research/Wildfire/Firewise-USA
In addition to landscaping for fire safety, it is critical that you think about how you can make your home and other structures on your property less susceptible to fire. This is a good chart/source for things to think about:
https://ucanr.edu/sites/hdnmastergardeners/files/357133.pdf
Help Desk of the UC Master Gardeners of Contra Costa County (PDS)
- Author: Help Desk Team
We have all heard of this magical stuff called compost. But what is it? Where does it come from? Why is it so important for our gardens? The reason compost is so important is because it enriches our soil, adding important nutrients that are used by plants for growth. When we create compost, we are breaking down organic matter into a form that provides a rich amendment for the soil and promotes healthy microbial activity. With these nutrients, plants can better resist disease and insects. In addition, compost increases water retention and helps reduce soil diseases. And it can be rewarding to make your own!
What do you need for great compost?
Green material—Yard waste, kitchen vegetable scraps, coffee grounds, or fresh grass clippings. This fresh waste provides the compost's nitrogen content. Do not add meat, dairy products, oil, fat, or dog or cat manure.
Brown material—Dried leaves, torn up newspaper, pieces of cardboard boxes, or shredded paper bags. This dry material provides the carbon content. The smaller you cut the pieces, the faster the composting process will be.
How much of each—Start with equal parts of green and brown material and add up to twice as much brown material as green. Don't use more green material than brown.
Water—Water each layer of the pile to the level of a wrung out wet sponge. If the bin is exposed to rain and gets too much water, you might need to cover it.
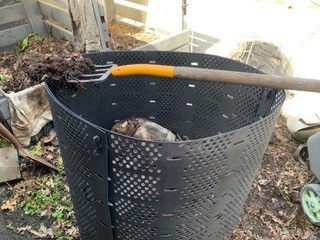
Air—Turn the pile every few days, if possible, but at least once a week for air circulation. A pitchfork works well for turning. In addition to letting the pile “breathe”, it helps prevent problems with flies and rodents. Turning the pile helps maintain an optimal temperature, while mixing prevents dense clumping of some materials such as wet green grass.
Temperature—Heat in the pile is generated by bacteria feeding on the green material. Temperatures above 140°F will kill many pathogens and weed seeds and will also accelerate decomposition for faster composting (see below). A compost thermometer with a long probe gives good information about when to turn the pile and when to water it.
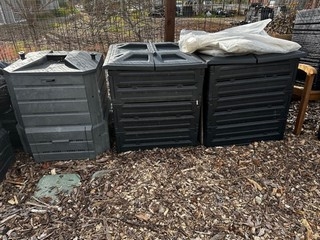
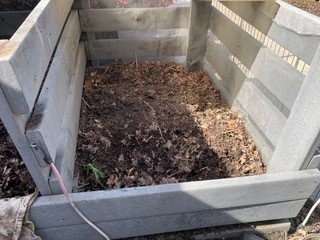
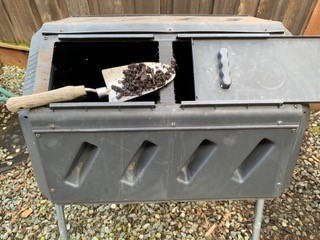
Different methods of composting—Factors to consider when choosing a method include the time and energy needed to maintain the pile, the amount of compost needed, and the time needed to achieve the finished product. The pile needs to be at least 3 feet square to generate enough heat for decomposition. You can build the compost pile right on the ground but if you build a structure to contain the pile, it should be 3–5 feet with one side open for easy access to build or turn the pile. Sun or shade does not matter as the temperature of the pile depends on its composition, not exposure to the sun. Other composting containers can include a closed container, like a rolling barrel, or an open bin composter. There are many ways to make compost: underground, above ground, in bins, in boxes, in pits, in bags, in barrels, in strips, in sheets, and in trenches.
Slow composting method (easy but slow)—Continuously add materials to the pile with little or no chopping of materials. Bury ‘green' scraps 6–12 inches in the center of your bin to reduce attracting flies and rodents. Turn and water as desired for finished compost in 12 to 18 months.
Intermediate composting method (a little more work but faster)—Build a 3' x 3' x 3' pile with materials cut into 2-inch pieces. Turn and water the pile weekly without adding more material to get finished compost in 3 to 8 months.
Fast composting method (the most work but finished fastest)—Build a 3' x 3' x 3' pile with materials chopped to ½ to 1½ inch pieces. Check the temperature of the pile every day with a thermometer in the center of the pile. Turn the pile immediately if the temperature is 150 degrees F or above. Turn and water daily while the pile is between 140–150 degrees F. As the pile cools, turn it whenever it reaches 120 degrees F. Once the pile cools below 120 degrees F, turn and water every week for finished compost in 6–8 weeks.
When is the compost done? The pile will shrink, losing about 1/3 of its volume. It will be dark brown and crumbly with an earthy smell. You should no longer be able to tell what each of the individual ingredients was. Allow compost to age for two weeks before you add it to the soil around plants. Or incorporate it into the soil, but don't sow seeds or transplant seedlings for two weeks.
For more details about composting and what materials to use:
https://sacmg.ucanr.edu/files/163139.pdf
For information about how to use compost in the home garden:
https://ucanr.edu/sites/ccmg/files/221120.pdf
This video is from our own composting experts at our demonstration garden in Walnut Creek: https://www.youtube.com/watch?v=E77Yps9K2bw The garden is open to the public on Wednesday mornings April through October. Please stop by and ask questions.
We hope to see you at Our Garden!
Help Desk of the UC Master Gardeners of Contra Costa County (JRB)


