Help for the Home Gardener from the CCMG Help Desk
Client's Question:
“I am thinking about what to plant in a strip along our concrete driveway and a fence line. I am wondering about a cactus garden. There is no watering source, other than by hand, which I am fine with and actually enjoy. Do you have any suggestions on types of cactus or plants? If cacti, I was thinking of ones that are not too spiny as I have small children as neighbors.”
CCMG Help Desk's Response:
Thank you for contacting the CCMG Help Desk about what to plant along your fence. It is difficult to give you specific suggestions without knowing what kind of sun exposure that strip gets. Walnut Creek gets quite warm in the summer and many plants that generally do well in full sun might not do as well between a fence and a concrete patio or driveway because both the fence and the concrete can increase the heat.
water-wise plants
You also need to be careful about drainage, especially for succulents. Many succulent gardeners create a small mound (8-12” high) to plant the succulents on to assure good drainage. In your case, maybe that mound would be parallel to the fence. The reason: the soil in many parts of Contra Costa is clay, which does not offer good drainage, making it difficult to grow succulents in the ground. Many succulents grow well in containers where it's easier to give them a better soil mix and control the water. Although most succulents are drought-tolerant, prolonged periods without water may cause their leaves to lose color, shrivel or drop. Give plants just enough water to keep them plump and attractive. You might consider planters (maybe rectangular to fit the space). This could be a solution for you to consider.
Other possibilities for the space would be some of the drought-resistant grasses, perennials or smaller shrubs, either planted in the ground or in containers. Some suggestions for these include lavender, salvia (such as Salvia greggii--autumn sage), Origanum, Santolina, or “pink muhly”--a grass (Muhlenbergia capillaris).
Contra Costa Master Gardeners Help Desk
Editor's Note: The Contra Costa Master Gardener Help Desk is available year-round to answer your gardening questions. Except for a few holidays, we're open every week, Monday through Thursday from 9:00 am to Noon at 75 Santa Barbara Road, 2d Floor, Pleasant Hill, CA 94523.
We can also be reached via telephone: (925) 646-6586, email: ccmg@ucanr.edu, and we are on the web at http://ccmg.ucanr.edu/
- Author: MaryJo Smith
"Me mind on fire -- Me soul on fire -- Feeling hot hot hot" are not just lyrics to the catchy one-hit wonder by Buster Poindexter. It's also what we've been thinking (and our plants have been feeling) this summer. Although as of September 22nd, the season technically shifted from summer to fall, the temperatures have remained in the mid- to high 90's.
The hot sun and high temperatures can be brutal on a garden causing plants and vegetables to wilt, and soils to dry out. This isn't only about the heat and sun though; when diminished water availability is added to the scenario, it becomes about the effects that all three combined have on the garden. The goal this year has been to keep a healthy amount of moisture in the soil using less water.
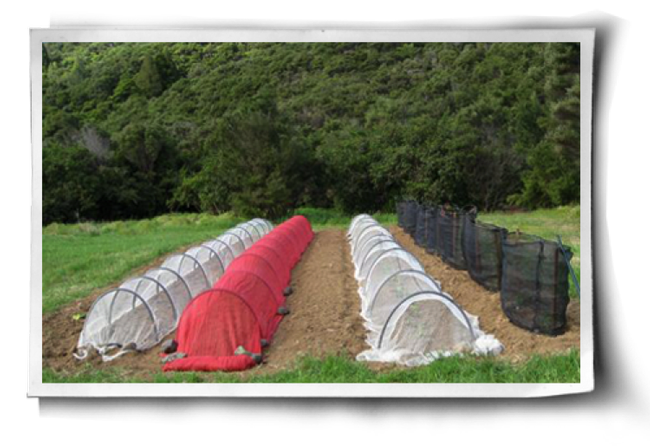
With the water restrictions still in effect, it's important to look at ways to grow a fall garden with less water. One way to do that is by using row covers or shade cloths.
Protecting the plants from direct sunlight by using row covers or shade cloth reduces the leaf temperature and plant watering needs (they don't "sweat" as much). This can raise the production of your garden and reduce your irrigating and fertilizing costs. Its also useful in protecting your vegetable patch from insects and birds.
Row covers are often used in the winter to protect plants from frost, and during the spring and summer months to block out the sun. However, consider using them during the early fall season to protect your newly planted "cool" season crops from the sun and heat. Row covers generally block out 15-30% of the sun, depending upon the thickness of the cloth.
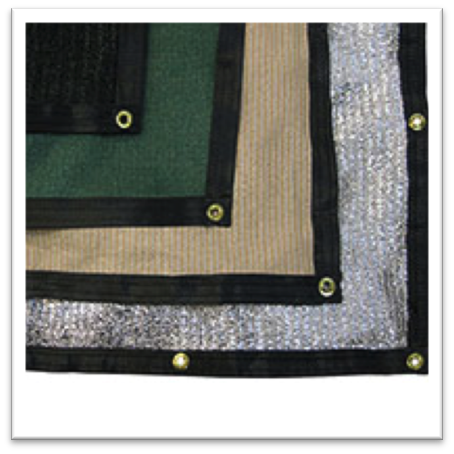
With the autumnal heat we've been having, shade cloth, which is a little heavier, might be an even better way to go. It comes in a variety of colors and densities depending upon the amount of sun to be blocked and what vegetables or plants need protection. While light colored shade cloth will reflect more of the sun's rays and heat, expect higher temperatures under darker shade cloth, unless you provide ample air space.
Shade cloth requires a simple support structure consisting of PVC or metal bows that span one or more rows. The bows support the shade cloth over the crop, providing cooling shade and reducing water needs.
If you are planting a vegetable garden, understanding the light requirements of each crop may allow you to plant some crops in a naturally shaded environment. Lettuce, currants, gooseberries, spinach, cauliflower and most beans can grow in conditions with less than full sun. Under these conditions, water use needs will be reduced due to the natural cooling of the plant.
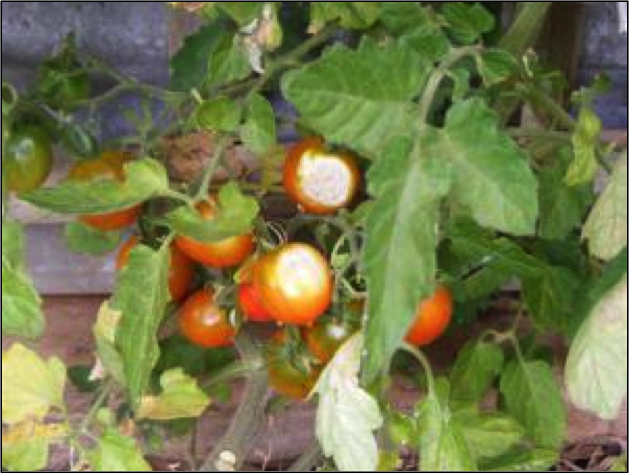
Even plants that require full sun and love the heat (80-90°), such as peppers and tomatoes, sometimes need shade cloth too due to the intense summer sun or heat. I placed shade cloth over my tomatoes this summer when the temperatures were especially high.
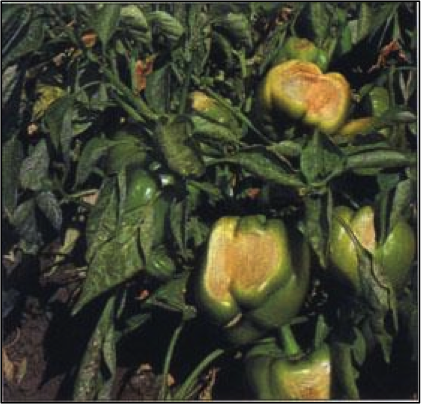
Shade cloth can be placed over plants during the hottest time of the day (11 am to 4 pm) to keep them from getting sunburned or stressed. Sun damage can result in wilted or burned leaves and skin. Many of the cool season crops will bolt or go to seed prematurely in higher temperatures, and leafy vegetables turn bitter in taste.
Seedlings and recently transplanted starters do best with reduced sun until they are established. Initially, a shade cloth with a 10% percent density is perfect for sun-loving plants; 30% density cloth is best for more sun sensitive plants. This weight of cloth can also provide some protection from the drying effects of wind. During the hot summer months, most vegetable garden plants require 40% to 60% percent protection from the sun. Even though we are now in October, given the high temperatures were experiencing, using a 40-50% shade cloth to cover the newly planted crops can help with reducing the temperature. Shade can lower plant and soil temperatures by as much as 10°F.
Row covers and shade cloth can be purchased at many garden centers or online. I purchase mine online because of the broader selection.
Help for the Home Gardener from the CCMG Help Desk
Client has a problem with "brown spots" in the lawn:
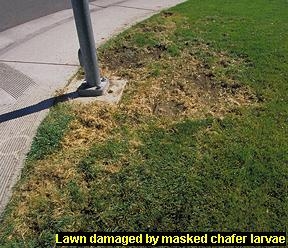
in the lawn
The lawn in question is in Orinda and is 1000 sq ft. The lawn has brown patches which pull up without the roots attached. After contacting a lawn care company, the client was sent lawn care information assuming that the problem was white grubs. The client would like help sorting out the problem.
CCMG Help Desk's Response:
We took a quick look at the materials that you received from the lawn care/pest control company. They are good resources, but don't really answer your primary question as to the source of the problems you are experiencing. We concur that you need to do more investigation to confirm a diagnosis rather than just assuming that the cause is white grubs.
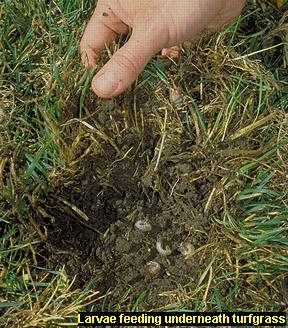
and larvae
Here is a link to a UC website that discusses the management of Masked Chafer Beetles and White Larval Grubs: http://www.ipm.ucdavis.edu/TOOLS/TURF/PESTS/inchaf.html. As you'll see when you visit the website, UC recommends that you dig around the roots of the turf in a damaged area in late fall through spring to look for the grubs. The website has good photos of what you are looking for. If you do locate the grubs, one of UC's recommendations for managing the problem is to apply beneficial nematodes.
This UC website describes the life cycle of the masked chafer beetle/white grubs: http://www.ipm.ucdavis.edu/TOOLS/TURF/PESTS/inchaflife.html As you'll see on the site, according to UC, the adults emerge from the ground and lay eggs in late spring and early summer. With this timing, the white grub larvae would be emerging during the summer months. UC recommends that for white grubs, nematodes should be applied in the late summer or early fall when more mature larvae are present and active. A second application about 2 weeks after the first will enhance control.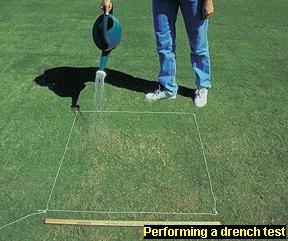
http://www.ipm.ucdavis.edu/PMG/PESTNOTES/pn7476.html. In particular, take a look at Table 2 which tells you whether you should use a drench test or dig in the area looking for signs of the insects. If you click on the blue highlighted names of the insects, you'll link to sites which have photos of what you are looking for.
If you decide to do a drench test, here's UC's website telling you how to do the test: http://www.ipm.ucdavis.edu/TOOLS/TURF/PESTS/indrench.hrml. We did some quick research and learned that the amount of dish soap that you use for the drench test should not harm the turf.
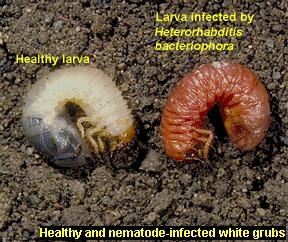
left: healthy larva
right: nematode infected
Finally, even with this information in hand, if you believe conducting these types of diagnoses isn't your forte, you could use this information to hire a consultant and/or pest control/lawn care company. CCMG can't make recommendations, but there are numerous sources in the telephone book and/or on the web. UC also provides some guidance in this area as well in the Pest Note “Hiring a Pest Control Company” (http://www.ipm.ucdavis.edu/PMG/PESTNOTES/pn74125.html)
CCMG Help Desk
Editor's Note: The Contra Costa Master Gardener Help Desk is available year-round to answer your gardening questions. Except for a few holidays, we're open every week, Monday through Thursday from 9:00 am to Noon at 75 Santa Barbara Road, 2d Floor, Pleasant Hill, CA 94523.
We can also be reached via telephone: (925) 646-6586, email: ccmg@ucanr.edu, and we are on the web at http://ccmg.ucanr.edu/
- Author: Shannon Wolfe
I started composting at my house a couple years ago. I had been eyeing an unused compost bin that my in-laws had in their back yard for a while, and when they finally offered it up to me, I was happy to take the bin off their hands and put it to use in my yard. Back when I lived in San Francisco I was always on top of what could go in the green waste bin, and what had to be put in the trash, and the same went for when we moved to Berkeley and when we moved to Walnut Creek. I love not putting things in the trash. Our recycling bin is usually the fullest bin on trash days. Since we have started composting some things still go in the city's green waste cart, but more and more goes into my personal compost bin. There was a bit of a learning curve at first, but now it is second nature to me (and its getting easier for my husband, too).
There are many reasons to compost: adding compost to your soil improves your soil's texture, fertility and ability to retain water. Compost adds microorganisms and other beneficial critters to your soil (I am always excited to see bugs and earthworms, and the occasional lizard hanging out in my bin). And when you add kitchen scraps to your compost bin you are keeping them out of the landfill - you are doing the ultimate form of recycling! I think composting can be intimidating to some people, but I am here to tell you that composting is not hard!
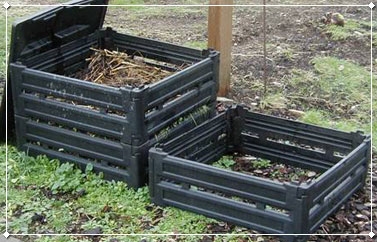
The compost bin I use is a Bio-Stack bin. Like I said earlier, I got it for free, so I am in no way advocating for this particular brand of bin, but I do enjoy it. It is light-weight and easy to make bigger or smaller as needed by adding or removing a layer. It also has a nice hinged lid that makes it easy to add new material to the pile. The lid comes off easily for watering and turning the compost. But if I did not have this bin, my plan was to just start a pile in the corner of my yard and compost the old-fashioned way. There is no need to buy anything to get a compost pile going!
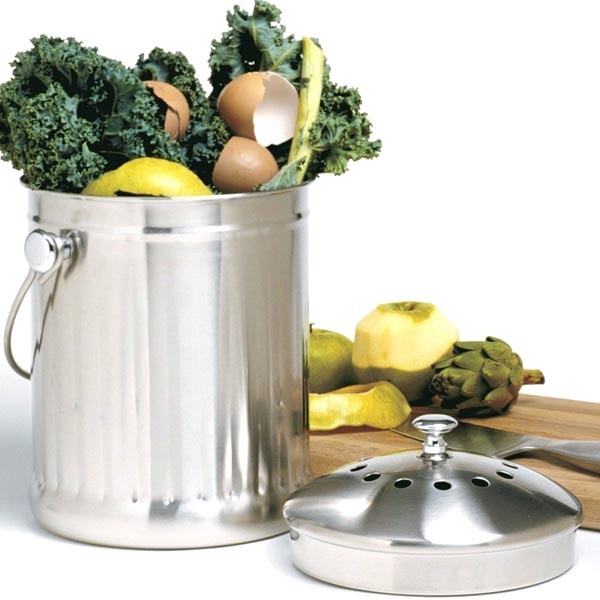
I would say the one biggest hurdle to composting at my house was deciding, and learning along the way, what I wanted to have go in my compost pile, and what was still best to send off in the city's green bin. Our trash set up had always included a trash can, a recycling bin and a green-waste can, so I just added a fourth container: the compost container. If you are already in the habit of putting food waste (and other things like coffee filters and paper towels) in a green waste bin, then adding another bin for compost materials is not that hard. Our compost bin is one of these stainless steel buckets with a lid and handle:
It works really well for us. It gets full maybe once or twice a week, depending on what we are cooking. When it gets full I walk it out to the compost bin and dump it. If its super funky inside, I fill it up with the hose, swish it around a bit and then dump that water into the compost bin too. Since I am already out at the compost bin I will usually take my garden fork, which I keep by the compost bin and turn the pile.
There are certain food waste items that I could put in my compost pile that I choose to put in the city's green waste bin. If for some reason we are using a lot of paper towels, I put most of those in the city bin. I have also learned that avocado pits, stone fruit pits, corn cobs and corn husks take a really long time to break down, so I no longer put them in my compost pile. But you can easily learn what works for you. Some weeks it feels like most of what is going in the compost pile is egg shells and coffee grounds, but so far the compost police have not showed up and punished me for any lack of diversity in my pile.
Another admission on my part, I don't water my compost pile as often as I should. But the pile continues to break down, just at a slower pace. From my experience, I don't think you can really compost "wrong." There are certainly best practices to use, and ways to make your food waste break down faster, but I think some people get too caught up in balancing the greens and browns, and watering and turning the pile that they never start one in the first place! If you have a compost bin that does develop an issue - like flies, or a nasty smell, there is pretty much always an easy solution.
I know that my summer crop of tomatoes and beans benefited greatly from the home made compost that I added when I potted them, and I encourage you to give home composting a shot, too!
If you do want some more basic information on composting, here are some great links to get you going:
Help for the Home Gardener from the
Contra Costa Master Gardeners' Help Desk
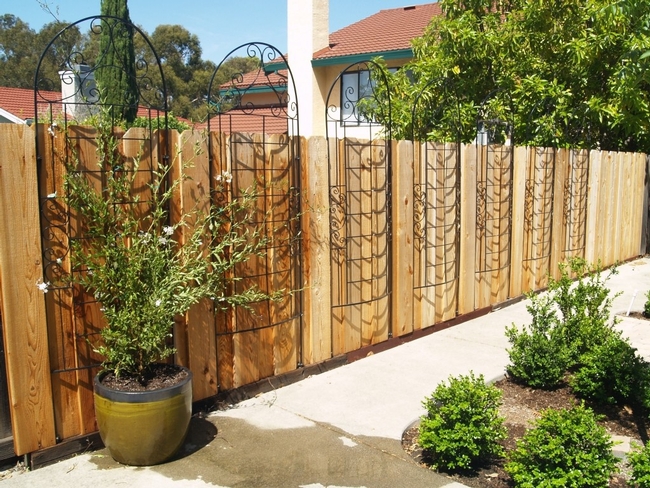
with trellis attached to fence
I've recently purchased a potato vine. As I was planting it, I noticed that the bottom of the trunk looked strange. I think I'm seeing exposed roots and if so, what should I do about it? I'm planting the potato vine to trellis along a 20-foot fence line. See photo. at right. This was my first attempt at a vining plant, and I'm not sure about planting it in a pot. How should I trellis the vine? Maybe I should buy a second vine to span the distance. Thank you.
Advice from CCMG Help Desk:
Exposed Roots: Typically, it‘s recommended to plant nursery plants at the same level they were in the nursery pot, so as not to bury the crown (where the roots meet the trunk). However, your particular specimen seems to be a bit unusual. If it came from the nursery like this, it seems that it was planted too shallow in the nursery pot, with some roots exposed. At this point, we might suggest that you add mulch (good quality compost is great for this purpose) to your container to cover some of these exposed roots, but not above the crooked base which appears to be the crown. Whenever using mulch, it should not be placed too close to the base or trunk of plants and trees, as this can lead to crown rot or other diseases.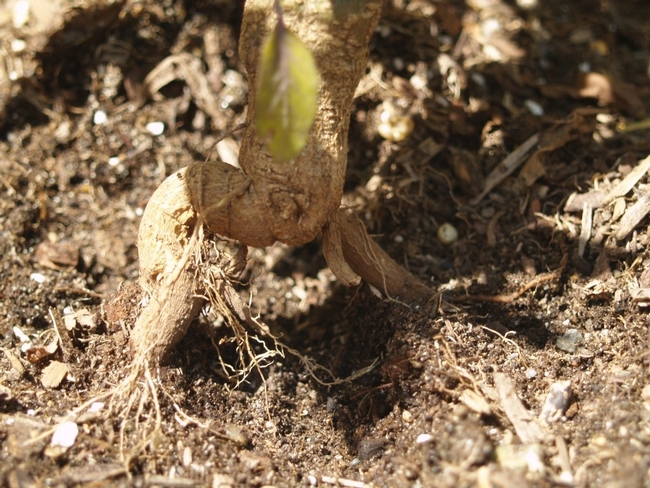
with roots exposed below the crown
Training the Potato Vine to the Trellis: The Sunset Western Garden book indicates that this variety of potato vine can quickly grow up to 30 feet. However, in a container, this vine may not grow to that length. Vines with twining habits will wind their stems around a support by twisting or spiraling new growth as it elongates. Using ties to train your vine along your trellis is a good idea. You will want to bend young growth while it is still green and supple and wrap ties around both the trellis and stems. Once the stems have wound around the trellis, remove the ties or move them further down the trellis. Additionally, the potato vine can be cut back heavily at any time of year to remove unwanted top growth and promote vigorous new growth. To achieve your desired effect, regular attendance to this training will be necessary.
It is difficult to determine the distance of your trellised fence from the picture, but it might be a good idea to add another vine to cover this area more quickly. Or, you might move your container to the middle of the trellis area and train the vine to grow in both directions.
Growng Plants in Containers: Consistent watering of container plants is necessary, especially in the summer months. Most container-grown plants still need moisture in the winter, though not as much.
Your container plants will also need the addition of some fertilizer over time as the nutrients initially available in the potting soil are depleted or washed out of the pot. Applying a general purpose or controlled-release fertilizer can be used as recommended on the manufacturer's label.
With some attention to the training and care of the vine, you should have a very impressive trellis. If Master Gardeners can be of further assistance, please do not hesitate to contact us.
Editor's Note: The CCMG Help Desk is available year-round to answer your gardening questions. Except for a few holidays, we're open every week, Monday through Thursday from 9:00 am to Noon at 75 Santa Barbara Road, 2d Floor, Pleasant Hill, CA 94523. (map) We can also be reached via telephone: (925) 646-6586, email: ccmg@ucanr.edu, and we are on the web at http://ccmg.ucanr.edu/. "Ask a Master Gardener" help tables are also present at many Farmers Markets as well as at the CCMG's "Our Garden" programs (map). See the CCMG web page for details/locations.


