- Author: Steven A. Tjosvold
When should container plants be irrigated? How much water should be applied? In this post, I describe the first step of irrigation scheduling, “when”, and the next post covers “how much”. First some background describing soil tension, available water, and the moisture release curve.
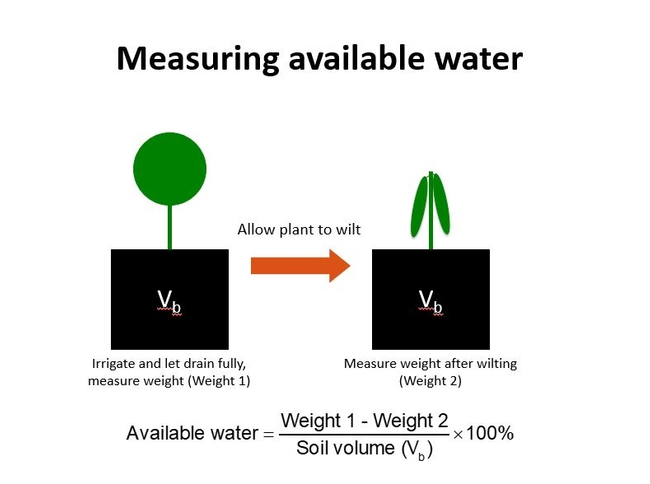
After irrigation and full drainage (container capacity), the plant removes water at first from the larger soil pores and then eventually from the smaller soil pores. The water is held more tightly by the smaller pores. As the soil becomes even drier, the soil pulls the water so tightly that the plant eventually begins to wilt. The “pull” that soil exerts on water is called soil tension. The amount of water held by the soil between container capacity and the wilting point is called the available water because it is the water that is available for plant uptake. Here's a relatively simple way to determine the available water. In practice, this would be done with several representative plants. Fig 1.
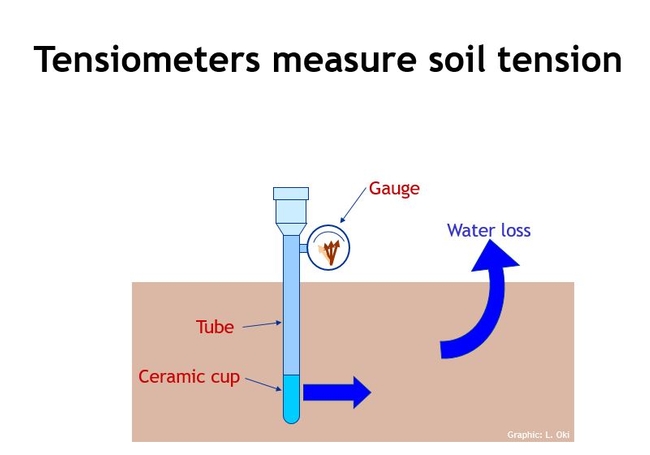
Soil tension can be measured by soil tensiometers. A tensiometer consists of an air tight, water filled tube with a porous ceramic tip at the bottom and vacuum gauge at the top. As soil dries, the soil sucks water from the tube, creating a vacuum, that translates to a measurement at the gauge. The soil tension is a negative pressure and is measured in recognizable units of pressure such as psi, centibars, milibars, and kilopascals. Fig 2.
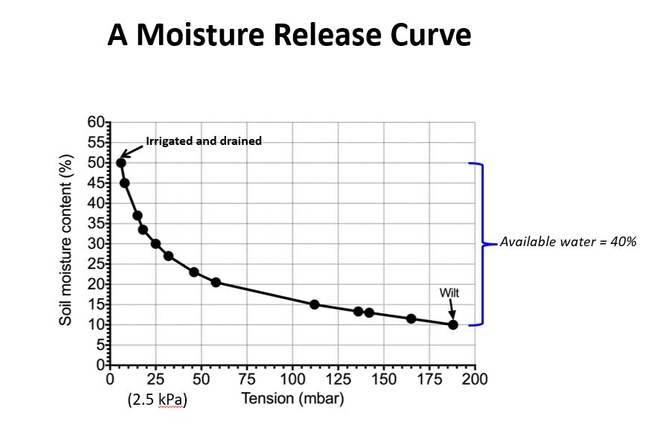
With respect to the plant, not all available water is easily available water. This can be seen in a moisture release curve. A moisture release curve, expresses the relationship between the amount of water held in the soil and the soil tension. It is determined by irrigating a plant, allowing it to drain to container capacity, weighing it regularly up to the point that the plant wilts, and measuring the corresponding soil tension with a tensiometer. Generally, a curve such as this is obtained. Fig 3.
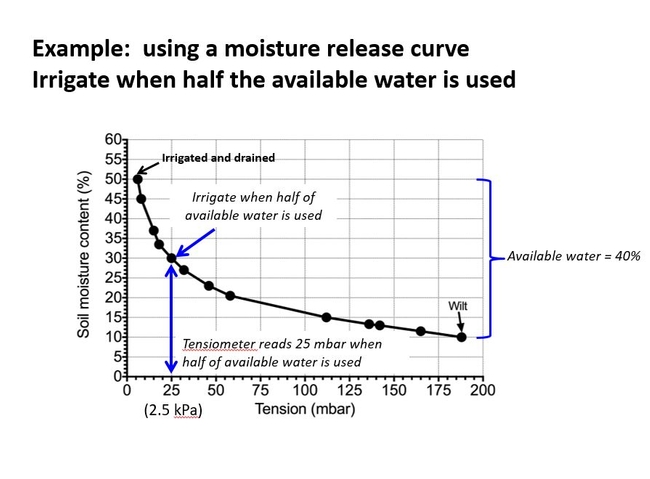
In a typical container soil, at container capacity, much of the water is not held tightly and is easily available to the plant (steep part of curve, low tension values). As the easily available water is removed, the remaining water is held more tightly (shallow part of curve, high tension values). Plants grow better at the lower soil tensions. Research has shown that plants should be irrigated when they have used half of their available water roughly corresponding to the point at which soil tensions rise rapidly. Fig 4.
In the example above, it would be recommended to irrigate at the point corresponding to about 25 mbar (2.5 kilopascals). At this point, water would be removed from most of the coarser pores. As the remaining available water is removed from finer pores, the tension begins to rise rapidly. In this illustration, wilting occurs at a tension of about 190 mbar (19 kPa). Note that there is still water in the soil (roughly 10% by volume), but it is unavailable to the plant. Other container soils (and field soils) have similar shaped curves.
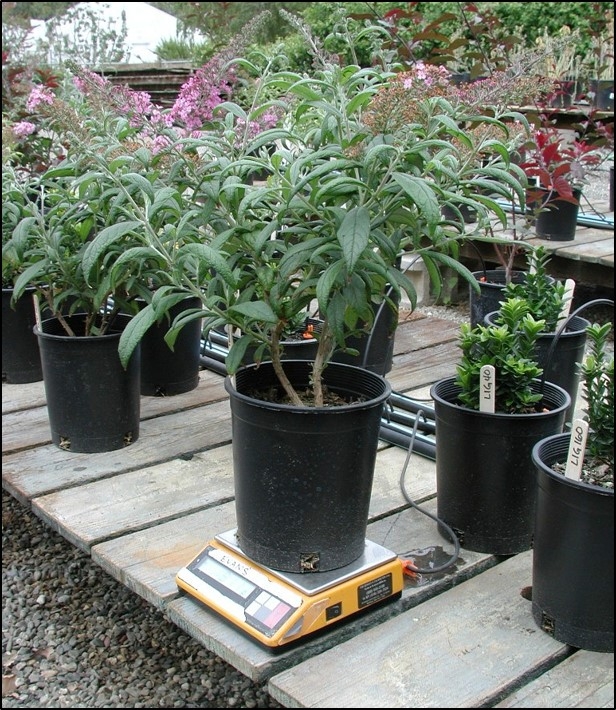
Tensiometers are not used much in container culture for various reasons. Intuitively an experienced grower or person responsible for irrigation scheduling picks up the pot and feels its weight. Simply, when the pot “feels light”, an irrigation is scheduled. Well here is my recommendation to improve on that by knowing the available water and quantifying the change in weight over time. Fig 5.
First, determine the available water by weighing representative plants at container capacity and again when the plant wilts. The difference is the available water (see Fig 1 again if you need to). Now, monitor the daily change in weight. Start by measuring the weight of the pot just after an irrigation and drainage. Weigh again every day. The change of weight (in grams) during a 24- hour period represents the volume (milliliters) of water removed per day by the plant. (One gram of water equals one mili-liter of water). Irrigation should occur when half of the available water is used. That amount of water is what the plant extracted from the soil and evaporated from the soil surface. You would think that might tell you also how much water to apply to fill the soil completely back up with water. But actually some adjustments are still needed to calculate how much water to apply.
Next: The adjustments for salinity and irrigation uniformity and examples.
Figures and tables adapted from: Management of Container Media by Richard Evans, UC Davis, for the class, ENH 120.
- Author: Steven A. Tjosvold
In the previous post, I showed that soil air-filled porosity and flooding can affect the occurrence and severity of root rot. There are some other related factors that can affect root rot too. Soil settling can occur for various reasons and can reduce air- filled porosity. Soil settling or “shrinkage” of the soil volume can occur when organic soil components naturally decompose. The most vulnerable to fast decomposition are incompletely composted wood products. They can break down resulting in smaller particles that fill air spaces. The soil settles. This all results in a loss of air-filled porosity. The total soil volume of the soil is reduced too, resulting in less total water-holding capacity and the need for more frequent irrigations. Container soils with organic components such as peat and coir are more stable and not prone to shrinkage.
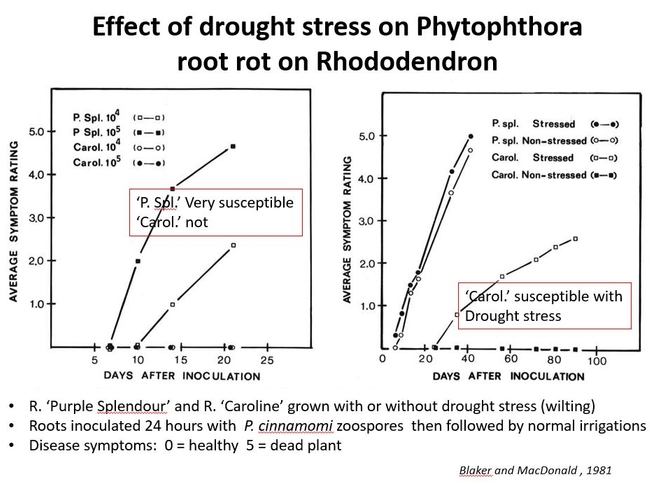
The effect of drought stress on Phytophthora root rot has been studied on two rhododendron cultivars, ‘Purple Splendor' (a very susceptible cultivar) and ‘Caroline' (less susceptible cultivar). For each cultivar, a group of plants were selected and the soil was dried to the point that the plants started to wilt. The roots of this group and a group of non-stressed plants were then inoculated with P. cinnamomi zoospores and then followed with normal irrigations. Disease symptoms were observed for over 80 days. “Purple Splendor' was very susceptible in both the drought- stressed and non- stressed condition, while the less susceptible ‘ Caroline' was only susceptible in the drought- stressed condition. So, a relatively resistant cultivar such as ‘Caroline' became predisposed to Phytophthora root rot when it was subjected to drought stress. Fig 2.
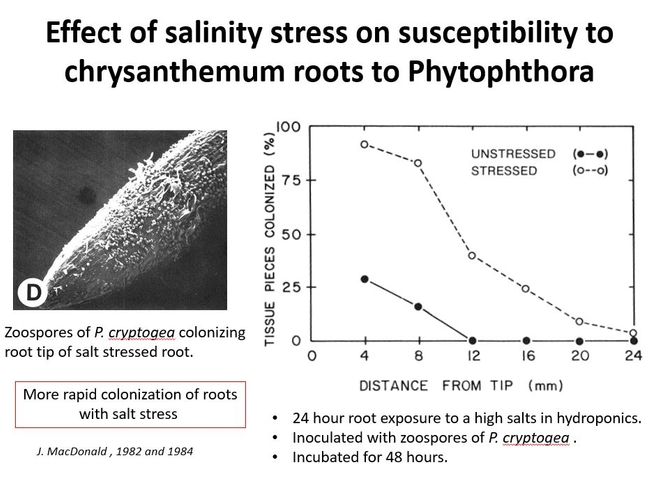
Other stresses to roots might also affect susceptibility to Phytophthora. Soil salinity stress was studied on chrysanthemum roots. Chrysanthemum roots were exposed to high mineral salts in hydroponics for 24 hours. After 48 hours it was found that those roots that were exposed to high salinity became more colonized by Phytophthora cryptogea. Fig 3.
Salinity stresses might be more common than you think. Salts in the soil become more concentrated as water is removed by plant uptake. Of course, if soils are inadvertently dried too much (as the example above with drought), salts concentrate greatly in the soil solution. The over- application of a topical fertilizer or an inadvertent spike of liquid fertilizers from a poorly functioning fertilizer injector could cause high salinity in the soil solution, resulting in the plant's predisposition to root rots.
Next: Available water and irrigation
- Author: Steven A. Tjosvold
Parameters for air- porosity and water- holding capacity have been established for container soils. These parameters were developed based on the needs of the plant. But the occurrence of root diseases can be affected by the amount of air and water in the soil too. Many horticulturists say that root diseases are commonly associated with “heavy soils” and “too frequent irrigations”. Some say “dry out the soil between irrigations”. Why is that?
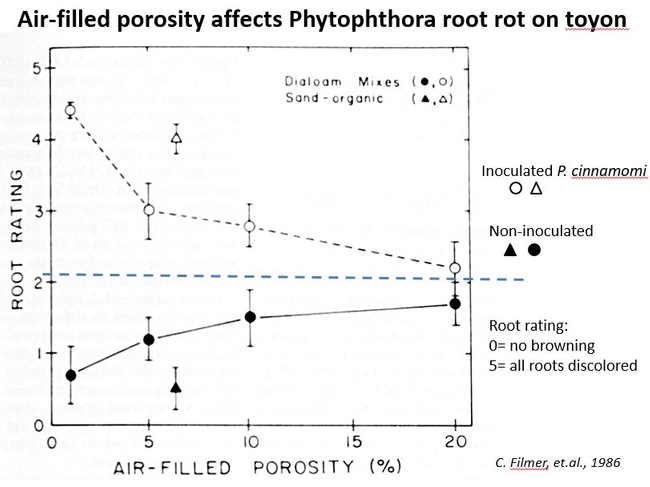
There is research that supports these statements. A study evaluating disease severity of Phytophthora root rot on toyon in two container mixes illustrates the importance of having a relatively high air porosity in a container mix (Filmer, et.al, 1986). With increasing air- porosity, root disease decreased when plants were inoculated with Phytophthora, and root health increased in non-inoculated plants. Fig 1.
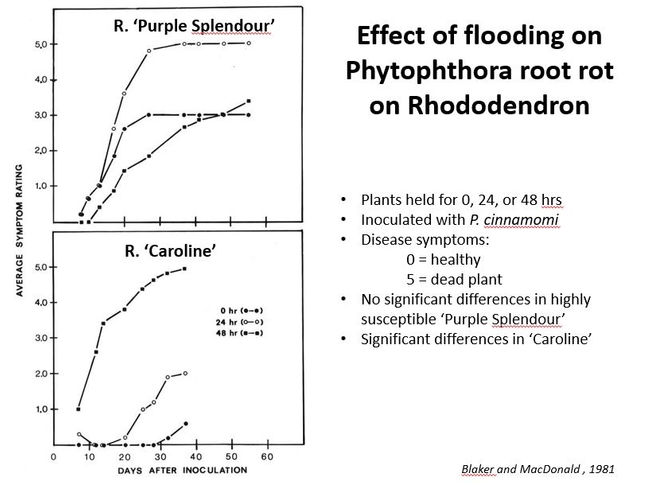
Another study demonstrates the impact of flooding containers on the severity of Phytophthora root rot on Rhododendron (Blaker and MacDonald, 1981). There were two rhododendron cultivars, ‘Purple Splendor' (a very susceptible cultivar) and ‘Caroline' (less susceptible), each inoculated with Phytophthora cinnamomi and “flooded” in their containers so that the soil was saturated for 0, 24, and 48 hours. The data showed that in ‘Purple Splendor', the disease progressed quickly in all flooding regimes (the top graph), but in ‘Caroline' there were differences in flooding regimes (the lower graph). In the less susceptible cultivar 'Caroline", disease severity increased with longer flooding periods. Fig 2.
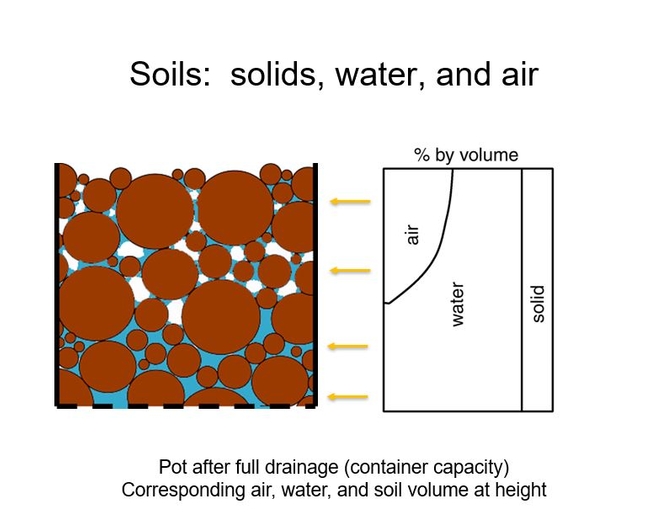
Although “flooding” in this experiment may seem a bit extreme, yes, who would ever irrigate like that, I would remind you of the illustration that I showed in Soil Mix, Part 2. After full drainage (container capacity) there is a saturated soil layer, a “flooded” layer, at the bottom of the container. Fig 3.
It is easily conceivable that the bottom of the container could be flooded for 24, 48, or even more hours. In periods that have low transpiration rates, the plant's roots do not remove this saturated zone quickly. This might occur after a poorly-timed irrigation just before a rainy period. It might occur in a poorly ventilated greenhouse that has chronically high humidity.
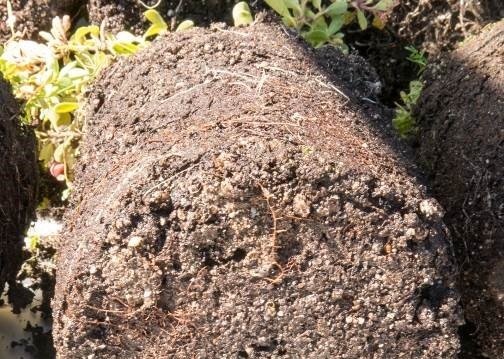
Evidence of root disease being initiated in this saturated zone is seen commonly. In the following example with Manzanita uva-ursi, the brown roots and lack of fine roots at the bottom of the container is caused by Phytophthora root rot. Note that the roots above these are still healthy and white. They have not been consumed by Phytophthora, at least yet. Fig 4.
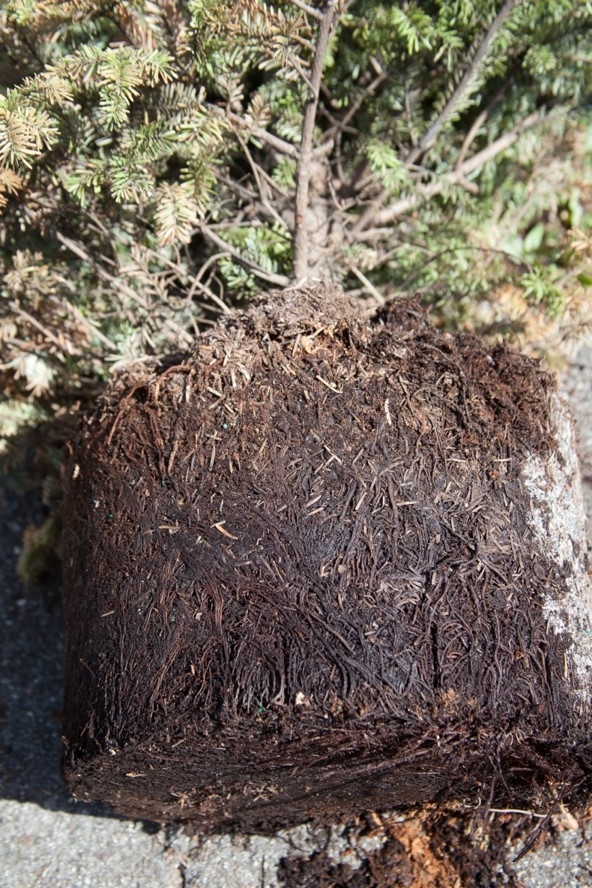
Another example of Phytophthora root rot on fir. In this case, the only healthy white roots remaining are at the upper profile of the soil. Fig 5.
Next: Effect of Soil Settling, Salinity, and Drought on Root Rot
- Author: Steven A. Tjosvold
Container soils must have the right balance of air-filled and water-filled pore space. This is especially important right after irrigation. I showed in the previous blog that field soils shouldn't be used in containers because they don't drain well and create a saturated root environment. Roots need air (oxygen) for respiration, so you can't have the roots drowning for very long. You need a good balance of air and water. This blog discusses what is a good balance and explains why container size affects it.
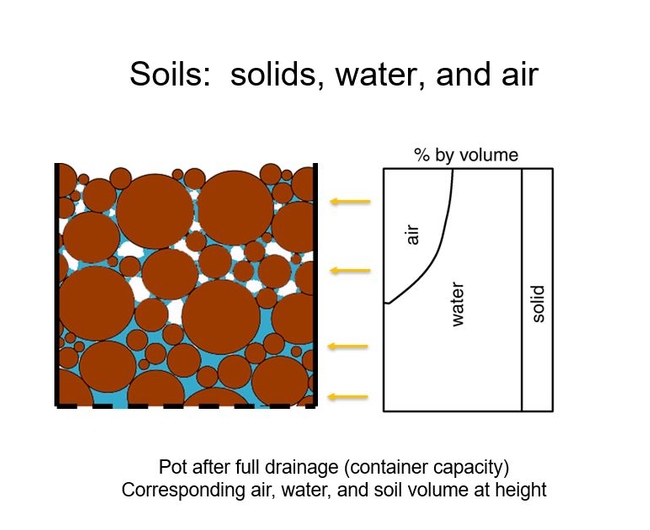
Simply, container soils consist of solids that form the intricate pore space that holds water and air. After full drainage (container capacity), the pore space on the bottom of the pot is saturated with water. Closer to the surface, there are more open pores that hold air. This is seen in Figure 1.
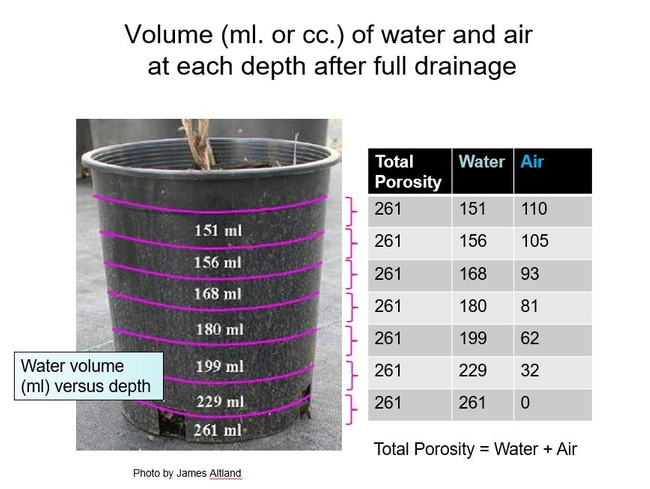
The balance between air and water filled pores in the container can be illustrated more specifically. In Fig 2, water volume (ml. / cc.) in vertically sliced sections are shown on the container with the corresponding air volume in the table. Note that total porosity is constant if the soil components are uniform, and that Air + Water = Total Porosity.
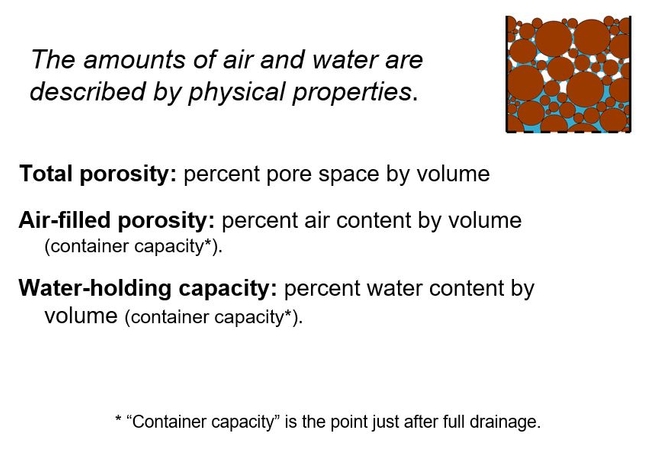
It is useful to define terms to describe the amounts of air and water and total porosity. Total porosity is the percent of the soil volume occupied by pore spaces, water- holding capacity is the percent of the soil volume that contains water, and air-filled porosity is the percent of the soil volume that is filled with air. These parameters can be measured for any soil mix for a designated container size. With standardized parameters, researchers can study how they affect plant growth and root diseases. Soil manufacturers can develop, standardize and describe soil mixes. See figure 3.
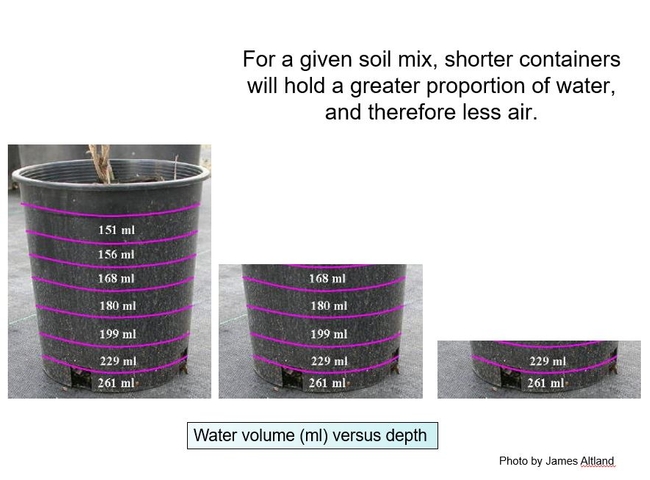
These parameters would of course be affected by the particle sizes of the soil components. (See previous blog, Fig 5). In addition, the size of the container-- actually the height of the container-- affects these parameters too. For any given container mix, as the container height decreases, the water- holding capacity increases. As container height increases, the water-holding capacity decreases. This is seen in a very simple way using the pot example given earlier. I have visually "sliced off" the top of the container to show the water that would be held in shorter containers. See figure 4.
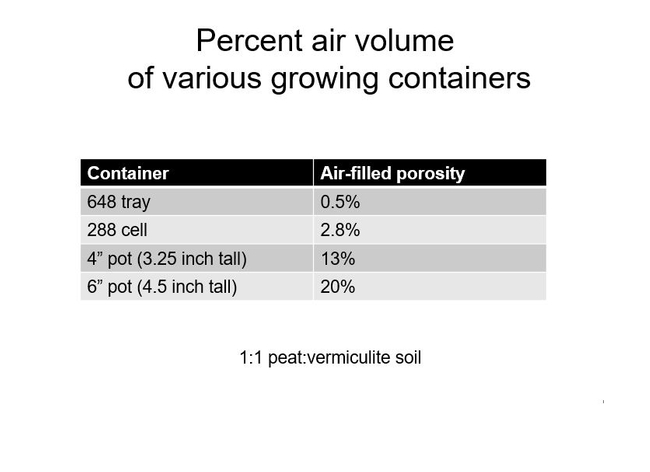
And seen more specifically with this example using air-filled porosity. Remember, more water, less air! Fig 5.
So a container soil that works well in a tall container may have too high of a water holding capacity and too little air-filled porosity in a short container. The opposite is true for a short container too. The container height should be considered when selecting the container mix. You probably have seen this. The container media for a propagation flat for vegetative cuttings often is composed of components with large particles (e.g. perlite, scoria, and vermiculite) to minimize the overall water holding capacity and maximize the overall air-filled porosity.
Next: What are favorable levels for water-holding capacity, air-filled porosity and total porosity?
Figures and tables adapted from: Management of Container Media by Richard Evans, UC Davis, for the class, ENH 120. Photo of pot/water relationship by James Altland
- Author: Steven A. Tjosvold
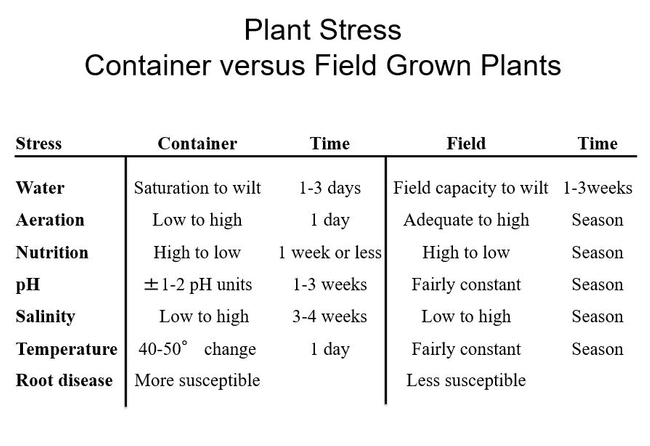
First some basics: A container soil, as with any field soil, must provide a reservoir for moisture, air, mineral nutrients, and anchorage for plants. A container limits the soil volume that roots can develop in and is relatively shallow in depth. As a result, plants grown in containers are subjected to more intense environmental stresses than those grown in a field. That is why growing in containers requires precision in irrigation and fertilizer management and is often fraught with plant problems and even disasters.
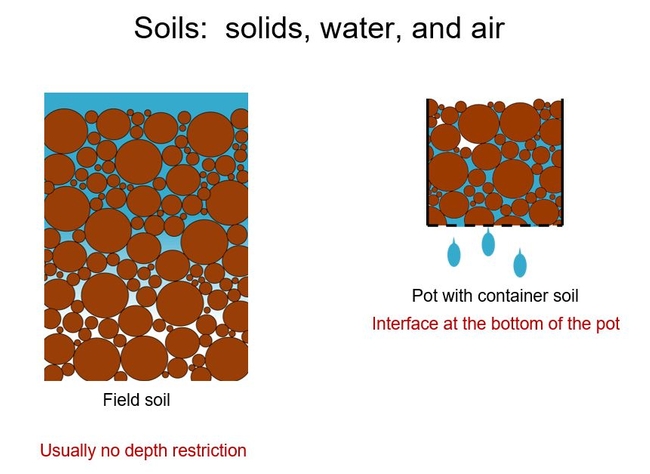
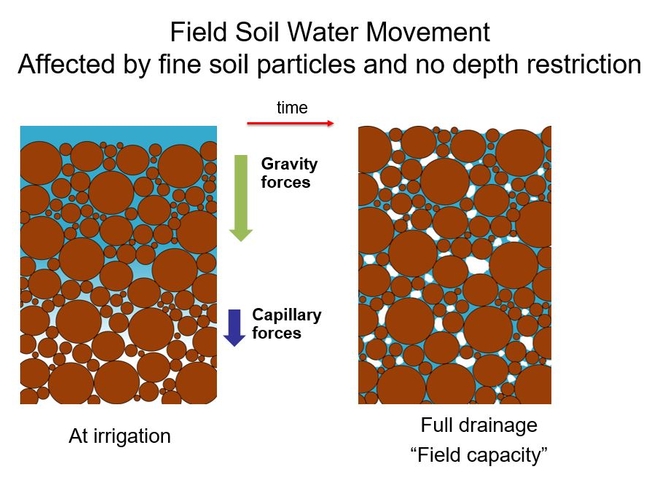
Why not just use field soils in containers? As mentioned, they are relatively heavy; consequently they are expensive to ship and are more difficult to lift and move in the nursery. Moreover, field soils hold too much water in containers. An understanding of the physical forces that are acting on water in the field and the container helps explain this. The first thing to note is the effective depth of the two situations, field versus container. Good agricultural field soils have no physical depth restrictions to a developing root system (e.g. a mature fruit tree root's often only need to colonize the top two or three feet of soil, while the effective soil depth is often greater). However, a container of course limits the depth of the soil and the drainage water interfaces with the ambient air at the bottom of the container.
When water is first added to a field soil, gravity forces pull the water in the water-filled pores down. Below the saturated zones, capillary forces help pull water deeper too. (These forces are a result of the small- pores or capillary-like spaces). When full drainage has occurred, water movement is mostly at equilibrium. The soil is said to be at “field capacity”. (This term is useful to describe the point in time when the water holding capacity for a field soil is measured).
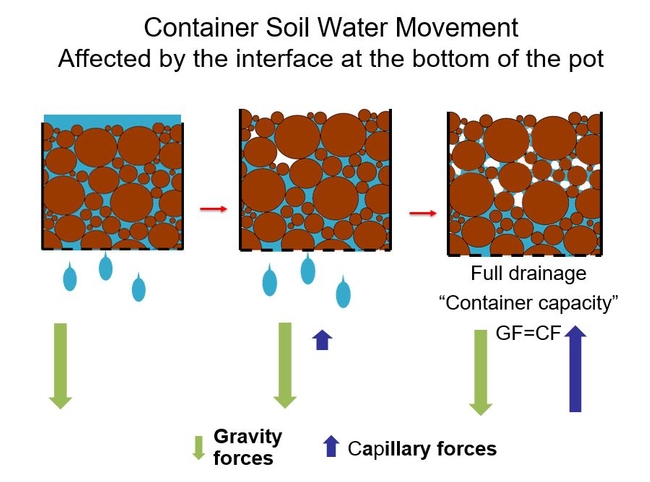
The same forces affect the movement of water in containers but in a different way. At first gravity is pulling the water downward out of the water-filled pores, and water drains out the bottom of the pot. But as water drains, the upper soil profile begins to form capillary-like spaces, and capillary forces begin to tug water upward. As water continues to drain, the same upward capillary forces begin to tug upward at the bottom of the container. After several minutes of drainage, the upward capillary forces on water equals the downward gravity force, and water movement is mostly at equilibrium. The container stops draining. The soil is said to be fully drained or at “container capacity”. (This term describes the point in time at which water and air holding capacity is measured for container soils).
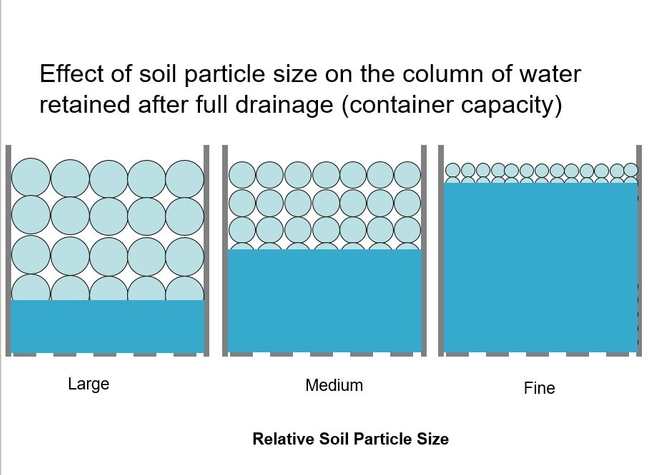
The capillary forces tugging upward is related to the pore diameter. The smaller the pore diameter (the tinier the capillary) and the more the capillary pulls upward. Smaller soil particles make smaller pore diameters and will result in a higher column of water at container capacity. Simply this is seen below.
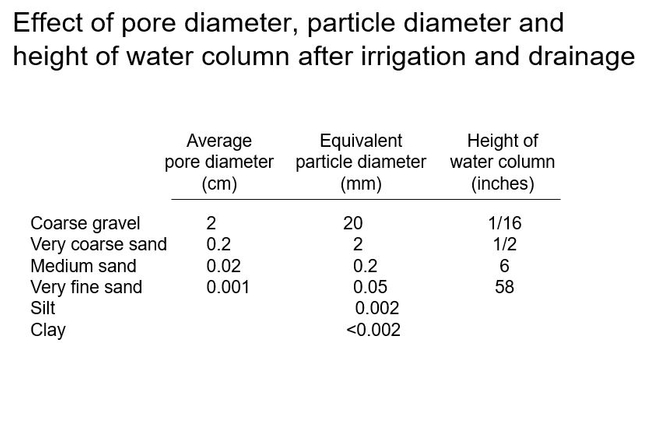
The rise of the water column can be calculated based on soil particle size. Here are examples of various soil particles and their pore diameter, particle diameter, and resulting height of the water column at container capacity.
Field soils are composed of the smallest particles in this table: clay, silt, and various sizes of sand. This table illustrates that, after irrigation and drainage, even a pure medium sand would create a water column of about six inches and saturate the entire soil to the top of a 6-inch-high (gallon) container. As I mentioned earlier, the soil has to provide air to the roots (beside moisture, etc). And now you can see that field soils would create a saturated root environment in a container after an irrigation. You can't have the roots drowning for very long. For this reason, field soils work poorly for plants grown in containers. Container soils have to contain large soil particles!
Next: Water and air holding capacity of container soils.
*Figures and tables adapted from: Management of Container Media by Richard Evans, UC Davis, for the class, ENH 120.

