Crocus Sativus
By Karen Seroff
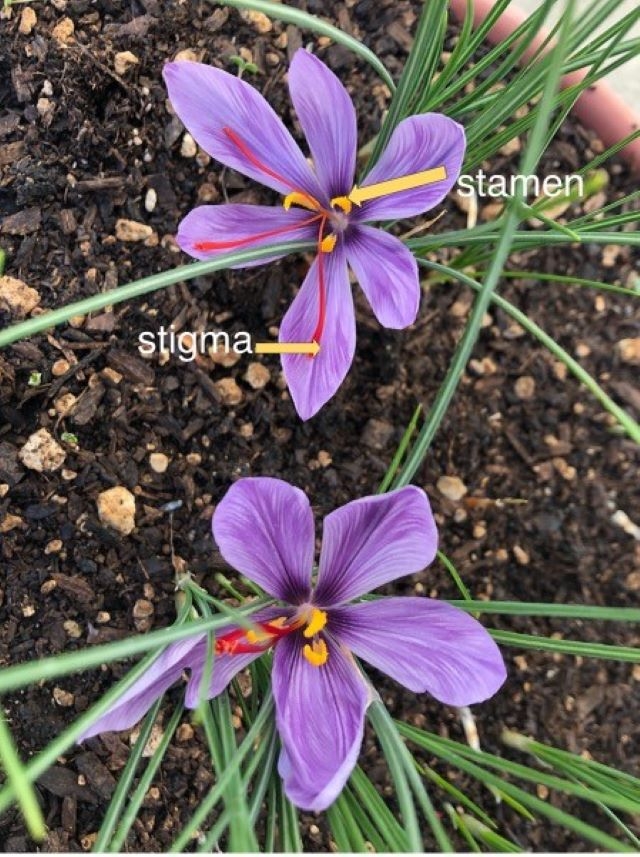
When most gardeners hear the name ‘crocus', they think of charming little bright purple and yellow flowers coming up through patches of snow heralding springtime. But there is another famous crocus that instead blooms in the fall, and is unique in that it is harvested for its stigmas.
Crocus sativus, also known as Saffron Crocus, was first introduced to Spain by the Moors of North Africa. It has influenced the cuisines of many countries worldwide, and has the reputation of being the most expensive spice in the world. This is due to the small yield of the plant and the intensive labor of harvesting the three long red stigmas of the plant—otherwise known as saffron. Each plant usually produces between 2-4 flowers, and approximately 150 flowers are needed to provide 1 gram of the dried spice.
The lovely purple flowers bloom for approximately two weeks in the fall and must be harvested quickly. The three stigmas per flower must be carefully removed with tweezers, air-dried, and then stored in a tightly sealed vial or bottle until they are used.
Interestingly enough, Saffron Crocus can grow well in many different climates, and it is not difficult to cultivate here in Santa Clara Valley. This perennial loves full sun to partial shade and does best in well-drained, loamy soil. It prefers moderate to low watering and is frost-tolerant. Corms should be planted 2-4 inches deep and spaced 4 inches apart.
The corms (similar to bulbs) are best planted in the fall, with leaves appearing in early spring, and then dying back during the summer. New leaves will appear as the weather gets cooler in September and October, and the new blooms will soon follow. Every three or four years, the Saffron Crocus corms can be divided to prevent overcrowding. Division should be done in the summer months during the dormant period.
Gophers, squirrels, and mice will eat the corms if they have access to them. Planting them in raised beds with hardware cloth or in pots may help. Another issue that can arise is fungal disease. This can happen if blooming occurs during a rainy period. Root rot can also be a problem if the soil is overwatered or has poor drainage.
There is another fall-blooming crocus-like flower that is similar in appearance to Crocus sativus. It is commonly called meadow saffron or autumn crocus, and is in the genus Colchicum. It is important not to confuse this with Crocus sativus, as Colchicum flowers are toxic. You can tell them apart by looking at the stamens. Colchicum have six stamens, while the Saffron Crocus has only three.
Growing Crocus sativus can be a fun and rewarding new gardening experience. There are many different recipes that include saffron, and it can be exciting to experiment with new spices and cuisines. Corms can be purchased at many nurseries, as well as through online companies. And someday, you may be able to share your extra corms with your fellow gardeners!
More information:
- Saffron, UC Master Gardeners, Santa Clara County
- Crocus sativus, Missouri Botanical Garden
- UCCE Central Coast & South Region, Center for Landscape and Urban Horticulture
- Grow Your Own Saffron, Washington State University
- Colchicum, North Carolina Cooperative Extension
Photo via UCCE Santa Clara County Master Gardeners
Attracting Hummingbirds - Nature's Aerial Acrobats
By Catherine Wire Roberts
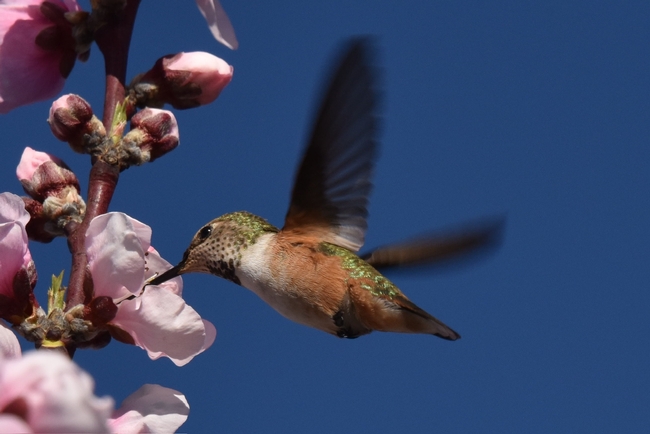
The whir of tiny wings is an unmistakable and welcome sound to a gardener, announcing the presence of an efficient pollinator and fantastic flier. These tiny birds are nature's best acrobats - besides hovering, they can fly in reverse, sideways and upside down! Not only are they fun to watch, they are expert pollinators, covering more territory than insects can in the same amount of time.
We are fortunate that several species of hummingbird make their home in Santa Clara County, or come through our area during their migration. In fact, Mount Umunhum, which towers over Santa Clara Valley, was named after this little bird by one of the area's indigenous tribes – “Umunhum” is Ohlone for “Resting place of the hummingbird.” [1]
Depending on migratory patterns, six species of hummingbirds, either reside in, or migrate through, California [2]:
- Allen's Hummingbird (Selasphorus sasin) - breeds in coastal areas from Southern California to Oregon, a close relative of the Rufous Hummingbird and similar in appearance.
- Anna's Hummingbird (Calypte anna) - the largest hummingbird in California, a year-round resident, able to sing.
- Black-chinned Hummingbird (Archilochus alexandri) - breed in the U.S. during summer and travel to Western Mexico for winter. Prefer habitats close to water.
- Calliope Hummingbird (Selasphorus calliope) - smallest breeding bird in North America - the weight of a penny! Spends summers in mountain habitats from Southern California to Oregon.
- Costa's Hummingbird (Calypte costae) - can be found in California's deserts and along the coast. Has a distinctive voice.
- Rufous Hummingbird (Selasphorus rufus) - travels from summer in Alaska to winter in Mexico - one of longest known migratory flights. Populations are in decline.
A Hospitable Habitat
Some hummingbird species are threatened by climate change and human stressors on critical habitat. These include limited availability of nectar-producing plants impacted by temperature changes; loss of forested areas (critical to the life cycle of more than 80% hummingbirds) from invasive plant species or human actions like timber harvesting. Additional threats include wildfire, groundwater pumping, insect or disease outbreaks, and pesticide use.[3] You can help counter these and enjoy the antics of these special birds by providing a welcoming habitat.
Here are a few ways to make your space hummingbird-friendly:
Offer flowering plants: Colorful
, tubular flowers are favorites, and it's true hummingbirds are attracted to red. Bees, who are red/green colorblind, will pass up the red flowers, leaving more nectar available for hummingbirds to enjoy uncontested. You can find pictures and inspiration in the
UC Davis Arboretum's Hummingbird Plant List. Three plants recommended by the California Native Plant Society[4] to plant for winter blooms are:
- Franciscan manzanita (A. franciscana) — a 1' tall mounding groundcover with pink and white flowers
- Chaparral currant (Ribes malvaceum) — a small fragrant shrub with pale pink hanging flowers.
- Fuchsia-flowered gooseberry (Ribes speciosum) — a large, easy-to-shrub with abundant hanging red flowers.
Avoid pesticides: With such a tiny body, even ingesting a minor amount of pesticide could be fatal. Additionally, hummingbirds do not live solely on nectar. Entomologist Doug Tallamy of the University of Delaware says that “hummingbirds like and need nectar, but 80 percent of their diet is insects and spiders.” [5] If those are diminished by pesticides, the hummingbirds will lack a sustainable food source.
Provide clean water: These tiny treasures enjoy a bath! If you have a water feature, make sure it stays clean to minimize the spread of disease.
A word about feeders: liquid feeders can attract hummingbirds to your garden and can be conveniently placed to capture the acrobatic action. If you choose to have a feeder, make sure you clean it regularly, so harmful bacteria does not accumulate, and keep it free from ants and bees. Also consider that if they are consuming the nectar freely at the feeder, they are not pollinating other plants in your garden.
Attracting hummingbirds is a matter of providing the right environment with plenty of nectar to power their flight. With a little extra care and savvy plant choices, you can enjoy these special birds by providing a resting place in your own outdoor space.
Sources:
- Sierra Azul Preserve History
- USDA: Maintaining and Improving Habitat for Hummingbirds in California
- https://westernhummingbird.org/habitat/
- https://www.cnps.org/gardening/hummingbird-gardening-5098
- What You May Not Know About Hummingbirds
More information:
- UC Davis Hummingbird Gateway Garden
- UC Davis Hummingbirds in Your Garden
- Western Hummingbird Partnership
Succulent Topped Pumpkins
by Rhonda King-Curry
Step 1: Select a pumpkin (colors, textures and sizes can vary but pumpkins with a flat top will provide more area to work with). Rinse and dry the pumpkin. Does it have a stem? it's not 100% necessary but a stem is helpful to apply hot glue to it so that items stand up and give some height to the creation. In the end, you might not even notice the stem because it will be covered in succulents and other dry material.
Step 2: Gather materials
- Tacky glue
- Dry moss
- Hot glue gun
- Garden clippers
- Wooden chopstick (to keep your fingers away from the hot glue)
- Succulent cuttings (consider different textures, colors, heights, sizes and shapes). Be wary of succulents with farnia on them (it's a natural coating that acts like sunscreen for the succulent). Touching the farnia will cause it to rub off and it won't look so great to have fingerprints on your succulents.
- Dried material (examples include small pine cones, dried seed pods, poppy pods, dried grasses such as wheat or barley, acorns, magnolia seed pods, black walnut seed halves, clusters of dried berries, dried Jacaranda pods -- anything that won't come apart as it dries further.
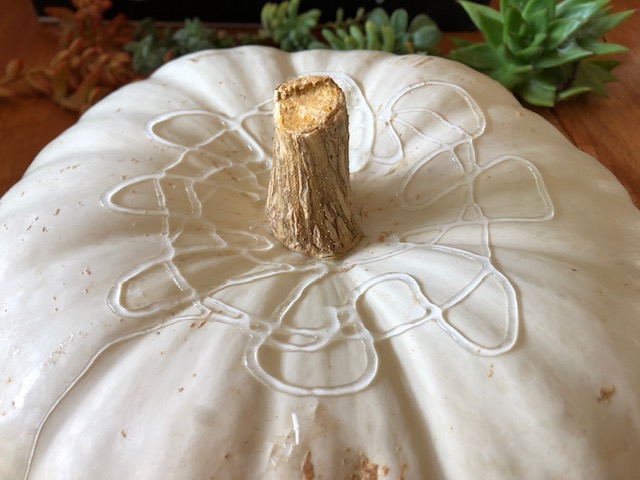
Step 3: Apply the tacky glue to the top of the pumpkin, spreading it out about 2/3 of the way to the edges.
Step 4: Add the moss and press down gently to adhere. You don't need to wait very long for it to dry. I usually just get right to the next steps and let it dry as I'm working.
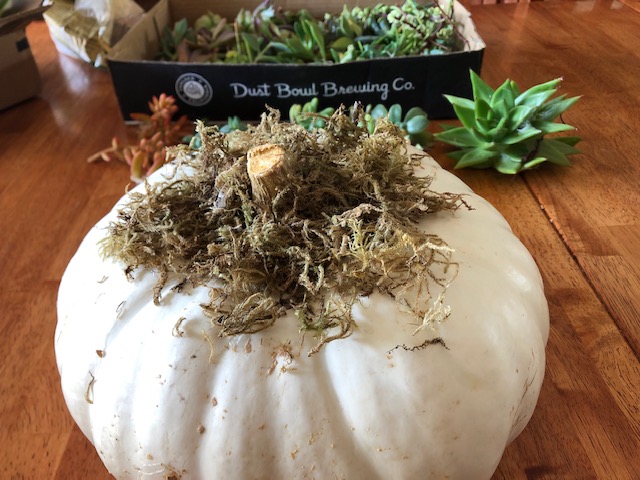
Step 5: Select Thrillers, Fillers & Spillers. Thrillers will be larger, spectacular succulents, using 1 - 3 depending on the pumpkin size. Spillers are materials that will dangle over the edge and spill down. Fillers are not as spectacular as thrillers but will add some color or texture to the arrangement.
Apply hot glue to the succulent stem (and/or pumpkin stem) then apply pressure using the chopstick until it stays where you want it. Repeat with more succulents and dried material, turning the pumpkin as you go to keep your arrangement filled out on all sides.
Be sure to remove the lower leaves from succulents so that you have at least an inch of stem to apply hot glue. You save the leftover leaves or stems. They will eventually continue to grow. Place them on top of soil and keep them moist by spritzing them with water to keep them from drying out. Leaves will shrivel up and give energy to make a new tiny succulent.
Tips: If you see a big gap that you don't know what to do with, select a succulent with a rosette shape to fill the gap easily with its wide flower shape.
Start with longer stems, but snip to shorten them as needed.
Your succulent-topped pumpkin will last for months (longer if you give enough indirect light so that the rosette shapes don't elongate to reach for the sun). Spritz with water each week to keep the moss a bit moist and for root development. After the holiday season succulents can be replanted or you can cut off the top of the pumpkin and plant that.
Seed Saving: Harvest and Storage
By Hillie Salo
The first consideration when harvesting seeds is the practice of selecting seeds from the most vigorous and healthy plants that have fruits with traits that are desired. Next is determining seed maturity. Mature seeds have the highest germination rates. In order to ensure that the seeds reach greatest maturity, they need to be left on the plant to ripen for as long as possible.
Seed harvest can be divided into wet seeds and dry seeds. Wet seeds include tomatoes, capsicums, chillies, and eggplants (aka as the Solanaceae plant family) and melons, squashes, and cucumbers (the Cucurbitaceae family).
For wet-seeded crops, the most mature seeds will be found in fruits that are over-ripe and just past the edible stage. Cut open the fruit, remove the seeds, then wash and dry. Tomatoes and cucumbers can benefit from a ferment for a few days.
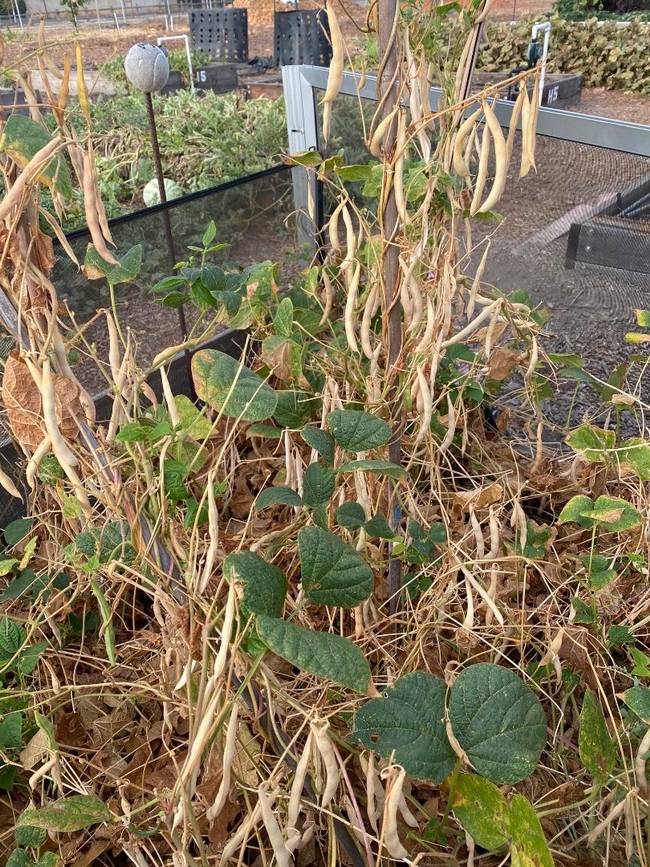
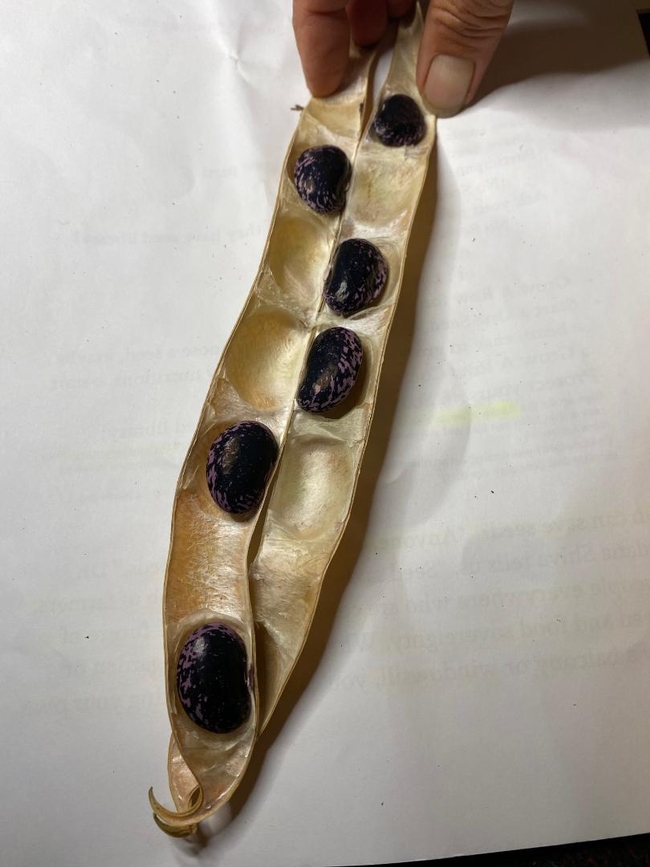
There are some signs to look for in dry seeds that indicate they may be ready for harvest. Most seeds will exhibit some change of color, usually from light to dark. They may easily release from the plant or rattle when shaken. Noticing how dry the pod or seed feels may help determine if the seeds are ready to harvest. Seed pods can be harvested individually as they mature or wait until 60-80% of your seeds are ripe to make a whole crop harvest.
Many flowers can be easy to collect seeds from including alliums, nigella, poppies, cosmos, calendula, zinnias, cleome, sunflowers, honesty and foxgloves,
Seeds need to be extremely dry before storing. Some considerations when drying include making sure that there is plenty of air circulation and temperatures do not exceed 95°F (35°C). It is not recommended to dry seeds in direct sunlight.
There are a couple of tests to help determine dryness in seeds. For thin seeds such as melon seeds, bend the seed. If the seed snaps then the seeds are dry enough for long-term storage. If instead the seed bends, it will need more drying.
For larger seeds, such as bean seeds, take a hammer to the seed. If the seed shatters, it is ready for storage. If it should smash or mush, continue drying until able to pass the hammer test. Another easy test is to bite the seed. If a tooth mark is visible, it still needs more time to dry.
When seeds are dry enough, they need to be separated from the non-seed material, known as chaff. Threshing is the method that separates the seeds from the plant. This is done by some mechanical means, such as beating with a flail.
Before seeds can be stored, they need to be as clean as possible. Non-seed material can lead to mold and rot. Cleaning seeds can be done by winnowing and screening. Winnowing is a process that uses weight to separate seeds from the chaff. The lighter chaff is blown away separating it from the heavier seeds as they fall.
Screening uses size to separate seeds from the chaff. With two screens together, one a little larger than the seed and the other a little smaller, most of the chaff can be filtered out.
Once your seeds are clean and dried, they are ready for long-term storage. The rule for seed storage is cool, dark, and dry. A closet can be a fine place for storage for many years for most seeds. For longer storage, a refrigerator or freezer can add even more time for any special seeds.
Seeds should be stored in airtight containers such as Mason jars. Make sure to label your seeds. The more information the better, but at a minimum: name and date. Consider leaving a label inside with the seeds as added insurance in case the first label is lost.
To check for viability in your seeds, a simple germination test can be useful. On a damp paper towel, lay out 10 Seeds. Roll up the paper towel and place it in a plastic bag. Leave a small opening for the seed to breathe.
Check your seeds after 3 days, continue checking for the next 10 days. Most seeds sprout between 7–10 days. Divide the number of sprouted seeds by the total number of seeds started and multiply by 100. This will give you the germination percentage. If your percentage is less that 70%, adding additional seeds when you plant may increase the number of plants that may germinate in your garden.
Happy Seed Saving and don't forget to check the UCCE Santa Clara Master Gardener Saving Seed Basics page for more information.
The Tale Of Two Dwarf Alberta Spruce Christmas Trees in Santa Clara County
by Jeffrey Jenks
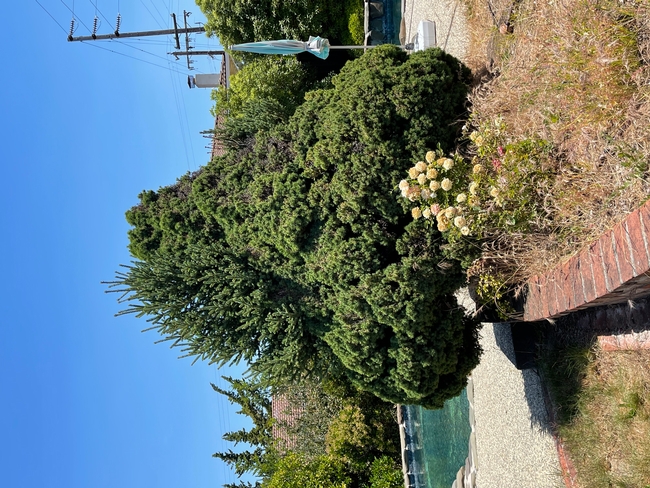
Dwarf Alberta spruce tree exhibiting reversion
Planted over 30 years ago, this mature dwarf Alberta spruce (Picea glauca var. albertiana ‘Conica') in Cupertino has reverted and is now growing like a normal white spruce. This phenomenon is called “genetic reversion.”
How did this happen? Originally, buds or cuttings from an Alberta spruce plant were grafted onto a spruce rootstock and remained true to form. This is how many cultivars, such as Alberta spruce, originate. However, just as the original genetic mutation occurred to produce the cultivar, occasionally a reverse mutation occurs and portions of the plant “revert” back to the species' normal growth.
A blog post from the UC Master Gardener Program of Napa County describes this same reversion with a confirming photo.
What should have been done when the reversion occurred? Examine the tree to determine where the reversion originated and prune the branch back to that point. Often, reverted shoots grow more vigorously than the rest of the tree. Unfortunately, this dwarf Alberta spruce was left with multiple un-pruned, reversions that now dominate the tree.
This has created a difficult decision that may result in removing the tree completely since it has outgrown its place in the landscape, pruning out the normal white spruce branches leaving “holes” in the conical shape, or pruning the outgrowths to be flush retaining the conical shape. It's best to “nip it in the bud” when a reversion first appears.
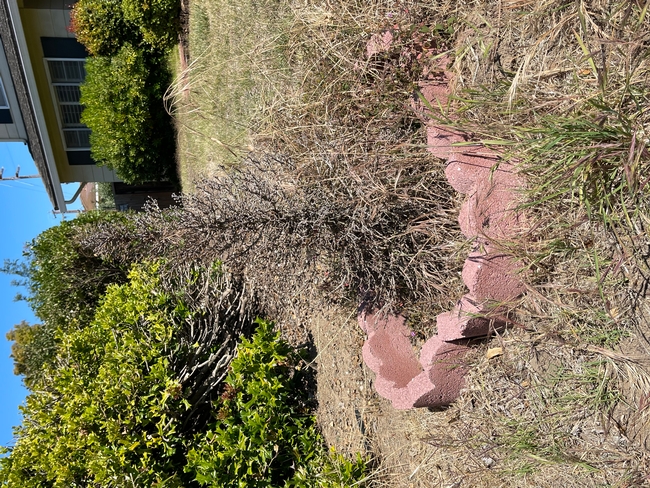
Transplanted from a nursery in about 2020, this dwarf Alberta spruce Christmas tree in the same yard in Cupertino is dead. How did this happen when the same species of tree grew to maturity in the backyard as shown above? One explanation is that dwarf Alberta Spruce is only hardy in USDA zones 3–8. Cupertino is in USDA zone 9b.
What can be learned from these stories about two dwarf Alberta spruce Christmas trees?
- If you want to take the dwarf Alberta spruce Christmas tree that you bought at the nursery and transplant it in your landscape and have it be hardy, check to be sure you are in USDA zones 3–8.
- If you do plant a dwarf Alberta spruce Christmas tree and you want it to retain its conical shape and avoid reversion, then at the first sign of a branch emerging that is below the graft union prune the branch back to the point of the reversion.
- Finally from the Holiday Ideas section of the UC Master Gardeners of Santa Clara County, consider renting a tree from Our City Forest as it's on its way to a permanent home in the community.
Fall Fruits
by Amanda Crooks
Fall is here, which means it's time to start harvesting fall tree fruits. If you have any apple, pear, pomegranate, persimmon, or nut trees in your yard, you may be closely monitoring the fruit to harvest it at the right time. Read below for some fall fruit harvesting tips.
Some general fruit harvesting and storage tips include:
- Use your senses to determine when the fruit is ripe enough to pick. Look at the color, feel it, and pay attention to the size.
- Harvest when the fruit is cool (ideally in the early morning) and keep the harvested fruit cool to promote fruit quality and shelf life.
- Twist and lift the fruit up to remove it from the tree; don't pull straight down on it.
- Handle harvested fruit carefully to avoid bruising or puncturing the skin.
- If needed, let the fruit ripen in a cool, dry place inside. Then store in a refrigerator or other cool storage to maintain freshness.
- Fruit on the same tree may ripen at different rates, so you may need to harvest at different times.
Apples
Apples can either be left to ripen on the tree, or you can pick them before maturity and let them ripen after harvest. But don't leave them too long, as apples left on the tree tend to drop off the tree and can also become mealy. After harvesting your apple crop, fertilize the tree and remove any fallen fruit to control for codling moths. After leaves fall, remove and discard or compost them to prevent the spread of apple scab.

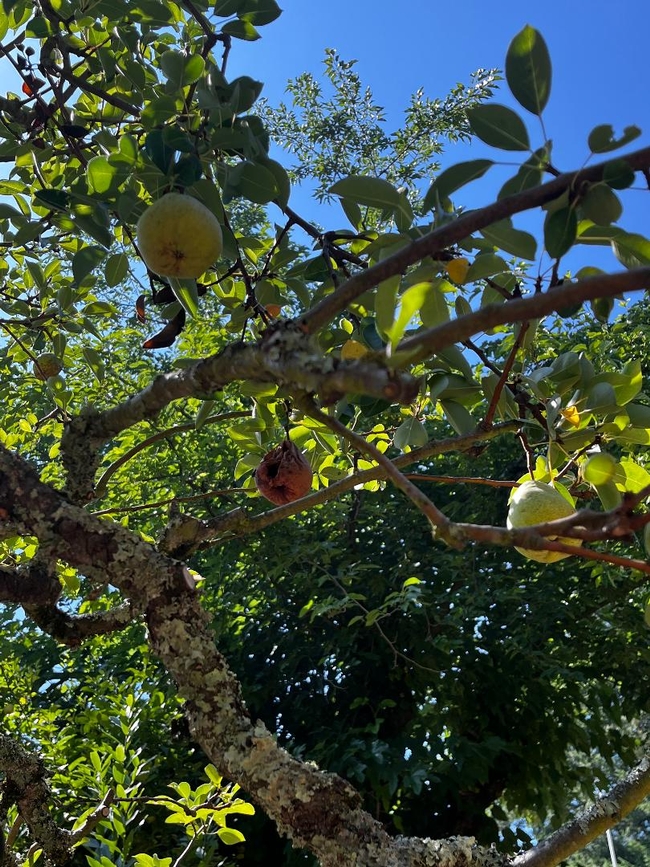
Two pears ready to pick, and one left too long on the tree (photo credit: Amanda Crooks)
Pears
Unlike apples, pears must be picked before they're ripe. Do not let them ripen on the tree. Follow similar horticultural practices with pears as you would an apple tree post-harvest. Note: this is different for Asian pears. The Clemson Extension says:
There are also several differences between Asian pears and the more common European pear. Asian pears reach optimum quality when allowed to ripen on the tree, similar to apples and peaches. European pears are usually harvested in a green stage and allowed to ripen at room temperature.
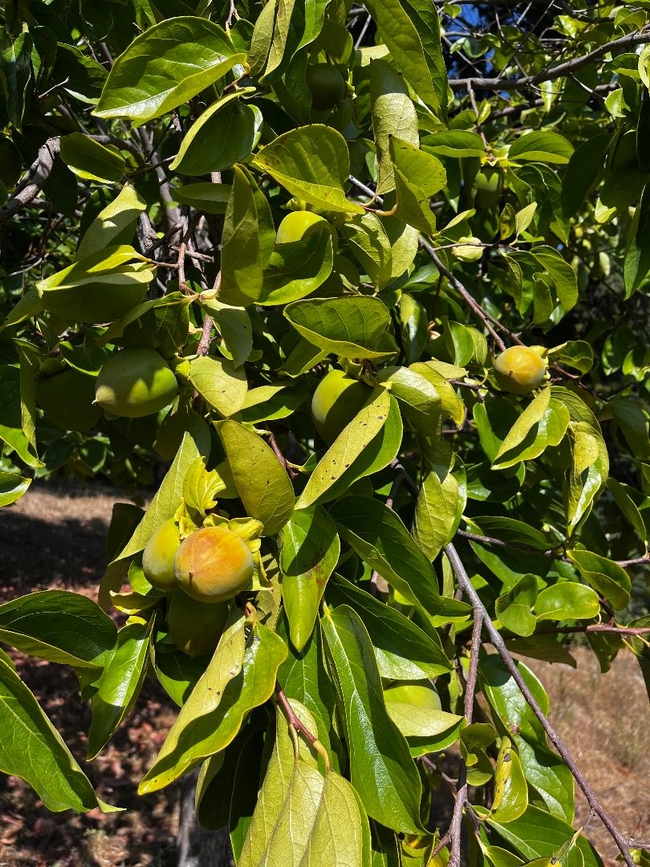
Two persimmons starting to change color. (photo credit: Amanda Crooks)
Persimmons
Persimmons should also be harvested before they fully ripen. Harvest after the skin has turned orange, but before they begin to soften. Make sure to use some shears or snippers to cut the persimmon off the tree; don't twist and pull them off like pears and apples.
Pomegranates
Look for shiny, red, leathery skin and large firm fruit before harvesting pomegranates. Like persimmons, pomegranates should also be clipped off the tree using shears rather than pulled off. Wear thick gloves and protective clothing to avoid getting poked by thorns. Pomegranates are highly susceptible to damage, so handle them carefully.
Nuts
Depending on the nut tree you have, look for changes in size, color, or cracks or changes in the hulls before harvesting. Most nuts will drop easily off the tree when they're ready to harvest. You'll want to cure some nuts, such as hazelnuts or walnuts, before consuming.
Sources:
- The California Backyard Orchard UCANR
- Harvesting Fruit: UC Master Gardeners of Alameda County
- UC Davis Fruit and Nut Resource & Information Center
