- (Focus Area) Yard & Garden
Why are wine bottles tall and narrow? That distinctive shape contributes to the happy marriage between cork and a bottle made tall enough to lie on its side so the wine can “breathe” through the cork as it matures. Lying on its side while stored in cool, dry cellars ensures that the liquid within the bottle will marinate the cork end just enough to keep it from drying out and crumbling.

What do wine, wax, and wrinkles have to do with local trees? In 1904, a cork oak grove was planted in Lower Bidwell Park near the Nature Center on East 8th Street. The grove was located within a 29-acre tract of land that John Bidwell donated in 1888 to the newly created State Board of Forestry for use as a woody plant nursery and demonstration plantation.
Cuttings and young plants were collected from all over the globe for the project, including species of willow, mulberry, linden, maple, oak, catalpa, pine, and eucalyptus. The ensuing planting spree in the 1890s included Sequoia gigantica, a tract of Italian cypress (these trees gave rise to the name “Cedar” Grove), and a large plot of Scots pine. Of those late-19th century conifer plantings, only the cypress remain: the Sequoia were decimated by a freak freeze in 1932, and bark beetles took all but a few of the pines.

The species can reach about 66 feet in height, but is usually smaller than that in its native habitat. There are two notable exceptions: In Portugal, the Sobreiro Monumental (Monumental Cork Oak), is 234 years old and 52 feet tall, with a trunk so large in circumference that it takes up to five people with outstretched arms to encircle it. It is listed as a National Monument, and cited in the Guinness Book of Records as the largest and oldest cork oak in the world. Closer to home, a Quercus suber in Napa is registered as a California Big Tree. It is 89 feet tall, with a trunk circumference of 20 feet, and a crown spread of 81 feet.
The acorns of the cork oak have a distinctive fringed cap, smooth chestnut skin, and characteristic green mark at the bottom, and the tree's shiny, deep green, loosely-lobed leaves are attractive. But its bark is the cork oak's claim to fame. Almost ghostly pale in color, the bark is deeply furrowed and springy, and provides an ecologically sustainable cash crop. The thick, insulating bark also makes it possible for the tree to survive fires, after which it regrows branches to fill out the canopy.
 with Iberian hog, in Spain. Joseph Connell")
Modern uses aside, the method of harvesting the bark from the cork oak dates back to the Middle Ages, using an axe that has barely changed in all that time. Virgin (or “male”) cork is cut for the first time from trees about 25 years old. After that, the bark is harvested every 9 to 12 years. Trees can live over 200 years, and one harvest of bark from a single tree can produce enough to cork 4,000 bottles.
In the harvesting process, the bark is peeled from the tree by hand, using only an axe to strip the bark from around the tree. Absolutely no machinery is employed. It can take up to five people to harvest the bark of each tree. Because expertise and finesse is required to peel off the bark without damaging the trunk's cambium layer, harvesters train for about 8 years.
Our cork oaks in Lower Bidwell park were also harvested periodically; scars from a stripping performed in 1940 and again more recently are visible even now.
 in Spain. Joseph Connell")
In addition to providing cork bark, cork oak groves in Portugal and Spain support another form of agriculture: their acorns provide sustenance to sheep, cattle, and especially hogs. A superior type of ham with a distinctive sought-after flavor is obtained from the Iberian pigs that feed on the fallen acorns.
Our local cork grove in Lower Bidwell Park provides a window into the past by hearkening back to the ancient farming traditions of the Mediterranean countries, and is a living legacy to John Bidwell's quest to, as local naturalist Rex Burress elegantly stated, grow plants “far from their native origins but brought together to mingle in a new habitat.” Best of all, in my opinion, is our cork oak grove's genetic bond to those trees that make a crucial contribution to good wine.
UC Master Gardeners of Butte County are part of the University of California Cooperative Extension (UCCE) system. To learn more about us and our upcoming events, and for help with gardening in our area visit our website. If you have a gardening question or problem, email the Hotline at mgbutte@ucanr.edu or leave a phone message on our Hotline at 530-552-5812. To speak to a Master Gardener about a gardening issue, or to drop by the MG office during Hotline hours, see the most current information on our Ask Us section of our website.
- Author: Lauren Fordyce

The glassy-winged sharpshooter is a large leafhopper that can transmit several important, often fatal, plant diseases in California. This includes Pierce's disease of grape, alfalfa dwarf, almond leaf scorch, and mulberry leaf scorch. Pierce's disease is of most concern in California since the state accounts for about 94% of U.S. grape production.
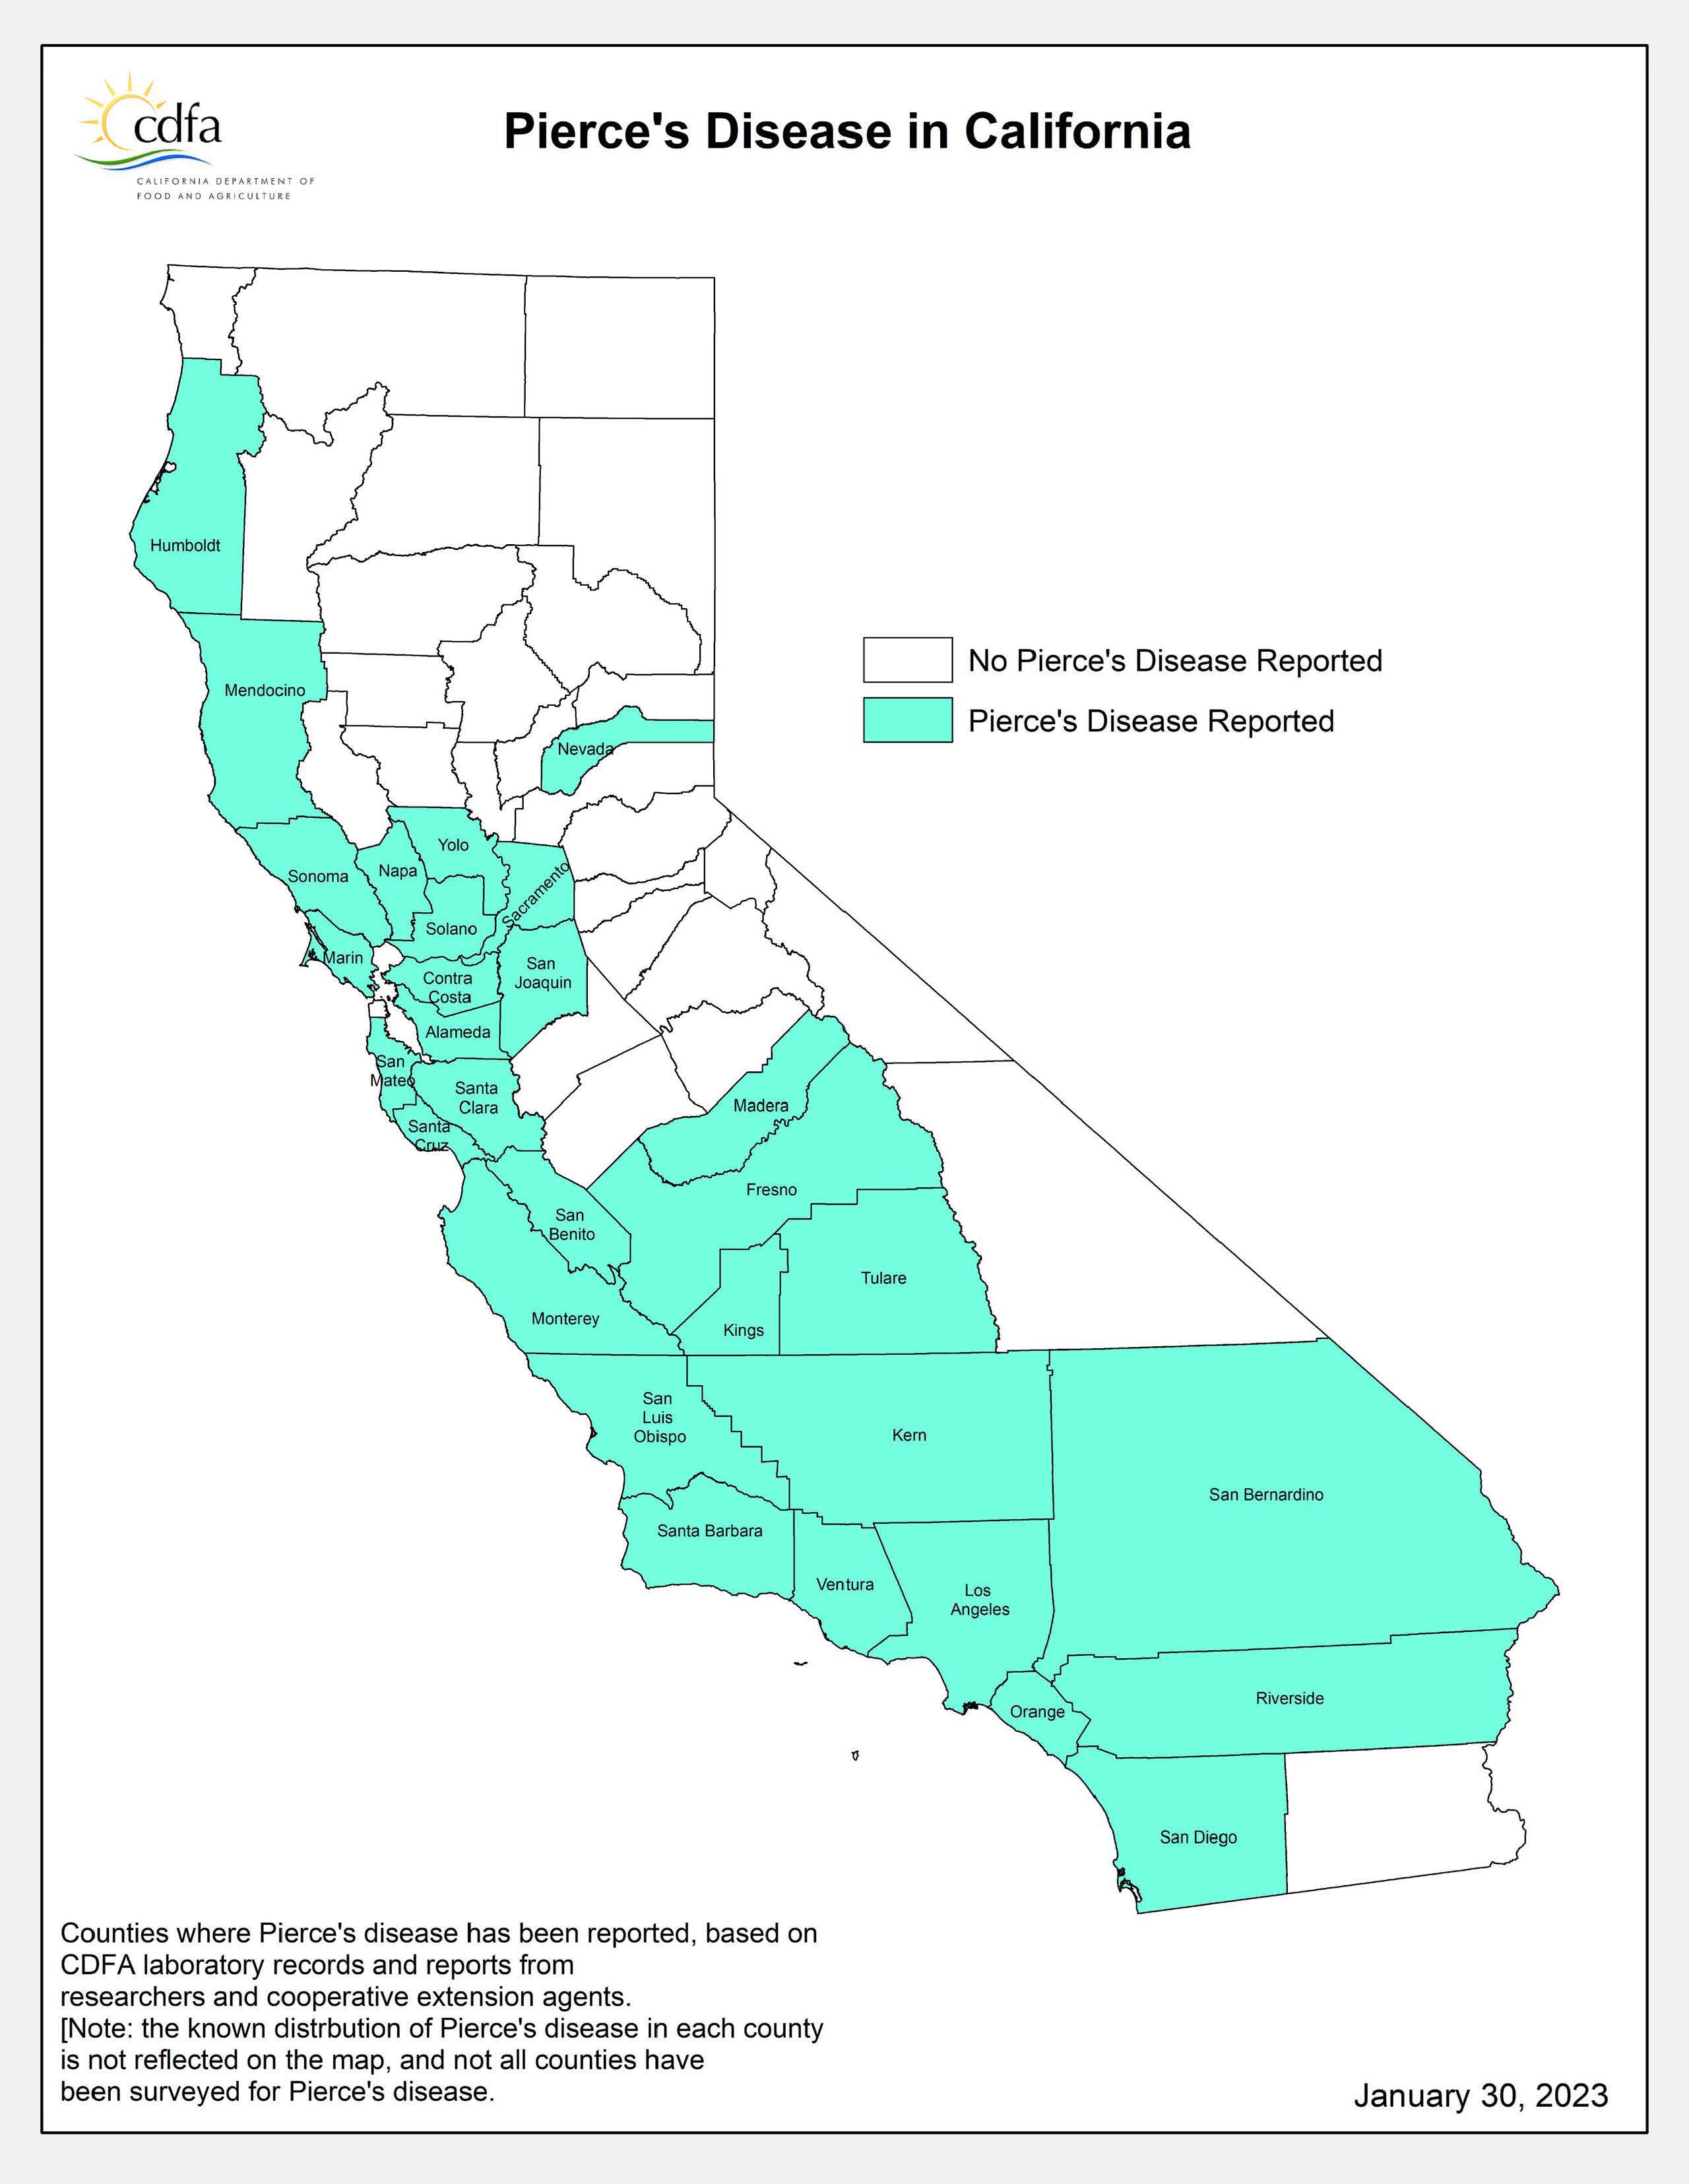
Pierce's disease of grape has been reported in many counties throughout California. View a map of the current distribution of the pathogen. Glassy-winged sharpshooter adults are ½ inch long and dark brown to black with light-colored spots on their heads. Eggs are laid in masses under the leaf surface, resembling a greenish blister. Once the eggs hatch, the egg mass turns brown and remains as a scar on the leaf.
What can you do?
Glassy-winged sharpshooter feeds on many woody plants as well as annual and perennial herbaceous plants. It is common to find this invasive insect on acacia, avocado, eucalyptus, citrus, crepe myrtle, heavenly bamboo, grape, photinia, pittosporum, hibiscus, periwinkle, xylosma, some roses, and many others. Inspect plants for this pest, especially new shoots or growth. Use yellow-sticky card traps to monitor their populations.
If you find glassy-winged sharpshooter in an area not currently known to have this pest, immediately call the California Department of Food & Agriculture Pest Hotline at 1-800-491-1899, or contact your local agricultural commissioner's office.
To learn more about this pest and the diseases is transmits, visit Pest Notes: Glassy-winged Sharpshooter.
- Author: Kathy Keatley Garvey
If you're struggling with triple-digit temperatures, think about the honey bees.
They need to collect water for their colony to cool the hive so their brood can develop. And for other purposes.
Just call them "The Water Girls."
Lately the bees have taken a liking to our birdbath. The birds? They're practicing social distancing.
We remember Extension apiculturist Eric Mussen (1946-2022) telling us "Like most other animals, the bodies of honey bees are mostly water. Thus, they need to drink water routinely as we do. Additionally, water (or sometimes nectar) is critical for diluting the gelatinous food secreted from the head glands of nurse bees, so that the queen, developing larvae, drones, and worker bees can swallow the food. They use water to keep the brood nest area at the proper relative humidity, especially when it gets hot and dry outside the hive. Water droplets, placed within the brood nest area, are evaporated by fanning worker bees and that cools (air conditions) the brood nest area to keep the eggs and developing brood at the critical 94 degrees Fahrenheit required for proper development."
Unlike us, honey bees cannot simply turn on a faucet. "They will fly up to nearly five miles to find a suitable watering source," Mussen told us back in 2014. "Suitable to honey bees might not be suitable to us, but if it is moist, it may be visited. Suitable to the neighbors is a separate question. Honey bees can become quite a nuisance if they visit drippy irrigation lines or hose connections, birdbaths, pet water dishes, swimming pools, fountains, or wet laundry and the like. The water foragers become habituated to those sites. If you try to dissuade the bees by drying up the source for a while, it becomes evident that the bees will visit the site every so often so they'll be around quickly after the water is returned."
What to do? "People have tried to use repellents in the water, but the bees are likely to use the odor as an attractant when attempting to relocate the water source. Some people have had success keeping bees and wasps out of their swimming pools with very lightweight oils or monomolecular films--their purpose is to prevent mosquitoes from being able to breathe. But, if the water is splashed very much, you'll require a new layer."
And all those bees struggling in your swimming pool? "Not all moribund honey bees in a swimming pool are there because they were trying to get a drink. Every day, approximately 1,000 old honey bees from each colony die naturally. This normally occurs during foraging, and the bees just flutter down to the ground, sidewalk, driveway, parking lot, or whatever they were passing over. Some flutter into swimming pools. They are not dead, yet, so they can and do inflict stings on people who bump into them on the surface of the water. "
Beekeepers should make sure there's a watering source on their property so the bees won't hunt for water elsewhere, Musssen pointed out. It should be available all year around. "Once the bees are habituated to the site, most of them will use that source."
It's also a good idea to place corks in a birdbath for the bees to stand on. Bees don't like to get their feet wet. And if they drop into the water structure, they can drown.
As for the bee tenants in our watering hole, bring 'em on.
We absolutely love "The Water Girls." The birds, well, not so much. (But they do have access to a second birdbath and a fish pond.)
")
")
")
")
- Author: Lauren Fordyce

Hydrilla is easily spread since it often breaks apart into tiny pieces that can each produce new plants. It also produces special survival structures on the stems (turions) and in the sediment (tubers). Each tuber can produce a new plant. The tubers can survive up to seven years in the sediment before sprouting, even if no water is present.
What can you do?
Hydrilla can be introduced to new areas on boats, trailers, fishing tackle, and sometimes even waterfowl. Inspect these items and remove any plant material from them before leaving the water. Hydrilla is also commonly sold for use in aquariums. Never dump your aquarium water into waterways or down the drain.
The California Department of Food and Agriculture (CDFA) conducts eradication efforts in multiple counties throughout California. The largest eradication effort is the infestation in Clear Lake which began in 1994. The program has successfully eradicated hydrilla from 15 counties since 1976.
If you find hydrilla, contact your local agricultural commissioner's office or the California Department of Food and Agriculture (CDFA) Pest Hotline: 1-800-491-1899.
Learn more about this invasive aquatic weed by visiting the links below:
- California Invasive Plant Council https://www.cal-ipc.org/plants/profile/hydrilla-verticillata-profile/
- Educational pamphlet on hydrilla https://www.cdfa.ca.gov/plant/npdes/docs/aquatic-weeds/HydrillaPamphlet.pdf
- Hydrilla Eradication Program https://www.cdfa.ca.gov/plant/ipc/hydrilla/hydrilla_hp.html
- Author: Erin Wright
No matter what you grow - trees, shrubs, flowers, veggies, turf areas - they all require some kind of irrigation in our Mediterranean climate. We had a good and late rainy season this year, so our plants were happy when the growing season kicked off and moisture ‘banks' were full. Dry and warm days are here, so now is a good time to test your sprinkler and irrigation systems to keep your garden happy and beautiful. Watering is one of the key cultural problems (culture in gardening means those activities involved in siting, selecting and caring for plants) master gardeners will ask about as they help to diagnose plant problems. Proper watering can keep some plant problems under control. Keeping ahead of irrigation problems by checking each sprinkler, drip head, or micro sprayer in your garden will ensure your plants receive the proper water to thrive and provide beauty, shade and food for your summer enjoyment.
Use this handy checklist and basic troubleshooting guide to check your watering system.
Warm Season Irrigation Checklist
Walk Your Garden
A visual inspection can help you identify problems with your irrigation system.
- Look for stunted or wilted plants that indicate a clogged or misaimed emitter or sprinkler.
- Turf areas will turn a dull gray color as they get too dry. Conduct a sprinkler/irrigation station test to reveal if there is enough water coverage for that spot. To test, turn on each irrigation station in sequence and observe the results.
- Check your plants for pests since plants suffering from under watering or over watering are more susceptible to pests and disease.
- Pay special attention to how much water is distributed during the station/zone test (see details below). Observe if all the plants are getting sufficient water, or if there is pooling under the plants or runoff onto the sidewalks
- Check any historic problem areas to ensure adequate irrigation coverage.
Irrigation Controls/Timers
If you have an automated sprinkler timer, here are the things to check as you head into the new growing season.
- If you turned off the system for the winter, turn the system back on.
- Replace the battery if your timer has one.
- Set the clock to the proper time and year.
- Check the timing for each valve and zone program
- Set time based on plant needs. You can find watering guidelines below in the Resources section.
- Set watering days and times of the week to match your water agency's watering guidelines/restrictions.
- Test each station/zone on your sprinkler timer (see below for troubleshooting repairs)
Sprinklers

Your station test from above should have helped you identify problems with your system.
- Replace broken sprinkler head “geysers” with a new sprinkler head. Most common sprinklers are easy to replace by untwisting the sprinkler from the riser (the part attached to underground piping) and replacing with the same type. Your sprinkler type may allow you to replace just the watering head. Check the manufacturer's website for full instructions.
- Use the same type of sprinkler in each zone. Not all popup sprinklers deliver the same volume.
- Use Teflon tape in the threads of the riser to ensure a leak-free seal.
- Adjust the sprinkler radius and spray pattern to get full coverage to reduce dry areas and water waste. You can find instructions for sprinkler adjustments on the sprinkler manufacturer's website as many offer instructional videos for the DIYer.
- Modern or smart sprinkler timers offer advanced settings to optimize how you water your garden. One feature, ‘cycle and soak' allows you to divide the total irrigation time into shorter intervals so the water has time to soak in. This setting is valuable for lawn areas as it promotes deep watering for root health. This also works well in sloped yards, raised beds, or heavy soils, preventing wasteful runoff. Even if your system doesn't have this feature, you can schedule several short consecutive watering times that provide the same effect.
Drip Systems

- Clean or replace clogged micro-spray heads.
- Adjust micro-spray head aim and coverage area. Squirrels, household pets and other garden visitors can knock them out of aim.
- Listen for weird squeaks, hums, whistles and gushing water noise that indicate a broken or missing drip emitter.
- Look for hard water buildup which can reduce water volume. Clean off or replace the emitter.
- Replace the broken emitter with an exact match.
- Join torn or broken drip pipes with connector pieces.
- Check that the supply tubing ends are closed to allow the system to build pressure.
- Adjust the drip system to deliver water where your plants need it now vs. when they were planted. Be sure to apply water to the entire root area. Mature plants may need another drip head or two added for adequate irrigation.
Add additional drip heads as needed for maturing landscape. Consult your irrigation design and manufacturer for the number of drip heads each zone can support. - Remove drip lines and heads in areas where they are no longer needed. It's easy to install a plug in the supply tubing.
Garden Hose and Watering Cans

If you water with a hose and watering can, don't let your trusty garden friends let you down when you most need them!
- Fully unreel your hose and inspect it for holes and cracks, smooth out hose kinks if you can and inspect bulging sides for failure. Repair or replace as needed.
- Replace hose rings at the faucet to get a tight drip-free fit.
- Replace hose rings in watering tools - wands, spray heads to keep the flow strong.
- Clean debris from watering can, inspect for holes, clogged spout and sprinkler head.
With this checklist, you have likely identified a few adjustments to your system before the temperatures soar. Continue to monitor your system for problems and make timely repairs for the best health of your garden and to avoid a surprisingly large water bill.
Resources
- Irrigating fruit and shade trees and shrubs
- Watering calculators from the Center for Landscape Urban Horticulture.
- UC Guide to Healthy Lawns
- Cultural tips for trees, shrubs and woody plants
- EBMUD Lawn and Landscape Watering Schedule (opens a pdf document)
Have a gardening question?
We'll help. You can reach us by:
- Emailing acmg@ucanr.edu. Please include a photo of the problem, if you can, plus your name, phone number, city and a description of the problem.
- Using our online form.
- By phone, during our office hours, 10 am to noon Wednesday and 11 am to 1 pm Thursday: 510-670-5645. At other times, please leave a message and we'll return your call during our office hours.
- In person at our Hayward office, during our office hours, only by appointment.
