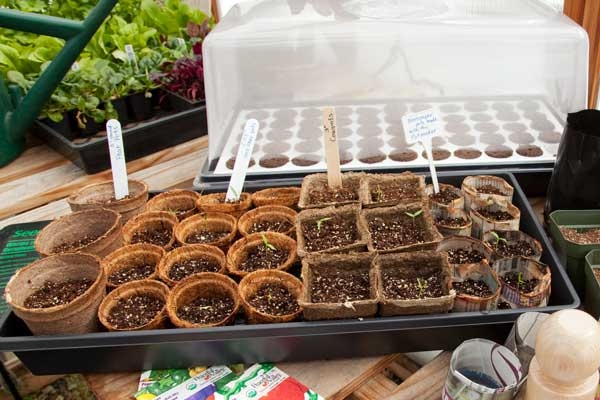
You may choose to sow your own seeds to grow interesting cultivars, or to regrow last year's magnificently-producing vegetable. My friend has saved seeds from her tomatoes for the last 6 years. They are now well-adapted to the Bishop climate and thrive here.
Sowing timetable
To plan the best time to start seedlings indoors, find the approximate date of the average last spring frost in your area. Count back from that date the number of weeks from the back of the seed packet to determine the appropriate starting date. A general guide would be:
- 12-14 weeks: onions*, leeks*, chives*, pansies*
- 8-12 weeks: peppers, lettuce*, cabbage-family crops*, hardy annual flowers
- 6-8 weeks: eggplants, tomatoes
- 5-6 weeks: tender annuals
- 2-4 weeks: cucumbers, melons, pumpkins, squash
(*) indicates a cold-hardy plant that can be set out 4 to 6 weeks before the last frost.
Choosing containers and medium
You can use nearly anything to start the seeds, from yogurt pots to paper milk cartons, homemade wooden flats to purchased seed trays but you may need to transplant them into larger pots once they've germinated. This can be fiddly and set the seedlings back. An alternative is to use biodegradable pots such as cow pots (made from manure), peat pellets or coco fiber pots that go straight into your soil. You can even make pots from newspaper – instructions here. Planting in large individual pots is ideal for plants such as squash and melons that won't grow well if their roots are disturbed.
Plastic (Seedling) trays last for years but should be sanitized by dipping them in a 10% solution of household bleach (1C bleach plus 9C water).
If sowing directly in flats, first line the bottom with a sheet of newspaper to keep soil from washing out.
Scoop pre-moistened planting medium into the containers or flats, and spread it out. Tap the filled container on your work surface to settle the medium, and smooth the surface with your hand. Don't pack it down tightly.
Seeds contain enough nutrients to nourish themselves through sprouting, so a seed-starting mix does not have to contain nutrients but don't use plain garden soil to start seedlings; it hardens into a dense mass that delicate young roots can't penetrate. When transplanting seedlings, use a nutrient-rich potting mix.

Sowing Seeds
Follow directions on the seed packet to space the seeds correctly. Bear in mind that plants have varying germination rates, and you may be better off using more seeds per inch/pot. If too many germinate close together, snip off the weaker seedling(s).
Follow directions to cover the seeds or gently pat the surface of the mix so the seeds and mix have good contact.
Label each kind of seed you plant and gently mist the mix. If using a watering can, use a rose nozzle so you don't wash the seeds out of place. Cover the container, using clear plastic to help retain the humidity for a few days and remove it once germinated.
Finally, put the containers in a warm place where you can check them daily. Seedlings are not tolerant of drying out at all and will die, so it is important to keep the soil moist but not waterlogged.
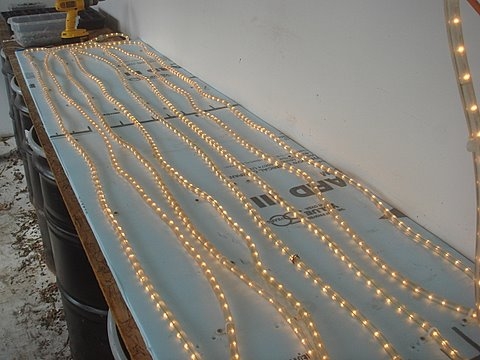
If you're using plastic trays, you probably won't need a heating pad, especially if you put it somewhere warm like the top of a refrigerator. Other containers may need some help. Most plants germinate best in a temperature range of 65F-75F. A great idea for a heater is to use non-LED rope lights (LEDs do not provide enough heat.) Attach the lights with cable staples, turn them on, and place the trays on them.
As soon as the seeds start to nudge the surface, ensure they have plenty of light or they will grow spindly. You can buy a fluorescent grow bulb, just make sure the bulb will not give off heat and burn your plants (more info here). Position it an inch or two from the seedlings and raise it as they grow taller. I also use a timer to ensure enough light, and I gently brush the seedlings daily to strengthen the stems.
Stay tuned for a future post from Paula on when to plant your seedlings!
