- Author: Michael D Cahn
- Author: David Chambers
Tensiometers are useful for monitoring soil moisture in vegetable and row crops so that plants are not over-watered nor become water stressed. As the name implies, tensiometers measure soil moisture (water) tension, otherwise referred to as matric water potential. Soil water tension is essentially a measure of the force that plants need to exert to suck water from the soil pores into the roots. A high tension means that the soil is dry and a plant needs more energy to extract water from the soil compared to when the soil is moist. Tensiometers function without batteries and wires, although they can be interfaced to dataloggers by adding a pressure transducer. Also, the readings are not affected by soil texture, temperature, and salinity unlike many electronic soil moisture sensors.
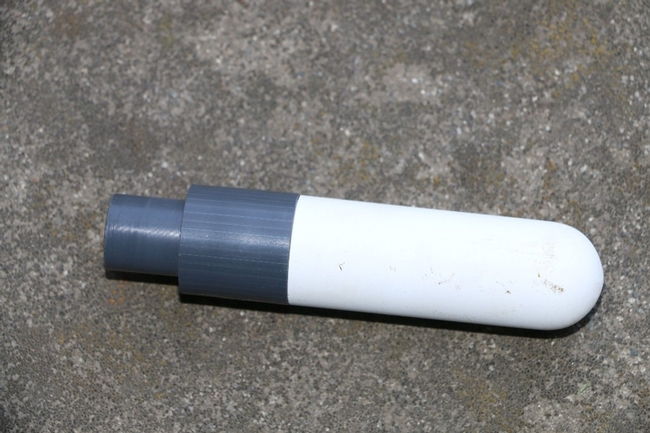
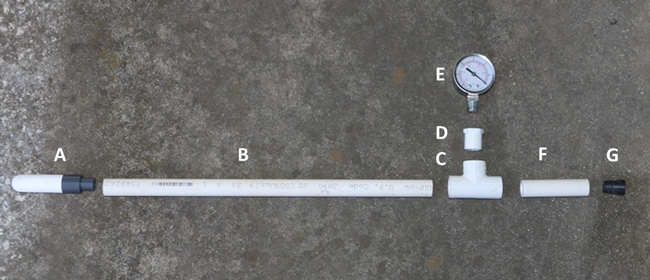
A previous article published in this blog described how to build a tensiometer from PVC parts and ceramic cups that can be purchased from a supplier in California. The design results in a dependable and inexpensive tensiometer that can be built by anyone comfortable using a few hand tools. The most challenging step was gluing the cup to the end of the PVC shaft using epoxy cement which can sometimes result in a vacuum leak if the bond is weak. Since publishing this article, we have built and used more than a hundred of these tensiometers and can suggest some modifications to the original design and a few other words of wisdom. For example, we observed that the PVC “T” can crack if the gauge is threaded too tightly or during cold weather conditions which can cause the plastic to contract, so we suggest using a different type of “T” and not to over thread the gauge. We have also collaborated with a supplier of the ceramic cups, SoilMoisture Equipment Corporation, whose engineers have developed a cup that can be bonded to the PVC shaft using standard PVC cement and primer rather than a specialized epoxy (Fig. 1). This improvement greatly reduces the time required to build the tensiometer which is why we call it the “ten-minute tensiometer.” Once you have some experience, you will probably need less than 10 minutes to assemble one of these tensiometers from the parts shown in Fig 2.
Materials needed:
Ceramic cups
Vender: SoilMoisture Equipment Corporation, Santa Barbara CA (805-964-3525, www.soilmoisture.com)
Part Number Y2630C, Dimensions: 0.875 inch OD x 2.75 inch length
Cost: $25 ea. Note that this is a new part that must be special ordered.
Vacuum gauge
Vender: Zoro.com/Grainger.com
Part Number 4FMK3, Description: ¼ inch MNPT 2 inch diameter test vacuum gauge
Weblink: https://www.zoro.com/zoro-select-vacuum-gauge-test-2-in-4fmk3/i/G0040792/?q=4FMK3 Cost: $18.99 ea.
#1 size rubber stopper
Vender: Grainger.com
Part Number 8DWU6, model RST1-S, Description: 24 mm neck, bottom diam. = 14 mm. Top diam. = 20 mm.
Weblink: https://www.grainger.com/product/GRAINGER-APPROVED-Stopper-8DWU6?internalSearchTerm=Stopper%2C+24mm%2C+Black%2C+PK52&suggestConfigId=8&searchBar=true&suggestConfigId=8&searchBar=true&suggestConfigId=8&searchBar=true&suggestConfigId=8&searchBar=true
Cost: $18.55 / 52 pieces
Schedule 40 PVC pipe (½ inch diameter)
Vender: irrigation supply or hardware store
Sand paper (60 or 80 grid)
Vender: hardware store
½-inch PVC “T”
Vender: irrigation supply or hardware store
Description: ½ inch Female slip x ½ inch Female slip T. Note that this T replaces part number 402-072 from Spears Inc., which we found to sometimes split during cold periods. Also, the previous part was often not in stock.
PVC bushing
Vender: irrigation supply or hardware store. Description: ½-inch PVC Male slip x female ¼” thread bushing.
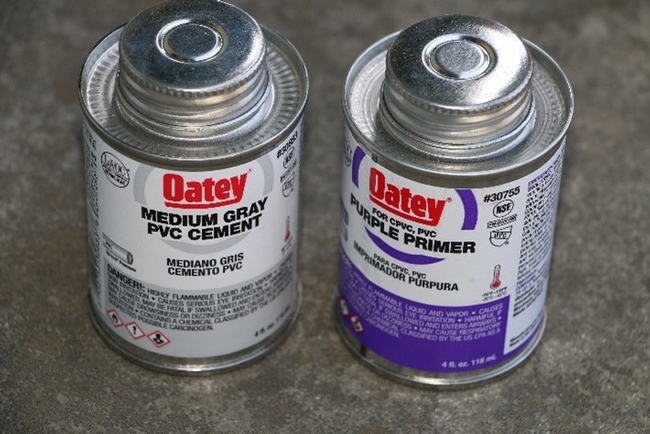
PVC cement (gray) and purple primer (Fig. 3)
Vender: irrigation supply or hardware store. Note that the gray cement provides a stronger bond than the clear product.
Gas pipe thread sealant (white or blue paste type)
Vender: irrigation supply or hardware store
Painters masking tape
Vender: hardware store
Petroleum Jelly (Vasoline)
Vender: pharmacy. A coating of petroleum jelly improves the seal between the rubber stopper and PVC tube.
Rubber gloves
Vender: hardware store, paint store, etc. Description: Nitrile disposable gloves to protect hands from PVC primer and glue.
Tools needed:
- PVC saw
- Miter box
Procedures
- Cut PVC pipe sections in the following lengths
1 foot depth tensiometer: top shaft = 4 inches*, bottom shaft = 17 inches
2 foot depth tensiometer: top shaft = 4inches, bottom shaft = 30 inches
We advise first cutting the bottom shaft about 1-inch longer than indicated above using the miter box or an electric miter saw to assure that the cut at the lower end is at a 90-degree angle (Fig. 4). The ceramic cup will fit crooked on the end of the shaft if the cut deviates from 90- degrees. After assuring that the cup fits well, the top end of the shaft can be cut to the exact length.
*Note that the top shaft can cut shorter than 4-inches so that when the tensiometer is installed in the field it has a lower profile to the ground, thereby reducing chances of being hit by tractor implements.
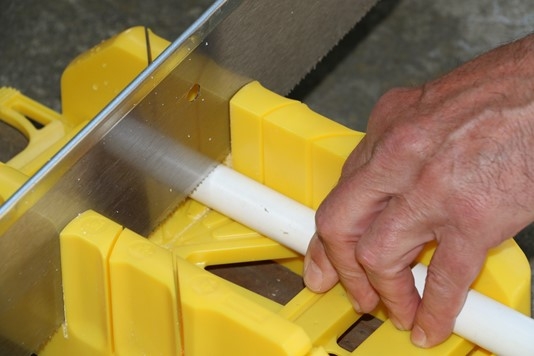
- Check that the ceramic cup fits into the bottom of the PVC shaft and is aligned straight. Sand the neck of the cup and/or the interior walls of the PVC shaft if the cup cannot be inserted at least half-way into the PVC. Be careful not to over-sand the cup or the fit between the neck and the PVC shaft will be loose and not bond well when glued. The fit between the neck of the cup and the PVC should be very tight such that a lot of force is needed to insert the cup into the bottom of the PVC shaft. If the cup is not in alignment with the PVC shaft, then recut the end with the miter box at a 90-degree angle and recheck the fit.
- Wrap the bottom of the PVC shaft and the top of the ceramic cup with painter's tape to prevent cement from coating the outside of the ceramic cup (Fig. 5).
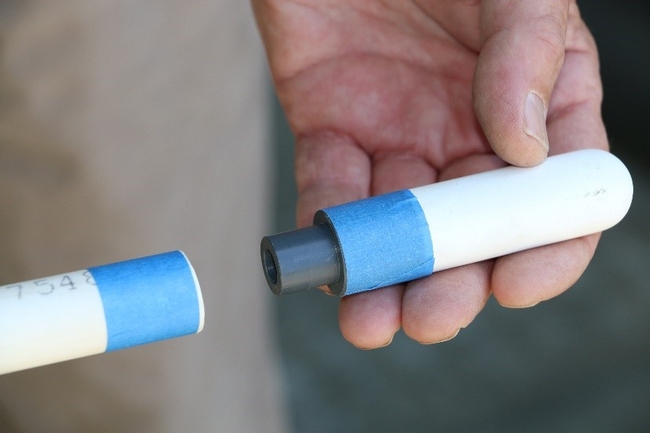 Fig. 5 Painter’s tape will protect the outer surface of the ceramic cup from becoming coated with cement and primer.
- In a well-ventilated location, apply PVC primer to both the interior of the PVC shaft and the outside of the PVC top of the ceramic cup. Then apply gray PVC glue to both surfaces, and push the parts together, and hold in place for about 30 seconds to 1 minute (Figs. 6-9). Tip: slightly twist the parts by about 30-degrees immediately after gluing to assure a good bond before the cement begins to set.
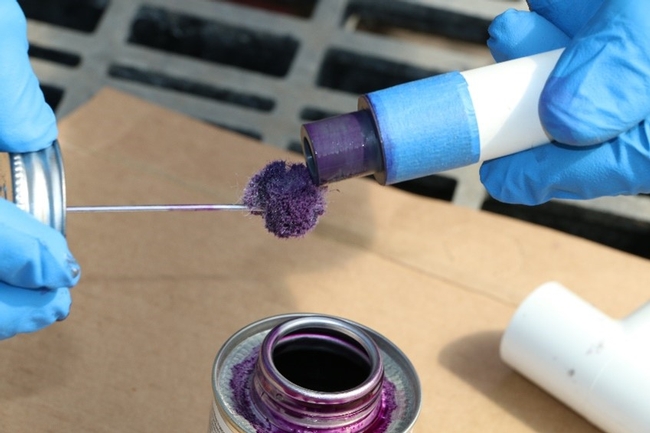 Fig. 6. Coat the PVC portion of the cup with primer and then PVC gray cement
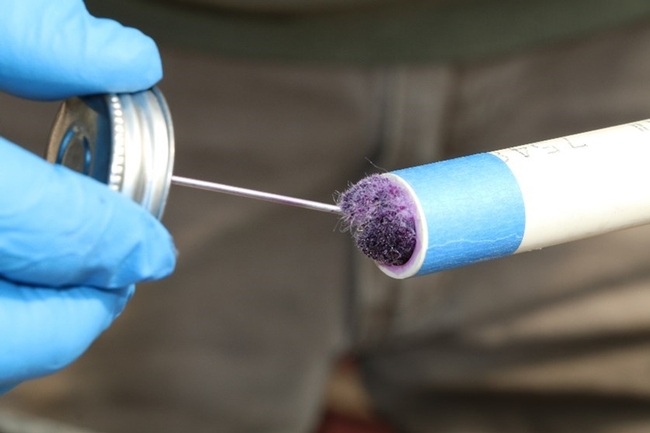 Fig. 7 Coat the inside of the bottom of the shaft with primer and PVC gray cement.
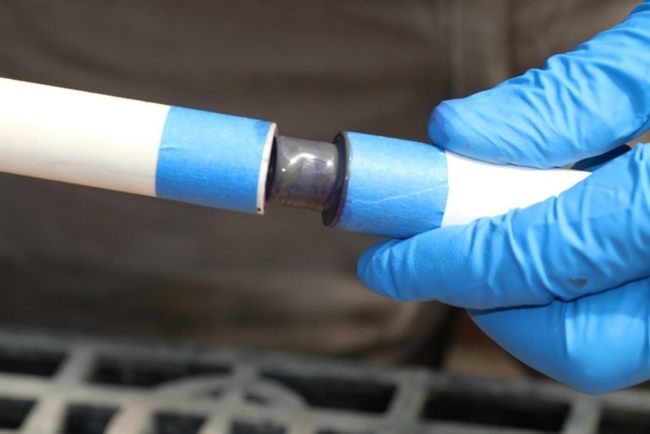 Fig. 8 Insert the cup into the shaft.
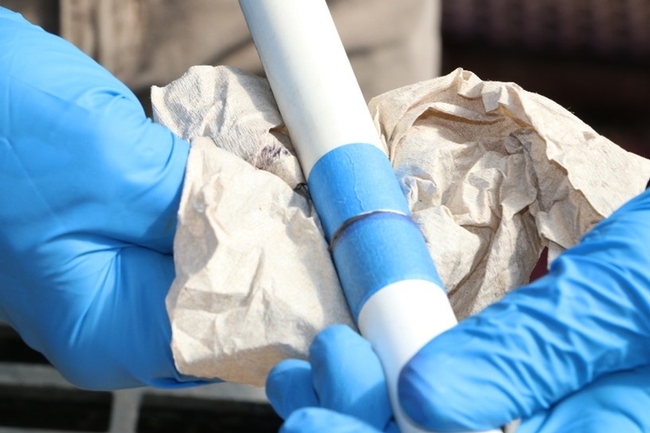 Fig. 9 After inserting the cup into the shaft immediately twist the cup about 30-degrees and hold in place for 1 minute while the cement sets. Wipe off any excess cement.
 - Next glue the top and bottom shafts and the bushing into the ½ inch, PVC slip “T” using the PVC primer and cement. After inserting each of these parts into the T, slightly twist them and hold in place for about 30 seconds while the cement sets (Figs 10-12). Also cover the non-glued areas with painter's tape to prevent the outside from becoming covered with primer and cement.
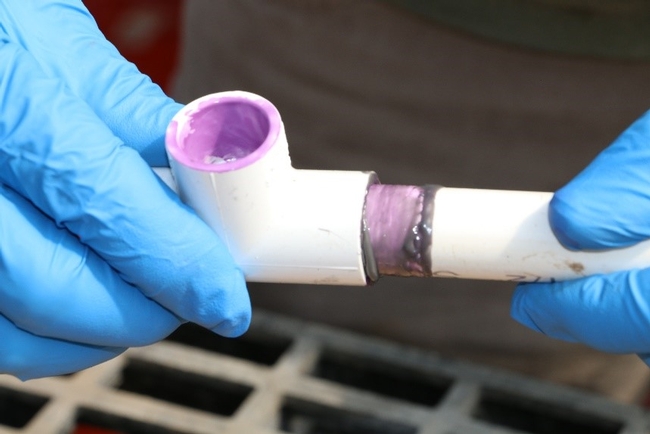 Fig. 10 Add primer to the interior of the “T” and the outside edges of the shafts and bushing. Then coat both surfaces with PVC cement.
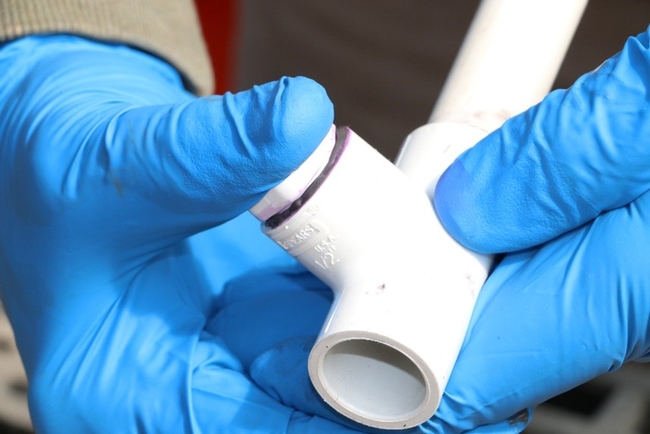 Fig. 11 Hold the parts in place for at least 30 seconds after gluing so that the cement can set.
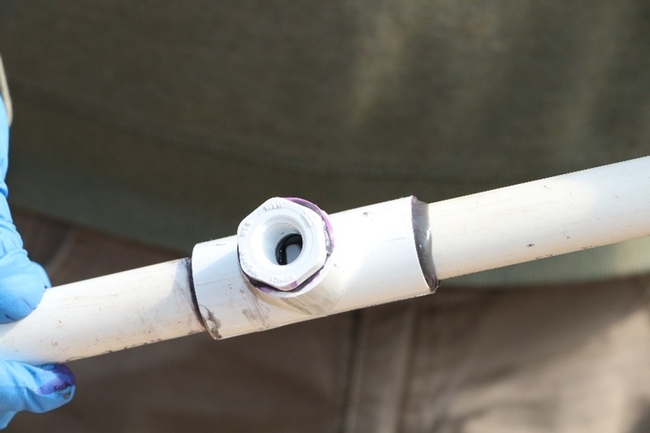 Fig. 12 The “T” shown with the bushing and upper and lower shafts connected.
- Coat the ¼ inch male threads of the gauge with pipe thread sealant and hand screw on the vacuum gauge. Tip: do not over tighten or the PVC “T” may crack.
- Fill the tensiometer fully with degassed distilled water. The water can be degassed by boiling it and allowing it to cool.
- Coat the lower end of the rubber stopper with a thin film of petroleum jelly and insert into the top end of the tensiometer with a light twist to firmly seat the stopper (A loose stopper is the main cause for vacuum leaks).
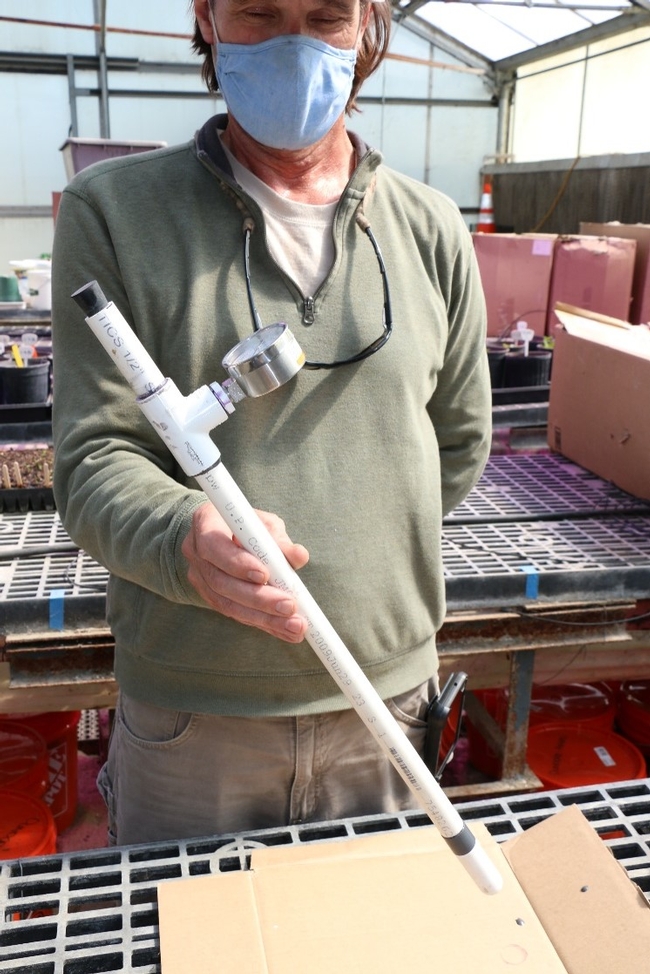
Conclusion
So that is it—the tensiometer is ready for testing and installation (Fig. 13). Hopefully, it did not take too long to build and with practice one should be able to assemble these tensiometers in 10 minutes or less. Please visit our previous blog article on how to test and install tensiometers in the field. Please let us know if you have any questions or feed back.



The new ceramic cup that glues onto PVC from soil moisture corp. has to be custom-made in small batches--not yet a big seller. If you have trouble ordering it, I suggest that you call Alan Farad directly at 805-964-3525 ext 223
Is there any other source for the ceramic cups? Soilmoisture has been less than cooperative in offering these for sale. They accepted the order but I have been waiting weeks and am unable to get any kind of response or order update from them.
Thanks!
Sorry that soilmoisture is taking so long to send you the cups. I do not know of a substitute source. I suggest that you call Alan Farad directly at 805-964-3525 ext 223
I do not think there is any particular issue with ordering the item (2630C). The lead time has recently been a little longer than usual. There reason was that I demanded to test each and every unit before shipping out to make sure that they perform well. Fortunately, the result was great (100% of the cups has passed the test so far). That is why we went back to the regular QC procedure. That will speed up the manufacturing process in the future.
One other thing worth mentioning is that we usually build to order. That is why our standard shipping lead time is 14 to 45 days (we usually ship in 2 weeks). Many people are surprised when they find out that they need to wait several days for their order to ship. That is because we are manufacturer, not retailer. We often times do not have 100s of the item in stock.
Regarding the 2630C, at the moment we have about 60 in stock. In case the orders pick up, we make more and we stock more.
In case somebody would like to order, they can email orders@soilmoisture.com or call (805964-3525 X240).
If there is any particular issue, please have them contact me directly. I’ll do my best to help.
Please let me know if you had any questions.
With kind regards,
Alan Farsad, Ph.D.
International Sales Manager
Soilmoisture Equipment Corp.
801 South Kellogg Ave.
Goleta, CA 93117
Work: (805) 964-3525 Ext. 223
Cell: (805) 284-7894
Fax: (805) 683-2189
Email: alan@soilmoisture.com
Website: www.soilmoisture.com
Skype: alan@soilmoisture.com
An alternative to the cup availability problem would be the Blumat cups out of Austria. They are available in North America fir a reasonable price. In use them in my home tensiometer with good results and 80kPa are achievable. Please refer also to the Martin Thalheimer article in my previous post.
Regards,
Gerhard