- Author: Dustin W Blakey
Vegetable gardening is both an art and a science, and an important technique for success is crop rotation.
By rotating crops, you can improve soil health, reduce pests, and increase yields. Continuous planting of the same kind of plant in the same place every year is a recipe for creating problems.
Here are 8 rules to follow for effective vegetable garden rotations.
Rule 1: Have Light Feeders Follow Heavy Feeders
Heavy feeders, such as tomatoes and corn, consume large amounts of nutrients from the soil. Following them with light feeders, like carrots or lettuce takes advatage of this difference.
Rule 2: Include Some Soil Improvement Crops
Soil improvement crops, such as legumes, enrich the soil by fixing nitrogen. Planting crops like peas and beans can naturally enhance soil fertility, reducing the need for chemical fertilizers.
Rule 3: Rotate Plants with the Change of Seasons
Different plants thrive in different seasons. Rotating crops with the seasons ensures that your garden is always productive and that soil nutrients are used efficiently throughout the year.
Rule 4: Rotate by Plant Families
Plants within the same family often share pests and diseases. Rotating by plant families (e.g., moving from nightshades to brassicas) can break pest and disease cycles, promoting healthier plants.
Rule 5: Use Rotation to Reduce Pest Populations
Pests can quickly become a problem if the same crop is grown in the same spot year after year. Rotating crops disrupts pest life cycles, reducing their populations and minimizing damage to your garden.
Rule 6: Rotate to Deprive Weeds of Light and Space
Different crops have varying growth habits and can outcompete weeds differently. By rotating crops, you can deprive weeds of the consistent conditions they need to thrive, thereby reducing weed pressure.
Rule 7: Winter is a Good Time to Use Cover Crops
Cover crops planted in the winter protect soil from erosion and add organic matter when they are turned into the soil. They also help to suppress winter weeds and can fix nitrogen, preparing your garden for spring planting.
Rule 8: Don't Be Afraid to Change Your Rotation Plan
Flexibility is crucial in gardening. If something isn't working, don't hesitate to adjust your rotation plan. Pay attention to your garden's needs and be willing to experiment to find the best solutions for your specific conditions.
For more information
There are many resources online that cover garden rotations. There aren't too many bad ones, in fact. Perhaps my favorite is a book called Crop Rotation on Organic Farms: A Planning Manual by Mohler & Johnson. You can buy the print version, but it's also available as a free PDF file. It's nerdy and information dense. Probably overkill for the casual gardener, but if you get serious about gardening or Organic production, it's excellent.
For a simpler introduction, see this article from the Royal Horticultural Society.
- Author: Ryan Daugherty
Most of us grew up with a lawn. For many of us, mowing the lawn was a part of our weekly chores growing up; yellow spots were treated like a black mark, and a dandelion popping up was like a declaration of war. We have all been brought up in or have participated in lawn care culture in one way or another, without many of us having much of an idea why. Why is the lawn so quintessential in our culture?
The concept of a lawn didn't really exist until relatively recently. Grass was used in landscapes as a frame for more interesting fare, like in the Gardens at Versailles, using it as the tapis vert or green carpet. In fact, before the 18th century, the word lawn itself didn't mean what it does today. The word laune meant a glade or clearing in a forest. Later, as we domesticated livestock, it came to mean more of a pasture where cattle would graze. The concept of the word "lawn" being used to mean a manicured grassy area was first recorded in 1733 in Europe. When lawns were featured in landscapes at the time, they were a status symbol of great wealth. You had to be wealthy to own land, and even wealthier to own land that generated no profit and just looked pretty.
A grass lawn as a landscape feature is largely the influence of "England's Greatest Gardener," Lancelot Brown, commonly known by his nickname "Capability" Brown, because he would often tell his clients that their property had the capability for improvement. Capability was a renowned landscape architect, known for a radical new style at the time called a "gardenless garden" as opposed to the patterned gardens of the day. The hallmarks of Brown's gardenless style were big undulating seas of grass leading straight up to the manor, with scattered plantings of trees and man-made lakes. He designed the landscapes of over 170 of the finest estates in England, making him one of the most prolific and influential landscape architects to come out of Europe. When the American aristocracy (many of them founding fathers) visited these estates, they were enthusiastic about what they saw and incorporated lawns into their estates back home in places like Washington's Mt. Vernon and Jefferson's Monticello. Thus, lawns as a landscape made it to a fledgling United States.
As the United States began to grow both in population and economically, the country took on a decidedly urban look with cramped housing for the new immigrants flooding into the land of opportunity. The European notion of getting away to the countryside couldn't really be practiced because we didn't have countryside; we had a wild, rugged frontier, which had its charms but being a relaxing place to have a picnic wasn't one of them. In response, there was a shift in the ethos of American landscape architecture. There was a growing thought that we wanted our landscapes to be open, welcoming, and ample. Around the same time, "The Father of American Landscape Architecture," Frederick Law Olmsted, designed Central Park in New York. His design heavily featured large grassy areas, strategic plantings of trees, and man-made lakes. Sound familiar? This work influenced other communities across the country to follow suit and design their public spaces with turf as a prominent feature.
Later in 1868, Olmsted would have the opportunity to work on the designs for the first planned suburb in Riverside, Illinois. He required that the houses be set back 30 feet from the road for… you guessed it, a lawn. This suburb served as an example for more housing developments not only because it fit into the aesthetic philosophy of landscape architecture at the time but it was also convenient for building architects and city planners. When an architect is drawing up plans for a whole subdivision of beautiful and functional homes and there's blank space on the page, it's easier to fill it in with a generic lawn than to draw up garden plans.
It wasn't until a hundred years later in 1950s-60s America that suburbs took off. Amid civil unrest taking place in urban centers across post-war, post-depression America, the latest generation of homeowners were ready for a quiet life away from the city, but close enough to have the modern consumer conveniences. The American Dream had shifted from the homestead to a white picket fence around one of Olmsted's lawns. Having great curb appeal was how you kept up with the Joneses and a tight lawn became an expectation. More importantly, those homeowners raised the largest generation from the largest baby boom that this country had ever seen within that culture, ensuring that the shared hobby of lawns would persist.
The lawn became an American icon and a symbol of communal identity and pride. Generations later, lawn care is a billion-dollar industry and Americans still love their lawns.
- Author: Ryan Daugherty
Water is essential for nurturing vibrant gardens and landscapes. By leveraging water meters, we can effectively monitor water usage, detect leaks, and optimize irrigation practices, ensuring every drop contributes to the sustainability and vitality of our gardens.
Understanding how to read a water meter is invaluable. It allows users to gauge water usage over time, detect leaks, and facilitates utility billing based on actual water consumption. Knowing how to read a water meter is great for tracking your yard's usage and spotting leaks.
How to Read a Water Meter
Most water meters are situated outside near the curb in a concrete box, marked with "water." Use a meter key or large screwdriver to remove the lid. Always check for spiders or other critters before reaching inside.
Understanding the Display
There are three types of water meters: straight-reading meters, digital-reading meters, and round-reading meters. Each type operates differently, displaying and indicating water usage differently.
-
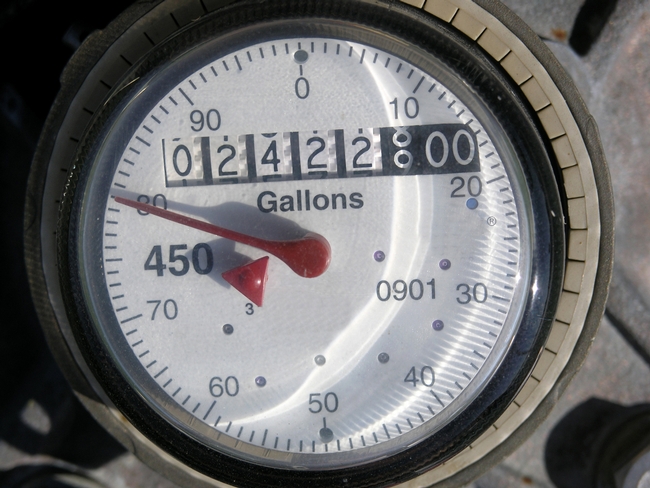
Straight-Reading Meters: Have black numbers on a white background. Usually, for residential meters, one sweep of the face equals 10 gallons or 1 cubic foot of water. The black numbers with a white background reflect the current meter read either in 1,000 gallons or CCF (1 CCF=100 Cubic Feet).
-
Digital-Reading Meters: Display a flashing indicator when water flows. The display might alternate between the meter reading and the flow rate.
-
Round-Reading Meters: These are less common and feature several separate dials. Read each dial from left to right, noting the value indicated by each.
Calculating Usage
Take a reading and run your irrigation. After you're done, subtract the previous reading from the current one to determine the water usage within that specific period. For instance, if the previous reading was 3,000 gallons and the current reading is 3,500 gallons, the usage is 500 gallons.
Basic Leak Detection Using a Water Meter
Some meters have flow indicators, like a small triangle, star, or gear that moves when water flows through it. This can be useful in detecting leaks. Ensure no water is being used on the property: turn off faucets, fixtures, automatic appliances like ice machines, don't flush toilets, and turn off the irrigation system. Look at the low-flow indicator on the meter. Any movement might indicate a leak.
If your meter doesn't have a flow indicator, mark the position of the hand or record the numbers on the meter. Wait for a while, such as 30 minutes, without using any water. After that, recheck your meter. Any change in position or numbers indicates a potential leak.
Subtract the initial reading from the final reading taken after the waiting period to calculate the leak rate (gallons or cubic feet per minute).
Understanding how to accurately read a water meter and perform basic leak detection will make it easier to manage your water consumption efficiently and identify potential issues for timely repairs.
- Author: Alison Collin
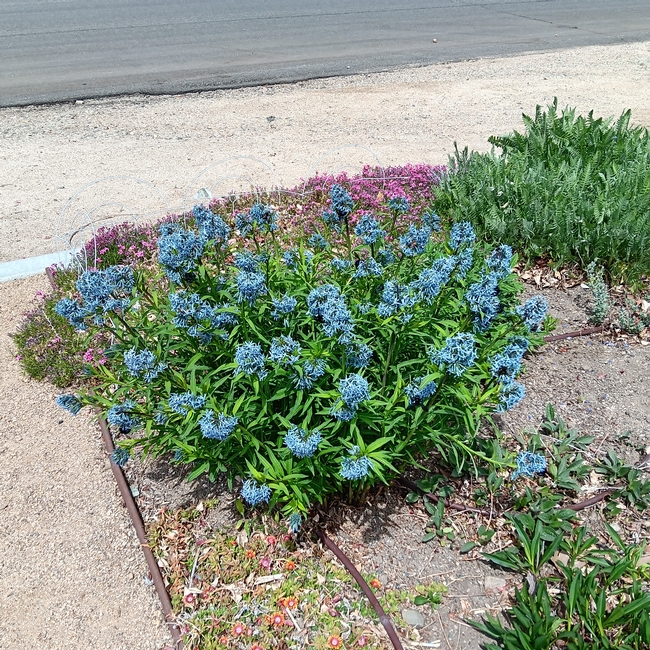
Amsonia, a plant native to the Northeastern USA, seems to be little known in the West. They are commonly known as bluestars on account of the shape and color of their flowers. I have never found it in local nurseries, but I have always been curious to find out how it would do in the Eastern Sierra since it is said to be hardy in USDA zones 3-11.
They like well draining soil and regular water, but are somewhat drought tolerant once established. They need partial shade in the hottest areas. Rabbits and deer tend to avoid eating it unless forage is scarce.
There are several different species of Amsonia, but Amsonia hubrichtii is considered to be one of the best bluestars which has needle like but soft foliage, sky-blue flowers and a bright gold autumn foliage color.
I planted an Amsonia hybrid “Blue Ice” about three years ago in a pollinator garden with sandy soil which I amended by the addition of a little compost, and it has performed very well. It makes a neat clump of foliage about 2 feet tall, with sturdy green stems which are black near the tips. The star-shaped, sky-blue flowers erupt in mid-April. The foliage has good fall color, after which the stems die down completely for the winter. It is not at all invasive, and the single clump has gradually increased in size.
They are relatives of Nerium oleander, and they contain a milky sap which can irritate skin. They are said to be hosts to swallowtail butterfly caterpillars.
One day recently, when the plant was in full flower, I was stunned to witness a frenzy of carpenter bees working the flowers! There were at least 23 bees — some massive — on the clump at the same time, together with 3 bumble bees, two other species of native bees that I could not identify, two different butterflies, and a ladybug! I have never seen a plant with so much pollinator activity at one time. Interestingly, these bees are all natives to our area, although the plant is not, and I have never seen a domestic bee on it.
I am pleased that I tried it.
Further information can be found at:
https://www.chicagobotanic.org/sites/default/files/pdf/plantinfo/fg187_amsonia.pdf
- Author: Laura Siering
Are you getting ready to start some seeds for your spring and summer gardens? Maybe you have some seed starting mix leftover from previous years. It is important to use disease-free soil for starting your seedlings in order to give them the best and strongest beginning and to help prevent damping off.
If a gardener is unsure whether their seed starting mix was free of diseases and weeds, one option is to sanitize the soil with heat. In the past we may have sterilized soil in the oven, but according to the LSU AgCenter, a quicker way to do it is in the microwave! Here's how.
Put seed starting medium in a microwaveable container. It could be a resealable, microwaveable plastic bag, or a glass dish. Make sure your soil has about 50% moisture. It will feel damp, but it won't drip liquid. If you squeeze a handful, it will form a loose clump that is easily broken up. Place it in your microwave and cook it for about 90 seconds in a 600-watt
oven. You want it to be at about 200 degrees Fahrenheit. Use a thermometer to verify the temperature and continue heating it in 30 second intervals until it reaches the correct temperature.
After it has cooled, you may plant seeds or start cuttings in it right away, or you may store it sealed up to a year.
Obviously this won't treat a lot of soil, but you don't need much to start seeds. If you need a lot of soil, you may want to purchase a new bag or bale of commercial seed-starting mix.
For more gardening information, check out the Master Gardeners of Inyo and Mono Counties webpage at: https://ucanr.edu/sites/newinyomonomg .


