Can I Use Google Drive Images in My Web Map?
Consider the following:
- Photos and other images are commonly used in ArcGIS web maps in popups or a sidebar to show picture(s) of the selected feature.
- Google Drive is widely available and works well for storing image files.
Given the above, it is hardly surprising that one of the most common questions we get is:
“Can I display images that I have saved in Google Drive
in an ArcGIS web map?”
Yes, but...
The short answer is yes, but with caveats.
TLDR: Just want to see the recommended solution? Jump down to Putting it all Together.
Caveats
Let’s start with the caveats. To summarize, the first thing to recognize is that there’s a better way to store photos associated with features using a mechanism already built into ArcGIS Layers called Attachments. Secondly, even if you don’t use attachments and your images are saved externally, there are better storage options than Google Drive.
Let’s look at these caveats in more detail.
Better Option #1. Use Layer attachments
The native way to store images in ArcGIS are with layer attachments. But before proceeding, we should review what Layers and Attachments are.
Preliminary: A Feature Layer is not the same as a Layer
On ArcGIS Online, the most common content item for vector GIS data is a Feature Layer. Digging a little deeper however, it is important to understand that Feature Layers are not the counterpart of an online shapefile. Rather they are a container for one or more Layers and/or Tables.
We can ignore this nuance most of the time because AGOL is very forgiving, but the difference between Feature Layers and Layers is important in this case because attachments are something you enable for individual Layers and Tables (on the item’s detail page), not Feature Layers.
Attachments
Attachments are simply files that are connected to features or rows in a table. Attachments can be any kind of binary file, like a JPG, PNG, WAV, or even something like a PDF. When ‘Enable attachments’ is turned on for a Layer or Table, each record can have one or more files associated with it. ArcGIS online stores these attachments behind the scenes, but it isn’t too hard to save them and it isn’t too hard to retrieve them when needed for a popup.
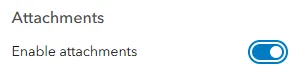
Enable attachments for Layers and Tables
on the item’s details page on AGOL
Should I use attachments?
If you are collecting and managing your data using ArcGIS products like Survey123, Field Maps, AGOL, ArcGIS Pro, etc. then attachments are definitely the way to go. In some cases however, the images might be stored somewhere else, and importing them into AGOL would be either cumbersome or impossible. In these cases, your next best option may be to store the images somewhere else and save the URLs in the attribute table.
Better Option #2. Get Proper Cloud Storage
If for some reason you can’t use ArcGIS’s built-in attachments, your next bet might be to store the images on the cloud and save a link to them in the attribute table.
However even if you go this route, Google Drive is still not the ideal storage option because it simply isn’t designed to provide storage for websites. Even if the methods I describe below work, load times won’t be as snappy as proper cloud storage that is designed to serve web assets. Google is no dummy and may even throttle or block access to the images completely if it detects an unusual amount of download activity.
Google has other products that are designed as cloud storage for websites, such as Google Cloud. Other options are AWS S3 and Azure Blog Storage from Amazon and Microsoft respectively. Hundreds of other vendors also provide cloud storage that is fast, distributed across a worldwide network of data centers, and redundant, which is what you want for websites. These services may not be free but you’d be surprised how cheap cloud storage can be for a modest number of image files.
Still want to use Google Drive? Continue reading…
Caveats aside, serving images from Google Drive for a web map might make sense as a temporary measure when a site is still being developed, if you’re not expecting a ton of usage and your images are already on Google Drive (e.g., from a Google Form).
Step 1: Upload Images and Set Permissions
The first step is to upload your images to Google Drive and make sure they’re shared with anyone who has the link.

Step 2: Generate a Direct URL for Each Image
The share link you get from Google Drive for a JPG or PNG file won’t work as the URL for an HTML image tag. Those URLs take you to a Google Drive page that will probably have a download button, but this won’t work for the HTML <img> which requires a URL that returns the image and only the image.
What you need instead is a ‘direct URL’. A direct URL for a Google Drive file is constructed differently than a standard Share link, but it’s not too hard to convert one to the other.
A share link for a file on Google Drive typically looks something like:
https://drive.google.com/file/d/19yTv4wGlLSVxZJjWQufGcUno8neqmzDL/view?usp=drive_link
There may be other variations of the URL, but the key thing to look for is the File ID. The File ID is typically a 33-character string and shouldn’t be hard to spot (it’s the green text in the share link above).
Once you have the file id, there are two ways you can turn it into a direct URL.
Option 1. The ‘UC’ EndPoint
Place the file id in the following template:
https://drive.google.com/uc?export=view&id=FILE_ID
As an example, the direct URL for the share link above is:
https://drive.google.com/uc?export=view&id=19yTv4wGlLSVxZJjWQufGcUno8neqmzDL
If you copy-paste that link into your browser, the photo itself (not a Google Drive page) will appear.
The Importance of ‘Pre-Sizing” Images for Your Web Page
Images on websites typically appear at a width of 600 pixels or less. For an image in a popup on an ArcGIS web map, the width may be 400px or less. On phones, they appear even smaller. This presents a little challenge for web developers working in today’s world where 4K (4096 × 2160px) or larger photos and images have become the norm.
The good news is that modern browsers can resize images on the fly, so they can display ginormous images in tiny spaces fairly easily. But this convenience comes at a cost. First and foremost, your beautiful high-resolution image might look horrible when it's shrunk to size, particularly if the original has a lot of fine detail or text. There will also be a performance cost. 4K images are orders of magnitude larger in size, which means more storage space is needed and more data has to be sent to the browser over the internet. Once it arrives, the browser will need to spend resources to resize the image to the proper size. For a single image on a fast connection the impact might be negligible. However on a site with many images and/or accessed using a slow internet connection, the effects can quickly add up.
The solution to the image size problem is simple - simply resize images to the required dimensions before you upload them. If you only need a 400 x 300px image, then provide a 400 x 300px image (or slightly larger).
If sizing images for the web page isn’t possible, the next best tactic is to let the server resize images for you on the fly. This dramatically lowers the amount of data that is transferred over the internet and reduces the work the browser needs to do to display the images, resulting in faster load times. Not all cloud storage services have the ability to resize images on the fly, but if this capability is available and your images haven’t been resized for the webpage, it’s worth taking advantage of.
Fortunately for us, Google Drive has the capability of reducing images on the server using the Thumbnail generator..
Option 2. The ‘Thumbnail’ Generator
Google Drive also provides a “thumbnail’ generator” URL that can be used as the direct URL for images. As a bonus, the ‘thumbnail’ generator supports a parameter you can add to the URL to specify the desired width or height. When you pass this parameter, it will resize the image on the server, without squishing it. This is the recommended approach i) when you know the display size of the image on the webpage, and ii) your images haven’t already been resized to fit.
The pattern to use for the thumbnail generator is:
https://drive.google.com/thumbnail?id=FILE_ID&sz=w1000
Where FILE_ID is the id of the file, and ‘sz=w1000’ is the desired width.
To return a copy of the above image that is 400px wide and the height resized automatically, we could enter:
https://drive.google.com/thumbnail?id=19yTv4wGlLSVxZJjWQufGcUno8neqmzDL&sz=w400
Try it yourself and see!
Similarly, if you want to set the image height to 400 pixels and let the width change automatically, change ‘w400’ to ‘h400’:
https://drive.google.com/thumbnail?id=19yTv4wGlLSVxZJjWQufGcUno8neqmzDL&sz=h400
Finally, if you want the longer side of the image (whatever that may be) to be 400, you can pass sz=s400. This is a good choice if your images could be either portrait and landscape, and you’re trying to fit them into a square container in your web map.
https://drive.google.com/thumbnail?id=19yTv4wGlLSVxZJjWQufGcUno8neqmzDL&sz=s360
Putting it all together
Putting everything together, if you really need to display images from Google Drive in a web map, I would recommend:
- save only the Google Drive File ID in your attribute table
- construct the image URL in the popup or sidebar using a dynamic expression based on the thumbnail generator template above
Let’s illustrate this with an example:
1. Create a text field in the attribute table and fill it with Google Drive File IDs
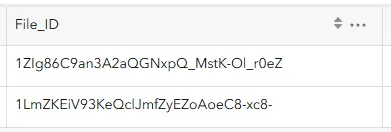
A text field in the attribute table with Google Drive file ids
2. Add an image object to the popup, and paste the template for the thumbnail generator. Where it expects the file id, enter the name of the attribute column that contains the File IDs in curly braces:
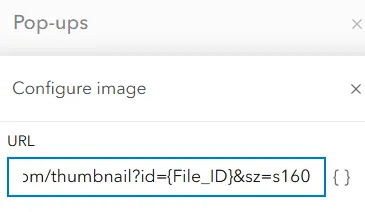
In the the Web Map Viewer, paste the direct URL for the thumbnail endpoint above
as the URL for an image on a popup, and insert the File_ID field in { } where the file id should go.
In this case, the longest side will be reduced to 160 pixels, and the other side set to match, so it should fit nicely with the width of a popup (which is about 430 pixels wide).
3. Finally, save your changes and click on a feature. The image should appear in the popup!
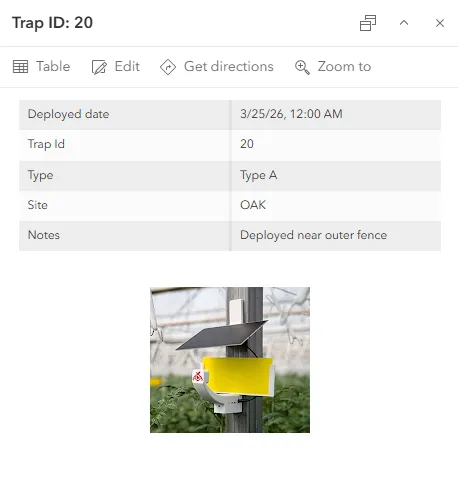
The image on Google Drive appears in the popup!