The Question of the Month is no longer being published. Enjoy exploring the archive.
2024 · 2023 · 2022 · 2021 · 2020 · 2019 · 2018 · 2017 · 2016
January
by Alton Wright
Bitter cold is on the way. What are some quick ways I can protect my garden?
Even a light frost can damage outdoor tropical or sub-tropical species, so staying on top of the winter weather is essential.
One often-forgotten preventative measure is to water everything in the morning before the freeze hits that evening. Wet soil absorbs heat and acts as a thermal insulator.
Make sure to move potted plants indoors or in a sheltered area next to buildings. Like wet soil, the building radiates heat during the night. Leverage your warmer backyard micro climates as good spots to place potted plants
Mulching, if you haven’t done so already to retain soil moisture and keep down weeds, is a great way to help plants tolerate the cold.
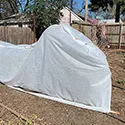
Covering and wrapping plants is the most common, fastest solution for freeze protection. Straw, blankets, and bubble wrap are all helpful. Use clothespins, tape, and other fasteners to close gaps and extend your covers to the ground. Purchasing reusable thermal covers or cloth might be worth the investment. These specially designed materials handle temperatures down to the 20s.
Remember that when you bundle up, bundle up your plants too!
Photographer: Laura Kling
February

by Alton Wright
I’m ready to order seeds for spring planting. Where do I start?
If you’ve ordered seeds online or by mail-order before, you’re probably staring at beautiful catalogs, or your inbox is jammed with offers.
As you begin your seed-buying mission, ask yourself a few questions: Which plants gave you the most pleasure this past year? Which ones were just not worth the effort? Do you wish you had grown a few more of this and far less of that? Was there something that you forgot to grow?
Review your own garden notes and photos. Assess your seed inventory from last season. Check the packages for information about seed viability. You may be able to plant them again this year.
Descriptions of seed origins can be confusing. Most seed retailers use these terms:
- Organic: The seed-bearing plants were grown under certified-organic regulations
- Heirloom: The seed-bearing plants were open-pollinated (OP), and the seeds will have the same traits as the parent plants.
- Hybrid, F1/F2: Indicates a cross between two pure-bred parents. The offspring often corrects growing challenges found in the parent plants.
Take your time, check multiple sources, and, of course, dream about the beautiful garden that you’ll create! See our vegetable planting guides for the valley (pdf) and the foothills (pdf) for when to start seeds and when to transplant.
March
by Alton Wright
Last year my garden was lackluster. Should I test my soil? And, if so, how do I do that?
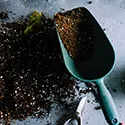
Yes, you should test your soil! Even if you had a bountiful harvest and abundant flowers, occasional soil testing is important to do. Nutrients, specifically organic matter and minerals, are required for plants to flourish. When they are depleted, the result will be weakened plants, low yields and scant blossoms. Understanding your soil’s profile will guide your amendment choices. In addition to understanding nutrient levels, soil pH, from acidic to alkaline, is another important consideration.
Professional laboratory testing can be pricey, but basic self-test kits, available at garden and hardware stores for $10 to $25 will provide good information. And here’s a quickie home pH test using ordinary kitchen items: Put two tablespoons of soil in a bowl, then add one-half cup of vinegar. If the mixture fizzes, your soil is alkaline. In another bowl, add two tablespoons of soil and dampen it with distilled water, then add one-half cup of baking soda. Your soil is acidic if you see fizz. If there’s no fizzing observed in either bowl, your soil is a neutral pH.
With a basic understanding of your soil’s nutrient and pH profile you can add the amendments your garden plant need. Happy, healthy gardening!
Photographer: Neslihan Gunaydin
April
by Alton Wright
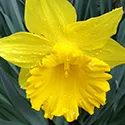
My beautiful spring bulbs finished blooming, and the plants look pretty shabby. Can I clean them up by removing their leaves and pulling up the bulbs?
Healthy, vigorous gardens demand good housekeeping. Many of us become neatniks when our spring bulb show of daffodils, crocuses and hyacinths comes to an end. We naturally want to remove their yellowing, spindly leaves. Don’t! Those leaves are needed to build reserves for future flowers. If you remove the leaves too early, you might forfeit next year’s show and weaken the plants. Leaves should eventually become as dry as tissue paper (usually around early summer) at which time they will naturally fall off or can be gently removed. One way to help disguise any unsightliness is to plant fast-growing summer annuals nearby and let their leaves fill in the voids created by the bulb’s withering greenery. Another option is to carefully apply mulch that the drying leaves will visually blend into. As for the bulbs, if you want to move or divide them, wait until late summer or early fall. Following these few basics will ensure years of enjoyment from your bulbs. Enjoy the repeating show!
May

by Alton Wright
Every season my perennials start out looking neat and orderly, but by mid-summer they are out of control, flopping over so that the stems holding their blossoms bend and break. How can I avoid this?
Your garden must be a showstopper! But your frustration is a common one. It sounds like you might have some tall plants with spiky blooms: Delphiniums, lupines, and hollyhocks come to mind. These types of plants require tall, strong stakes set close to them to tie the blossom spires to. You should also consider solid stakes near any fast-growing summer lilies. More bushy perennials, like peonies, daisies, rudbeckia, and dahlias, can be contained by placing support above the plant crowns. Use 2-inch by 2-inch (or larger) hog wire, cut into a shape close to the size of the plant’s crown, and firmly install it a foot or more above the emerging plant, so the stems will be supported as they rise through the gaps in the wire structure. While these supports might not seem aesthetically pleasing at first, within a week or two you won’t even notice that they are there. (Bonus Tip: If you like more natural-looking stakes and you have fruit trees that you prune, save any long, straight branches for future staking needs.). Happy Gardening!
June

By Jeanne Lawrence
I really like berries of all kinds, and would love to grow some in my own yard. What types do best in our area?
You are in luck! Many varieties of raspberries, blackberries, boysenberries, and blueberries can be grown in our area. Two raspberry cultivars, Bababerry and Oregon 1030, tolerate our valley heat, while other varieties need some afternoon shade. Heritage does well in the foothills. Blackberries are more tolerant of heat. There are two types of blackberries: those that grow erect and those that have a trailing habit. The Boysenberry is classified as a blackberry, however part of it is a deep rich purple similar to a blackberry, while other parts of it are as red as a raspberry. With good preparation and proper care boysenberries can be grown in the Chico area. Raspberries, blackberries, and boysenberries all need a trellis of some kind for support. Many hybrid Southern highbush blueberry varieties have been adapted for the hot summers and low winter chilling seasons of our milder Valley climate, and will produce fruit from April through mid-July. Good varieties include the early-ripening Misty, O’Neal and Jubilee; the early to mid-season Sharpblue; and the midseason varieties Southmoon and Sunshine Blue.
July

by Alton Wright
What’s wrong with my dahlias? The catalog I purchased them from shows pictures of giant flowers. Mine are small, with spindly stems.
There’s likely nothing wrong with your dahlias. Dahlias are showstoppers in the late summer garden and come in various sizes, shapes, and colors. It sounds like yours are growing well and require some attention to increase prime flower development. There are three steps to produce maximum-size flowers with solid stems, especially on dinner plate, cactus, and large ball varieties. First, when the plants are small, remove the top, central growing tips, usually in late June and early July. This is called pinching or stopping, and it encourages branching. Be careful not to remove too much. There should be at least four or more lateral leaves left behind at the point of tip removal. The second step, taken a week or two later, is thinning (removing) a few of the less vigorous branches to enhance ideal bud development. Finally, once buds develop, you’ll need to disbud. Dahlia bud terminals have three buds. Remove each of the two smaller side buds, leaving behind the central larger bud. Also, remove the leaf shoots from one or two of the leaf laterals below the remaining bud. These steps will encourage stronger stems with bigger flowers. Enjoy your dazzling display!
August
by Alton Wright
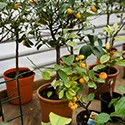
My 15-year-old citrus tree in a container has a lot of new foliage. Is it safe to prune some growth during the hot summer months?
While citrus trees grown in containers require pruning to maintain proper size and shape, this is not the ideal time of the year to prune severely. However, if our temperature cools down a bit, some light tip pinching and the removal of one or two small limbs is permissible. Remember that any pruning stresses the tree, and summer pruning can result in unsightly and possibly debilitating leaf scald on the remaining branches. If you choose to prune a little now, you might want to move your container so the tree is out of the blistering afternoon sun. If the container needs to stay in place, consider painting any newly exposed branch tops with diluted white latex paint. Remember to water it well and regularly. Ideally, prune in the spring (or sometimes after the harvest) to encourage new growth. Spring pruning allows the cuts to harden off and reduces the invasion of citrus leaf miners. You might want to sit back, enjoy your tree’s lavish growth, and prune next spring. Happy gardening!
September

by Jeanne Lawrence
I love my Naked Ladies when they bloom in late summer. But increasingly I notice clumps of bulbs that are no longer flowering. Does this mean I need to break up the clumps and space the bulbs out? If so, when is the right time to do it?
Like daffodils and many other bulbs, Naked Ladies (amaryllis belladonna) will eventually develop into large clumps of bulbs, most or even all of which have stopped blooming. When this happens, it is best to dig up the clump, divide the bulbs, and replant, with the bulbs about one foot apart and (in our area) with the tops of the bulbs at or slightly above soil level. Dividing and replanting should be done right after bloom time, when the bulbs enter dormancy, so this is a good September garden chore. In our climate it may take a few years for your Naked Ladies to bloom again after re-planting, but they are long-lived bulbs, very hardy overall, and very drought tolerant, subsisting on winter rains and requiring basically no summer water. Plus they are beautiful and fragrant–a nice choice for a water-wise garden.
October

by Alton Wright
Over the years, I have spent a lot of money on spring bulbs only to have them destroyed by gophers. I've tried planting in wire baskets and protected raised beds, hoping to eliminate the losses, but the baskets rust out, and the gophers eventually chew their way in. Any other ideas?
Many people have seen a significant increase in gopher damage this year, and spring bulbs are a prime gopher target. It sounds like you've implemented the proper methods to protect your investment. Here's a tip: Plant your bulbs in 1–3-gallon plastic nursery containers with ample drainage holes that are no larger than 3/4 of an inch. Place a few broken terracotta shards or rough stones in the pot bottoms. Fill them more than halfway with heavily amended sandy loam. Bone meal is the standard amendment for most bulbs. Plant bulbs tight, for example, 5–7 tulips or 4–5 hyacinths per gallon container. Sink the planted containers in your final locations, about 1" below ground level. Place some chicken wire on the tops of containers and put an inch of mulch on top. Water lightly and allow the winter rains and chill to do the rest.
November

by Alton Wright
I really like the brightly-colored fiberglass handles found on many garden tools now, but I've gotten some irritating splinters from them. What can I do to prevent this?
Ouch! Yes, those splinters can be itchy and sometimes painful. It's a common misperception that a fiberglass handle never needs maintenance. Here are a few steps to incorporate into your seasonal tool care regime to make them last longer and reduce the splinters.
- Always store fiberglass handles out of direct sunlight and dampness.
- Regularly inspect the handles for signs of cracking. While fiberglass is stronger and lighter that wood, it can crack, and once a crack starts, it’s time to replace, rather than repair, the handle.
- As with wood handles, at the end of the season run some fine sandpaper over the handle's surface to remove splinters.
- If necessary, coat the handle with an appropriate fiberglass sealer. Clear varnish or plastic dips/sprays are suitable for fiberglass, but it’s best to check with your local hardware store for recommendations.
- Be sure to mask up before you sand and paint.
Finally, always consider wearing gloves when using a fiberglass-handled garden tool. Happy gardening!
December

by Alton Wright
The leaves keep piling up. I’m so tired of hauling them away. Seems like such a waste! Do you have any other ideas for putting them to work in my garden that isn’t much work for me?
Leaves not tainted with insecticides, pesticides, or roadway oil/grease can benefit your garden in many ways! A layer raked underneath your trees (but away from their trunks) will help return nutrients to the soil, and thus to the trees. A layer raked onto flower or vegetable beds will act as mulch and, as it breaks down, compost. Leaving at least some leaves in your yard also helps wildlife, particularly ground-nesting bees. (For more information, see Promote Native Bee Habitat by Leaving Some Leaves and Stems on the Ground.) With little work, the leaves of oak, maple, sycamore, and other broadleaf trees can be transformed into leafmold, a valuable soil amendment and mulch. Leafmold results from a large quantity of leaves allowed to naturally break down, undisturbed, over a year or two. Pile leaves in a protected garden corner and throw a light tarp over them. Occasionally uncover and add a sprinkle of water to encourage decomposition. Another method is to bag them up in large garbage bags. Slightly compress the leaves while filling the bag, tie up the top, sprinkle a little water inside, and punch a few holes in the bottom to allow air in. After a year or two, you’ll have an excellent medium for seed starting, soil enrichment, and top dressing. Happy Gardening!