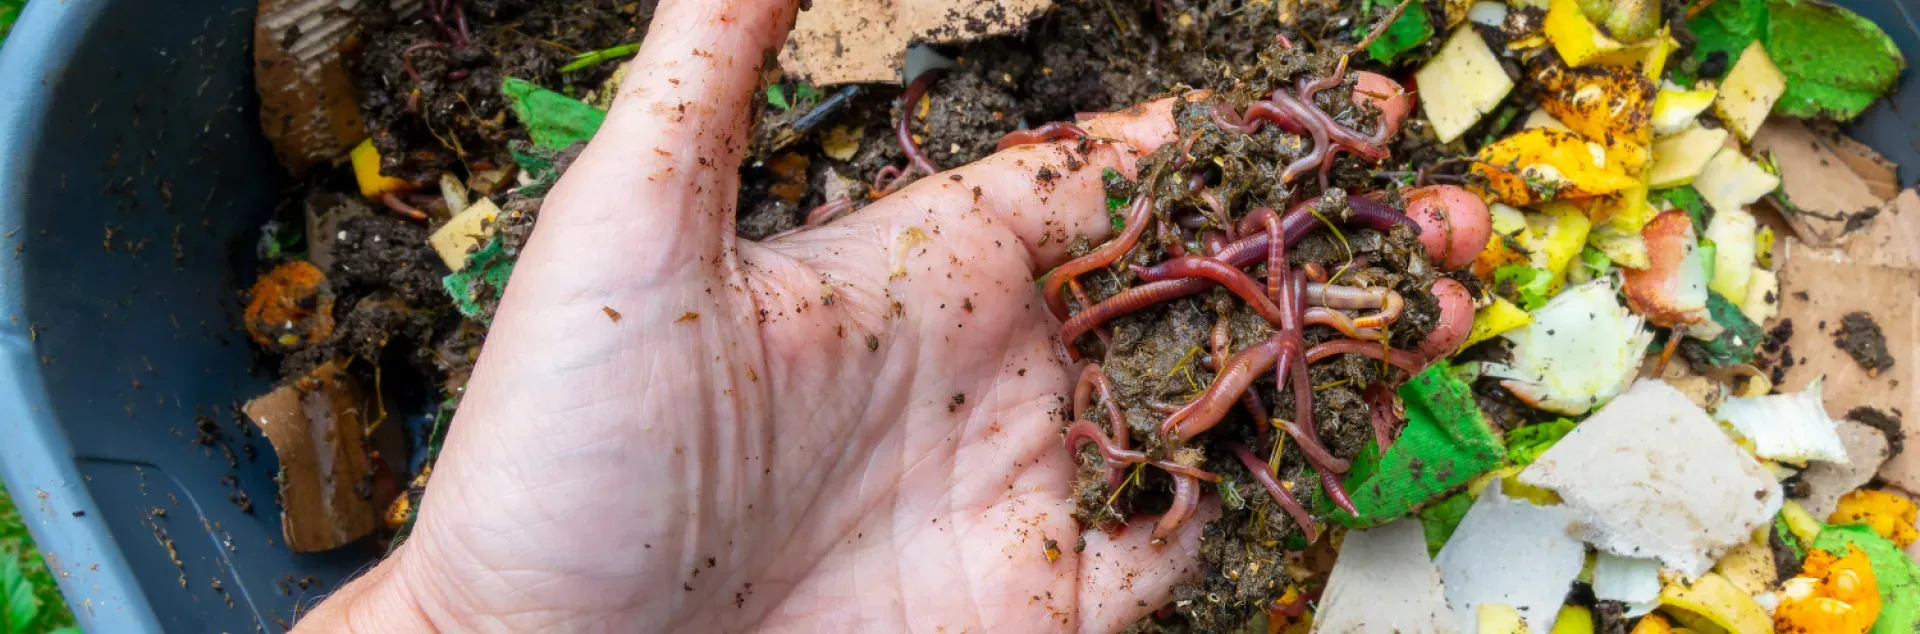
How would you like to recycle your kitchen scraps by turning them into "black gold," nutrient-rich worm castings? This can be accomplished by vermicomposting, which is the process of red wriggler worms turning food scraps into vermicompost or worm castings (worm “poop”).
Why vermicompost?
Vermicomposting differs from traditional composting in the organisms that break down food scraps. Vermicomposting uses red wriggler worms, whereas traditional composting relies more on microorganisms to break down organic matter.
Compared to traditional composting, vermicomposting is ideal for small spaces and can be done indoors or outdoors. Vermicomposting is less labor-intensive and often produces worm castings more quickly than traditional composting produces finished compost. Furthermore, vermicomposting does not attract rodents.
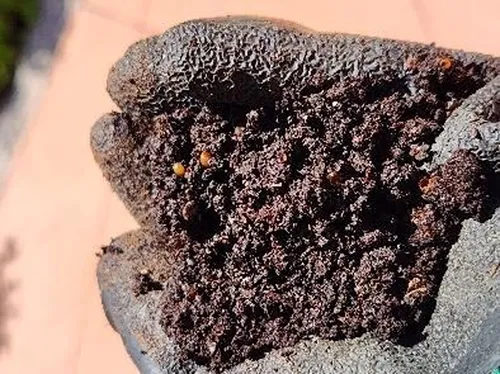
Like compost, vermicompost is an excellent soil amendment, enriching soil with nutrients and microbes while improving its structure and moisture retention. What sets worm castings apart is their higher nutrient content, being very rich in the macronutrients nitrogen, phosphorus, and potassium, as well as many micronutrients, including iron, magnesium, sulfur, copper, calcium, and zinc. Worm castings are also chock full of microbes and beneficial bacteria and are in a form more readily available to plants than compost. Like compost, vermicompost does not burn plants and can be used as a top dressing around plants or mixed into soil in both garden beds and potted plants. In addition, the excess liquid generated from the vermicomposting process makes an excellent liquid fertilizer.
How to set up a vermicompost system
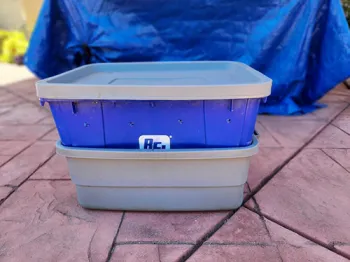
Vermicomposting bins can be purchased or homemade.
Materials for construction of a worm bin:
- 2 opaque plastic bins, with an inner bin that can nest loosely inside an outer bin. The outer bin should be wider and longer but shorter in height than the inner bin.
- The inner bin will be the worm bin. Any size bin can be used for the inner bin but preferably no taller than 20 inches.
- The outer bin serves as a catch basin for excess liquid that drains out of the inner bin (worm compost “tea”).
- It will be easier to collect the worm compost tea if the inner bin can be lifted easily out of the outer bin. Therefore, it is recommended that the outer bin be longer and wider but shorter than the inner bin.
- Plastic cover for the inner bin.
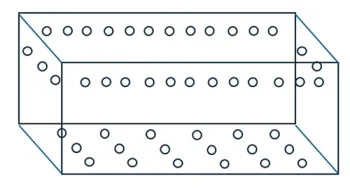
- Drill with a 1/4” drill bit (for drilling ventilation holes in the inner bin).
Materials for filling the worm bin:
- Bedding: unbleached paper and/or newspaper (no color ink or glossy paper) torn into ½” wide strips, shredded non-corrugated cardboard, leaves, or coconut coir
- Window screen or burlap bags (optional) to prevent worms from escaping from the bin
- Food scraps cut into small pieces (see detailed list below)
- Grit: a handful of soil or crushed eggshells (see the section below, “Filling the Worm Bin")
Grit helps worms digest the food - Red Wriggler worms (Eisenia fetida)
Can be purchased online or from bait and tackle shops
Constructing the worm bin:
- On the smaller inner bin, drill ¼” holes every 2-3” on the bottom (for drainage) and every 2-3" on all four sides near the top (for ventilation).
- Optional: Line this inner bin with window screen or burlap bags to prevent worms from escaping.
- Nest this bin inside the larger outer bin.
Filling the worm bin:
- Loosely line the bottom of the worm bin with about 3 inches of moistened bedding material.
- Gently scatter worms on top of bedding and add some food scraps (about 1/4 lb for 1 lb of worms) to allow worms to acclimate.
- Loosely cover food scraps with another 4 inches of moistened bedding material. (Optional: cover bedding material with moistened burlap.)
- After 3-4 days, add more food scraps and a handful of grit (remove covering bedding before adding food scraps, then replace the covering bedding)
- Place the plastic lid loosely on the worm bin to allow for ventilation
- Keep the worm bin in a location out of direct sunlight, where the temperature remains between 55° F-80° F. Shady areas are great. Outdoors, consider placing the bin under a tree canopy, under an awning, or any shaded location on the property. Indoor locations can be the garage, a shaded area in an enclosed porch, or even inside the house.
Feeding the Worms
- Recommended foods to feed worms:
- Most vegetable and fruit scraps
- Coffee grounds
- Loose tea leaves
- Tea bags (remove staples and make a hole in the tea bag for worms to access tea leaves)
- The following items may be added in moderation, provided they are cooked or raw, plain, and free of additives (such as salt, oils, fats, spices, dairy products, or eggs):
- Grains
- Rice
- Bread
- Pasta
- Foods NOT to feed worms:
- Citrus and other acidic foods
- Dairy
- Meat and bones
- Fats and oils
- Spicy foods (e.g. hot peppers)
- Alliums (garlic, onions, leeks, shallots, chives, scallions)
Maintaining and caring for the worm bin:
- Feed worms about every 5-7 days. Worms do not like to be disturbed. Remove covering bedding material before adding fresh food scraps. Replace covering bedding after adding food scraps. The quantity of food scraps added will depend on the quantity of worms. One pound of worms can eat about half a pound of food per week. Worms can potentially double in population every 60-90 days. If worms consume food in less than 5 days, then feed them more next time.
- Start small; one pound of worms is a good start. Worms stay within the top few inches, so don’t fill the worm bin too deeply.
- Make sure the bedding remains moist.
- If going on vacation, add extra food and bedding.
- During extreme temperatures, the worm bin can be moved indoors to the garage, enclosed porch, or inside the house. During heat waves, a damp blanket can be placed on top to keep temperatures down. During the winter, worm bins can be insulated with blankets or bales of straw.
- Every few months, harvest worm castings (see below) and collect the liquid that has accumulated in the outer bin. This worm tea can be used to fertilize plants.
Harvesting worm castings
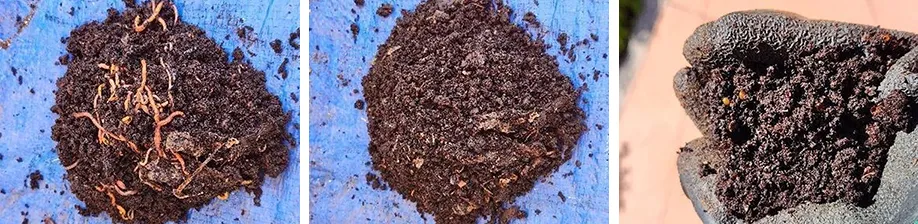
Method 1: Mound method
- Lay a tarp on the work surface.
- Make mounds of worm castings on the tarp.
- Let it sit a few minutes; worms will migrate to the bottom as they do not like light. Gently scrape off the top layer of worm castings; re-mound and repeat.
- Set up new bedding and food in the empty worm bin and return worms to the fresh setup.
Method 2: Half-bin method
- Move all material to one side of the worm bin.
- Set up new bedding and food on the empty side. The worms will gradually migrate to the new side within a few weeks. Harvest finished worm castings.
Making Worm Compost Tea:
- Soak worm castings in water for 1-2 days.
- Strain off worm castings.
- Use “tea” as liquid fertilizer.
- Strained castings can also be used as a soil amendment.
Troubleshooting:
- Lots of fruit flies: organic matter is too close to the surface. Cover food scraps with a thicker layer of bedding material.
- Bad smell: too wet or too much food. Add more dry material or feed less.
- Worms dying: too much food, too dry, too wet, or extreme temperatures. Feed less, adjust moisture, or move the worm bin out of the extreme temperature area.
- Ants: Bin is too dry. Add moisture.
With this basic information on how to begin vermicomposting, you are ready to set up your own bin. Soon, you can marvel at this wonderful process of red wriggles turning food scraps into black gold and watch your produce and flowers flourish.
References:
https://www.ucanr.edu/site/uc-master-gardeners-san-luis-obispo-county/vermicomposting
https://ucanr.edu/site/uc-master-gardeners-orange-county/vermicomposting-vermiculture-orange-county
https://ucanr.edu/site/uc-master-gardeners-san-joaquin-county/composting-worms
https://www.epa.gov/recycle/how-create-and-maintain-indoor-worm-composting-bin
https://www.lsuagcenter.com/articles/page1651169706312