Posts Tagged: Seeds
Collecting Seeds to Create Native Plant Spaces for Wildlife
The Nature Conservancy (TNC) excels at native plant restoration and ecosystem stewardship on a landscape-wide scale. By creating, extending, and conserving native habitat, they provide permanent and migratory wildlife species the spaces they need in...

Showy milkweed. Laura Lukes
Weeds and Weed Seeds
Note: This was originally published in the Contra Costa Times
Conquer weeds by understanding their life cycles
As a gardener in Contra Costa County, you know from observation that weeds have an immense capacity to produce seeds. In fact, the high reproductive output of weeds is astounding. Per plant, pigweed produces 117,400 seeds, mullein 223,200, lambsquarters 72,450, shepherd's purse 38,500, johnsongrass 80,000, curly dock 29,500, and wild mustard a mere 16,000 seeds.
Weed flowers can be small and inconspicuous, but, after flowering profusely over a period of several months, they produce a tremendous quantity of seeds. Black medic, kikuyugrass, and spotted catsear flower 5 to 7 months. Dandelions bloom 9 months out of the year and each flower produces thousands of wind-borne minutely barbed pappus-bearing seeds which can germinate year-round.
The sheer quantity of seeds ensures waves of seedlings. Yet, germination is discontinuous: it doesn't happen all at once. In gardens and in other disturbed areas, seeds are stored in the soil until shallow tillage brings them to the surface where conditions for germination are ideal.
Weed seeds persist in the soil below the germination zone and can be viable for a surprisingly long period of time. Mustard seeds thought to be 600 years old were excavated from a monastery garden in Denmark and 11 of them germinated. The longevity of field bindweed seeds is over 50 years. Lambsquarters seeds are viable for 20 to 50 years. Grass seeds tend to live an average of 3 to 10 years, whereas broadleaf weed seeds can be part of the soil seedbank for a much longer time
Life Cycle of Weeds:
Like other members of the plant kingdom, weeds are classified as annuals, biennials or perennials. The seeds of summer annuals germinate in the spring and mature plants generate seeds in summer and fall. Winter annuals sprout in the fall, live through the winter and produce seeds during the winter and spring. Biennial weeds spend their first year producing leaves before they flower and bear seed during their second and final year of life. Perennial weeds propagate by seeding but also vegetatively by means of creeping roots, rhizomes, taproots or bulbils. Weeds in their various stages of growth, flowering, seed production and dispersal are with us all year.
Weed Seed Dispersal:
Weed seed dispersal is varied and opportunistic. Though many mature weed seeds fall next to the parent plant, quantities of others are tumbled along or parachuted for miles by wind. Some burst out of capsules, landing 3 to 15 feet away. Others hitch a ride by attaching themselves to animal fur with burs or seed hooks. Many are digested by birds or livestock, transported by water or by the gardener's boots and tools. In their quest for territorial expansion, weeds use gardens as seed factory sites, as seed storage facilities and as launching pads for seed dispersal by gardeners.
Production of large quantities of seed, opportunistic seed dispersal, long- flowering periods, long seed viability, year-round seed production, and
discontinuous germination are successful strategies that weeds use to ensure their survival and expansion.
Managing Weed Seeds:
Weed seed management works best if you combine methods of control. Choose an irrigation system such as drip irrigation or microsprinklers so that only your plantings are watered. Be aware that cultivation brings weed seeds to the surface where they can germinate. Do not let weeds go to seed and replenish their weed seed reservoir in the soil. Reduce weed seed germination by eliminating their light source through use of a thick layer of mulch.
For More Information:
If you would like more information about identification of and controls for specific weeds, consult these University of California web sites:
https://wric.ucdavis.edu/
http://ipm.ucanr.edu/PMG/menu.weeds.html
http://ipm.ucanr.edu/PMG/PESTNOTES/pn7441.html
Help Desk of the UC Master Gardeners of Contra Costa County (CG)
Using Native Plants for Weed Control
One of the first steps in ecological restoration is often controlling invasive weeds, which can be a major barrier to native plant establishment. But what happens after restoration is complete? At most sites, weed pressure is an ongoing challenge that...
Lawn-pocalypse! Surviving Drought
Ah, summer! The season of sunburns, pool parties, and… lawn droughts. If your once lush, green carpet now looks like a crunchy brown doormat, you're not alone. Let's dive into why your yard is staging a dramatic death scene and what you can do to...

Bermuda grass and weeds overtaking drought stressed turf grass.
Indoor Seed Starting
Many of us have seed catalogs arriving in the mail this month, so now is the time to start thinking about your summer garden. We are publishing this article again because starting plants from seed is a great way to lower costs and increase the variety in your vegetable garden.
The seeds of many vegetable plants can be planted indoors several weeks before the usual outdoor planting date. In addition to the bonus of earlier harvest times, your young plants are protected at their most vulnerable stage from inclement weather and the hungry pests that love to feast on small, tender vegetable plants. Planting from seed also gives you access to a much wider variety of vegetables than you would get when purchasing seedlings from local nurseries or big box stores.
Most of us are not lucky enough to have a heated greenhouse or cold fame. Despite that, you can have success starting seeds indoors as long as you provide the conditions they need to germinate and grow. Here are some tips for successful indoor seed starting:
· Purchase your seeds from a trusted source. Fresher, higher quality seeds will have a higher germination rate (meaning more will sprout). Know your local climate zone and last frost dates and choose varieties that are appropriate for your area.
· Some vegetables do best when their seeds are planted directly into the garden. Peas, beans, and most root crops such as carrots, beets, and radishes are some of them. Check the information on the backs of seed packets and consult the CCC Vegetable Planting Guide below to find out which of the plants you wish to grow can be started early, and those that should be directly seeded in the garden.
· Time your seed planting. Not all vegetable plants grow at the same rate. From seeding to planting in the garden, tomato plants can take 5–8 weeks, while cucumbers or melons take 3–4 weeks. Plan your seed planting so that your plants are ready to go outside when the soil and air temperatures are sufficiently warmed up. A good rule of thumb is to wait to transplant outdoors when nighttime temperatures are consistently above 50°F. For more information on the timing of planting, check the backs of seed packets and the CCC vegetable planting guides provided below.
· Use a seed-starting mix. These mixes don't contain any actual soil, but they provide ideal conditions for sprouting seeds. Most importantly, they provide a good balance of drainage and water-holding capacity. Soilless mixes commonly contain some combination of these materials: peat moss, sphagnum moss, perlite, and vermiculite. Don't use garden soil as it doesn't drain well and may harbor plant diseases.
· Container choices. A wide variety of containers can be used- just make sure they are at least 2 inches deep. Recycled containers such as empty plastic yogurt or takeout containers work well. Make sure to poke holes in the bottom that will allow excess water to drain out. Used plastic plant pots, six-packs and flats are good choices and can be reused for many years but should be sanitized before reuse.
· Sanitize previously planted containers. Remove all soil and debris by scraping, brushing, and rinsing. Use a solution of 9 parts water and 1 part bleach to kill any possible plant pathogens. Soak plastic and other non-porous containers in a bucket of this solution for 10 minutes. Porous containers such as terra cotta should be soaked for 3 hours to overnight. Rinse thoroughly and allow to dry before using.
· Plant seeds at the proper depth. Check the seed packet for planting depth recommendations. You don't need to be too precise, just be sure not to plant any deeper than the directions suggest. The general rule is to plant the seed two to three times as deep as the seed is wide. For example, large seeds like beans should be sown about an inch deep, and very tiny seeds should be barely covered by the soil mix. Tamp down the soil very gently after planting and water right away to thoroughly moisten the soil (until excess water runs out of the drain holes). You will not always get 100% germination, so plant a few extra seeds.
· Don't forget to label all your containers. Do this before or while you are planting your seeds. Use materials that will stand up to wet conditions. Pencil on plastic or wooden stakes will work well.
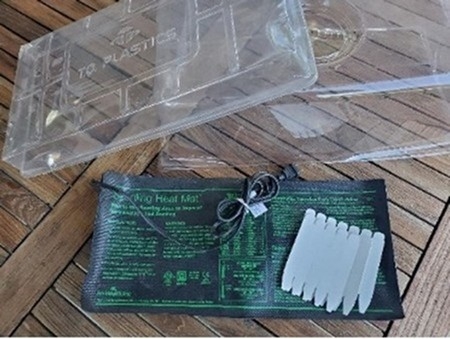
· After sowing, set the containers in a warm location. Most vegetables germinate best at temperatures between 65° and 75°F. A warm location in your home is one option. Another is to invest in an electric heat mat. They are made specifically for starting seeds and growing indoors, are an excellent way to provide consistent warmth, and will last for many seasons. Find heat mats online or at local garden shops and nurseries.
· Keep the seed-starting mix moist, but not soggy. Plant roots need both air and water. Saturated soil can cause seeds to rot and seedlings to die. Also do not allow soil to dry out. Check daily and water as needed. Clear plastic dome covers or plastic bags (be sure to keep them from touching the soil surface) can be used to help keep the soil evenly moist. Remove the covers after germination to allow for air circulation and to help avoid fungal diseases.
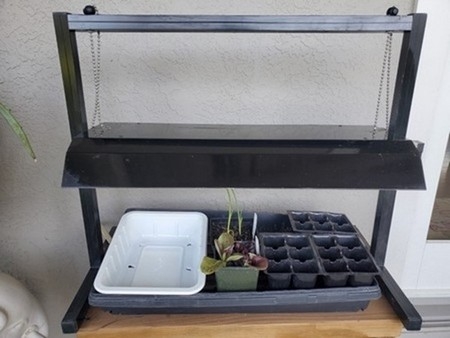
· As soon as seedlings emerge, make sure they get bright light. Placing them next to a sunny window is an option, but containers will need to be turned occasionally to keep the plants growing straight. Better results can be obtained by providing additional light from 40-watt cool white fluorescent tubes. Suspend the lights about 4¬–6 inches over the tops of the plants and keep them on for 14–16 hours each day. Be sure to move the lights higher as the plants grow taller.
· When the seedlings have one or two sets of true leaves, it's time to thin and transplant. If planted in individual pots, you will want to remove all but one seedling per pot. Cut or pinch extra seedlings off at the soil line. If several seeds are planted in flats or small cell packs this is the time to transplant them into larger individual pots. Four inch or quart size containers will give seedlings enough room to grow until it is time to plant in the garden.
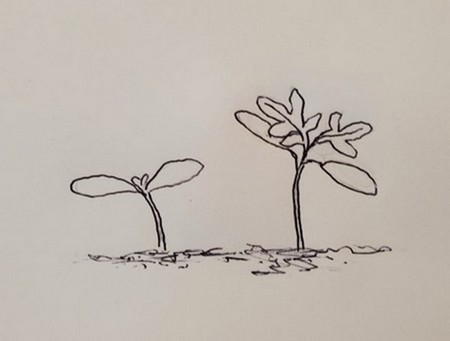
· Begin to fertilize weekly. Plants that remain in the seed starting mix will now need added nutrients. When your seedlings have one set of true leaves (see illustration below), use a half-strength fertilizer (liquid fertilizers are easier to use and apply). Organic mixed fertilizers are a good choice. Many of them will provide a range of nutrients that include micronutrients. You may decide to transplant your seedlings into a potting mix that already contains added nutrients, in this case adding fertilizers may not be necessary.
Illustration and photos courtesy of S. Hoyer
Seed Sources:
https://sonomamg.ucanr.edu/files/29795.pdf
Vegetable planting guides:
Contra Costa County Vegetable Planting Guide-Interior Regions
Contra Costa County Vegetable Planting Guide-Coastal Regions
Climate zones and last frost dates:
https://cagardenweb.ucanr.edu/Your_Climate_Zone
Local Frost Dates for Garden Planning
More information on vegetable gardening can be found in the links below:
https://cagardenweb.ucanr.edu/Vegetables/
Vegetable Gardening Handbook for Beginners
Help Desk of the UC Master Gardeners of Contra Costa County (SMH)


