

After last month’s cold and fog, are your roses starting to look awful? Some of mine are and some are not. Mother Nature is amazing! Some of the leaves on my rose bushes/climbers have turned yellow and fallen off. Many of my roses are still pumping out buds and blooms. If your roses have lost their leaves, rake those leaves up and place them in the green bin. They can harbor fungal diseases, which you don’t want on your roses. If you noticed fungal diseases on your roses from the cold, foggy weather, cut off those portions (to a bud eye) and dispose of them in your green bin. Again, you don’t want to spread fungal diseases amongst your roses.
I noticed on one of my roses the buds were covered in botrytis. (Click link for more on rose diseases.) Well, those beautiful buds are now gone. They need to be cut off and placed in the green bin. Do not compost them (or your rose leaves). Your compost bin will not get hot enough to kill those fungal spores or diseases. You don’t want to spread them throughout your yard.
Resist the urge to prune your roses now. Why? Because of the current air and soil temperatures. If it warms up a bit, your roses will think it is spring and act accordingly by putting out new growth. Our last frost date is around Valentine’s Day in the valley and even later if you live in the mountains. If we get a cold snap, that new, tender growth will freeze and you have to prune all over again. Prune your roses during late January/early to mid-February for a spectacular spring bloom, typically in early April. If you live in the mountains, prune them close to the last frost date for your area.
For now, clean up any rose leaves on the ground. Take off any buds that may have any type of fungal diseases. That should be it for rose garden chores until the end of January or beginning of February or later, if you live in the mountains. Sit by the fire or heater and take a look at new roses coming out in various catalogs or online. Order by the end of January, (if not available locally). Plant them in early February.
Equipment for pruning
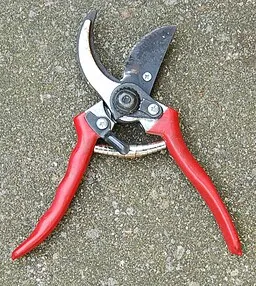
It is important to have proper tools for pruning. There are several tools that are vital in the quest for proper pruning. The first one is high-quality pruning shears. These should be a bypass type of pruning shear. I cannot tell you how many of these I have purchased over the years. Get a good one. Gee, once I got a good one, I didn’t have to keep buying cheap ones! It will save you a lot of heartache in the long run and the pruner will last. It is worth the investment.

Get a good quality lopper for cutting big canes. Make sure they have the bypass cutting blades, same as your pruning shears. These are ideal for pruning out larger canes and those canes that you can’t quite reach, down towards the base of the rose.
Use a sharpener for your shear and lopper blades. Dull, dirty shears and loppers can damage the canes of your roses and cause disease and dieback. Use a three-in-one oil after sharpening, to make sure the blades work smoothly.
Get a good pair of gloves. I recommend leather or goat skin. Cotton ones won’t cut it. The thorns (or technically prickles) from the roses will cut you if you wear those. You don’t want them puncturing your skin. Roses carry some nasty diseases. You don’t want to get any of those or to have to get a tetanus shot from not wearing proper pruning gloves.
You can get a pair of long gloves (rose pruning gloves) for protecting your arms. I have a pair of long “rose” gloves and also a pair of welding sleeves that I use when pruning. Choice is yours. Sometimes I prefer using the welding sleeves with my short leather gloves. Other times I prefer long rose gloves. Either will work well to protect your arms and hands.
I mentioned tetanus shots earlier in this article. Make sure yours is up to date. I know of rose growers who required serious surgery due to punctures by thorns. I would rather have you safe than sorry.
Pruning (for the end of January or beginning of February)
This is going to be a general guidance to pruning your roses. I tend to prune my mini roses differently than my other roses. Climbers are also pruned differently from other types of roses. I know this sounds so confusing. However, roses are very forgiving plants. Earlier editions of Rosie’s Corner covered pruning of all the different types of roses. I will go over those again during the month of February.
Most people are afraid to prune as they think they will kill their rose bush. It takes a lot to kill a rose bush. Pruning probably won’t do it. All of my roses are on their own roots. However, you may have grafted roses. If you have a grafted rose, prune 2 to 3 feet above the graft, depending on the type of rose. The graft is that knobby thing at the base of the rose bush, that should be above the soil line in this climate. Own-root roses are not grafted onto a rootstock rose, so you don’t need to worry about cutting the graft when pruning.
First, pull off all the leaves from the bush. Dispose of those in your green bin. Do not use them in your compost heap as they may be diseased.
Second, cut your bush so that it is between 2 to 3 feet in height (again this depends upon the type of rose you are pruning, climbers and mini’s are pruned differently). Remove any dead canes or small twiggy growth. Remove any canes that are crossing in the middle and may be rubbing against each other.
Third, after doing the above, take a look at your plant. If it is planted near or against the house/fence, remove any canes that may be hitting your siding or fence. If you want a nice, rounded bush, prune the canes accordingly so the plant has a nice round shape to it.

Prune to a bud eye. Usually, the recommendation is to cut ¼ inch above an outward facing bud eye. It’s your choice, depending upon where you want that cane to grow. New growth will grow from that bud eye.
You may end up with only six canes or so, when all is said and done. That is OK. You want to have a nice and open center for your plant so air will move through it. That will help to reduce fungal diseases.
Fourth, clean your pruning shears and lopper blades with an alcohol wipe between each rose bush. Don’t use a wipe that contains bleach as that can ruin the blades on your shears and loppers. The alcohol wipe will help to control diseases between each of your rose bushes.
Fifth, make sure the area around your newly pruned rose bush is clean. Take away any fallen leaves, twigs, debris, canes, etc. Dispose of them in the green bin for the reasons stated above.
If you grow roses in pots (I do too!), check to see if the soil in the pot has shrunken down to three or more inches below the rim of the pot. If so, it is probably time to repot your plant. You don’t want compacted potting soil. Pull out the plant and use new, fresh good quality potting soil for your rose.
Fertilizing
Resist! Resistance is not futile! You won’t need to fertilize until about the middle of February, when the new leaves start to come out.
Watering
Continue to water your roses once a week (if necessary). If it is raining, let Mother Nature water for you! If you water, make sure it is to a depth of 18 to 24 inches. Roses in pots generally need to be watered more frequently than roses in the ground.
Planting new roses
Now is the time to plant any new roses you have purchased. If you have decided to add to your rose garden, get No. 1 rated roses. It will increase your chance of success. See last month’s article on how to plant bare root roses.
Until next time…. “Roses do not bloom hurriedly; for beauty, like any masterpiece, takes time to blossom.” ― Matshona Dhliwal
___________________________
Written by UC Master Gardener Rosie D