Your smartphone is an excellent tool for recording video, but it does have some constraints compared to a dedicated camera. This section will help you capture better audio and video for your how-to videos.
Getting Started with Recording
To build a foundation in recording video with a smartphone, watch this 43-minute tutorial by UC ANR's Ricardo Vela, which covers recording technique and basic concepts for achieving a quality look and feel. Phone editing is also briefly covered — while this course uses Adobe Premiere Elements, your phone's built-in tools can help trim clips to save storage space and speed up file transfers.
Audio
Poor audio is more distracting to viewers than poor video. Getting clean, clear audio is one of the most important things you can do to improve your final product.
Audio Sources
The primary audio sources in a typical how-to video are:
- Narration (voice-over)
- Spoken content recorded with video, such as a demonstration by an on-screen speaker
- Ambient sounds such as nature, machinery, or water
- Sound effects (use sparingly)
- Music (optional)
Ideally these are recorded separately. The hardest part of recording is capturing clean audio without unwanted background noise.
Microphone Options
When recording with a smartphone, you have three microphone options:
- Built-in phone mic (some phones have front-facing mics only)
- Lavalier (lapel) mic worn by the speaker
- Shotgun directional mic pointed at the sound source
A lavalier mic will give you the best results in most situations. A shotgun mic works well in quiet locations. The built-in mic is the least preferred option. This video demonstrates the differences:
Lavalier Microphones
Lavalier microphones (also called lapel or lav mics) are omnidirectional microphones clipped to a shirt or jacket. They work well for recording an individual speaker. For this course, a corded lav mic is recommended over wireless — corded mics are reliable, simple to use, and sufficient for stationary speakers.
A good starting position is at armpit level or just under the collar. Experiment to find what works best for your situation. Use gaffer's tape to secure mics and other equipment without damaging surfaces.
This video covers lavalier mic placement and use:
Wind
Wind is one of the most common causes of ruined audio. It can overpower your mic input and trigger other sounds such as rustling leaves, windchimes, or shifting objects. Avoid windy locations whenever possible.
If you must record in a breezy location:
- Place the lapel mic under a collar or just inside a jacket (gaffer's tape helps secure it)
- Move around a corner or behind a windbreak
- Use your reflector to block wind
- Attach the windscreen to the mic
If your mic is inside clothing, be careful of movement — fabric rubbing against a mic will be louder than wind.
Recording Audio at a Computer
Recording audio at your computer is sometimes more convenient, but it introduces a few potential issues:
- Room echo: Small rooms can introduce subtle reverb. If the effect is too strong, try a larger room with carpet and soft furnishings. Bedrooms are a good option.
- Fan noise: A loud computer fan can come through on the recording. Use a longer cord or record onto your smartphone with your lav mic instead.
- Electrical hum: The mic input on many computers introduces hum, especially when plugged into a wall outlet. Recording through a USB headset or audio interface avoids this. Note: PowerPoint's built-in presentation recorder often introduces hum — use an external screen capture program such as Camtasia or OBS Studio instead.
Adobe Premiere Elements has a tool to remove hum, but avoiding it at the source will give you better quality.
Checking Audio
The human brain filters out background sounds automatically — recorders do not. Always check your audio before and after recording. This video demonstrates how easily background sounds can ruin a clip:
Use this sound check process before every recording session:
- Connect all equipment and secure connections with gaffer's tape
- Record a short test — have the subject say "testing 1-2-3" or run through part of their script
- Plug in headphones and listen to the playback
- If it sounds good, reconnect the mic and proceed with recording
- If sound levels are off, adjust the mic position and repeat from step 2
- If there are unusual background noises, record a few seconds of silence to diagnose whether the issue is environmental or a connection or hum problem, then repeat from step 2
Video
Lighting
See the Lighting Tips page for guidance on achieving good lighting.
Using a Camera Instead of a Phone
Smartphones are the focus of this course, but a mirrorless or DSLR camera is also a valid option if you already own one. Dedicated cameras offer interchangeable or zoomable lenses, larger sensors for better low-light performance, and focal length options that are more flattering for on-screen subjects.
There is no need to buy a dedicated camera for short how-to videos. If you have one and are comfortable using it, keep the following in mind:
- Depth of field: Longer lenses and larger sensors mean less of the image will be in focus. Stop down the lens (adjust the f-stop) and preview before recording. A starting point of f/5.6 with a 40mm lens outdoors works well.
- Focus: Pre-focus the lens and lock it to manual focus before recording. Continuous autofocus during video can look unsteady.
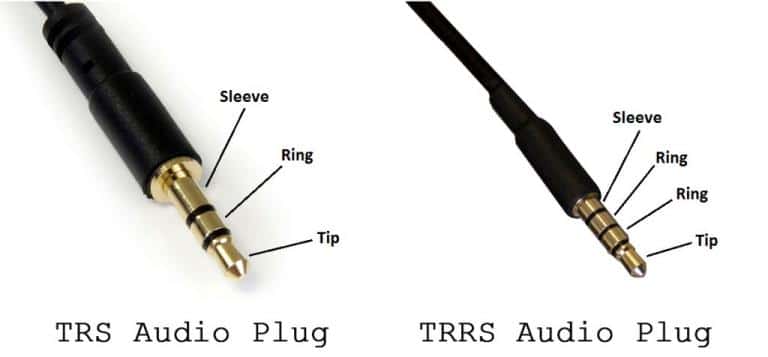
- Audio connectors: Most cameras use TRS connectors; phones use TRRS. You will need a TRRS-to-TRS adapter to use phone equipment on a camera. Do not use the camera's built-in mic.
- Recording limitations: Some older or lower-end cameras have limited recording length or lack HD quality. Test your camera before committing to a project.
- Tripod: Always use a tripod. Camera shake is more pronounced on longer lenses. For panning shots, use a fluid head tripod designed for video.
Mounting a Phone on a Tripod
For self-recording or stable footage, mount your phone on a tripod using a bracket made for that purpose.
The recommended phone mounting bracket includes a cold shoe slot on top for attaching an LED light or compatible shotgun mic. This video shows how to connect everything:
Use gaffer's tape to secure the mic and any dongles into their jacks. A loose connection will cause you to lose audio signal.
Gimbals
A gimbal is a mechanical stabilizer that counteracts sudden movement and produces smoother, more fluid footage. It is useful when you cannot use a tripod, such as when filming a walking shot.
A gimbal is not required for how-to videos. If you do not have one, keep your camera on a tripod and avoid walking or panning shots. For close-up panning effects, use a high-resolution still photo and create the pan during editing.
Types of Shots
You do not need complex camera work to make an effective how-to video, but knowing a variety of shot types gives you more options when telling your story.
B-Roll
B-roll is supplemental footage used in editing to support the main content (A-roll). Just as accessories can complete an outfit, B-roll can make a video feel polished and professional.
B-roll can:
- Further illustrate a point
- Add emotional or dramatic interest
- Break up visual monotony
- Signal a change in topic, similar to a paragraph break in writing
- Cover editing or recording mistakes
- Add context to a shot
Many Extension staff already collect photos for use in talks and publications. You can do the same with video B-roll while you are in the field. This video explains the difference between A-roll and B-roll and how to use them:
Organizing Your Files
Most video projects involve many clips that will be combined during editing. Organizing your files when you import them to your computer will save significant time later. Transfer files soon after recording — clips can be hard to locate on a phone, but your computer can sort by date to speed things up.
- Create one folder per project (one folder per final video). Separate multi-part series into separate folders.
- Give each file a descriptive name. Date alone is not a useful description and is already stored in the file's metadata.
- Label multiple takes clearly — a sequential number works well (e.g., clip-intro-1, clip-intro-2).
- Copy still photos from their original location into the project folder rather than linking across folders.
- Save your Premiere Elements project file (.prel) in the project folder. The default save location is difficult to find.
- If you know the intended order of clips, prefix filenames with a number so they sort correctly. Alternate takes can be labeled 3a, 3b, 3c, etc.
Building Confidence on Camera
Most people are uncomfortable hearing themselves on video for the first time. This is normal. The good news is that you already sound that way to everyone else — and if your clients value what you have to say, they will be receptive to you on video as well.
Confidence in front of the camera improves with practice. This video shows that progression clearly:
Permissions
In most situations you can record content with your phone without any special arrangements. However, if you plan to set up a tripod, interview someone, use lighting, or film in a public place, you may need to obtain permission. Written permission is also required to feature other people in your video.
At a private farm or home, a verbal ask is usually sufficient. Public locations can be more complicated. Review the Copyright and Permissions page before filming.