Good videos start with good planning. This section will familiarize you with the video production process and the resources available to help you get started.
The Basics
Begin by reviewing the February 2020 webinar "Adding Video to Your Extension Toolbox," which covers foundational ideas and resources available to UC ANR staff and advisors.
Watch the Adding Video to Your Extension Toolbox webinar recording
Additional resources:
- Branded assets page — latest UC ANR assets and guidance for use in videos
- UC ANR YouTube channel — examples of posted videos and branding in practice
Note: apps such as Powtoon and Doodly allow you to plug in content to create videos quickly. This course focuses on the full process — planning, shooting, and editing — rather than template-based tools.
Equipment
The following equipment is recommended for this course:
- Smartphone (and headphone dongle if required for your phone)
- Tripod (an inexpensive one works fine)
- Phone holder to mount on a tripod
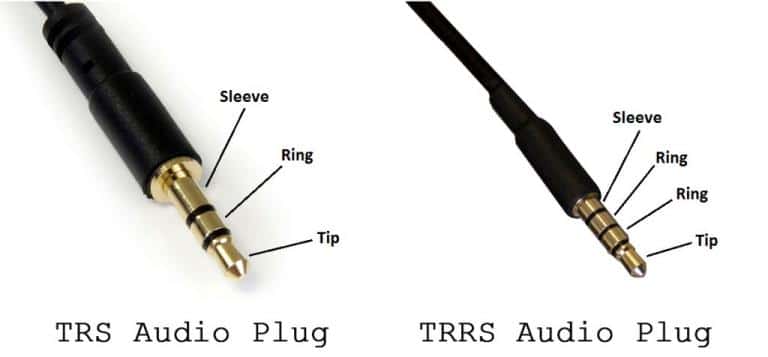
- Lapel mic with TRRS-type connector — see this image if you are unsure which connector type you have
- Adobe Premiere Elements 2019 or newer
This assumes filming in a bright location with even lighting. For outdoor filming, a 5-in-1 reflector set is highly recommended. For dark or strongly backlit indoor locations, an LED video light works well. Either option works better with an assistant or an additional light stand. If you prefer to hold off on additional equipment, record outside in the morning or evening, or film indoors near a large window.
Equipment demonstrations and additional guidance are covered in the April webinar recording and in the Recording section of this course.
Developing Your Idea
Plan your video before you begin filming. Short how-to videos — ideally 2 to 5 minutes — are easy to share and watch, especially on social media. UC ANR's YouTube channel looks for videos between 3 and 15 minutes. Longer videos are sometimes necessary, but as length increases, so does the time required to produce them. Start small.
To keep your video concise and focused, develop clear learning objectives before you begin. Vague objectives lead to longer, less effective videos. A useful framework for writing measurable objectives is Bloom's Taxonomy, developed by Vanderbilt University.
If your topic is too complex for a single short video, break it into a series of separate but related videos. For example, a topic like Tomato Spotted Wilt Virus could become:
- Identifying tomato spotted wilt disease
- Monitoring thrips insects
- Thrips management strategies
- Resistant varieties
Always keep your audience in mind — the same four videos above would look very different if aimed at a commercial grower versus a home gardener. Strategies that will keep your video concise:
- Start with a clear statement of the problem
- Know your audience
- Understand why the topic matters to the viewer
- Determine in advance exactly what viewers need to know
- Plan your video before you begin filming
Storyboarding and Scripting
Most video projects are planned using either an annotated script or a storyboard. Both are acceptable approaches. An annotated script uses text to display spoken content alongside descriptions of the footage:
NARRATOR: Laundry doesn't have to be hard. [Adding laundry to washer.] Simply toss your clothes into the washer, [Adding detergent] add a reasonable amount of detergent, [Set the temperature] adjust the temperature, [Close lid and start] start the washer.
Storyboards are more flexible and can also contain your script. The February 2020 webinar includes a good review — jump to the storyboard section at 19:27. The April 2020 webinar includes a review of storyboard proposals from UC ANR colleagues — view it on this site or watch on YouTube starting at 9:36.
The following videos demonstrate a range of storyboarding and scripting approaches:
- Introduction to Storyboarding — cinema-focused but clearly shows the connection between storyboards and the final product
- Storyboarding for People Who Can't Draw
- How I Write Scripts for My YouTube Videos — a contrasting approach to storyboarding
- How I Shoot without a Storyboard — a structured approach for situations where advance planning is not possible
As you develop your storyboard, think about the shots and footage you will need to illustrate each point. More detail on shooting is covered in the Recording section. Keep in mind that some content you may want to include could have copyright implications. Your storyboard is for your own use — artistic quality does not matter. Focus on whether it gives your project clear direction.
Exercise
Practice storyboarding with a low-stakes project before filming anything real. For this exercise, storyboard a short video on how to make scrambled eggs: crack eggs into a bowl, whisk eggs, heat a pan to medium with oil, cook with a spatula until set, serve.
Include the shots you need and a draft script for each shot. Do not worry about intros or outros — focus only on the scrambled eggs process. You should need 5 to 8 panels.