Grid, Snake, and Ring Layouts for Drip Irrigation
A well-designed drip irrigation system can save water, improve plant health, and make gardening easier. But the layout you choose matters just as much as the equipment itself. Different garden types require different approaches to deliver water efficiently.
Grid Layout with Sub Zones
Image

This layout uses drip tubing with built-in emitters spaced at regular intervals. The tubing is arranged in parallel lines across a planting bed, forming a grid pattern.
How it works:
- Water is distributed evenly across the entire bed
- Roots receive consistent moisture
- Ideal for crops planted in rows or blocks
Tips:
- Connect two or more sub-zones to water plants with similar water requirements and microclimate on one valve.
- Install flush-outs in planting bed (graphic shows them on hardscape for clarity only.)
- Install a flush-out at the hydraulic opposite end of the water supply.
- Use blank tubing to extend flush out to a convenient, accessible location, near the edge of pavement or a permanent landmark.
- Break complex shapes into simpler shapes.
- Always install tubing perpendicular to the slope.
Grid Sub-Zone:
Image
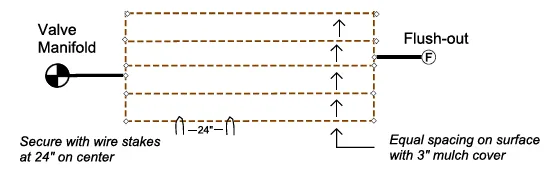
- A basic grid is used to apply water evenly over the entire surface. Use the basic grid when the entire area will be covered with plants at maturity, with very little or no bare soil or mulch showing.
- Equal spacing on the surface with a 3" mulch cover.
- Secure with wire stakes at 25" on center.
- Do not exceed 3 gpm in any one sub-zone.
Snake Layout (single line)
Image

- Install a single row of drip tubing for small plants, mature size less than 30" diameter.
- Insert blank tubing if there are gaps in the planting row where no water is needed.
- Install at least 3 emitters per plant and stake the middle emitter on top of the root ball.
- Secure with wire stakes at 24" apart along the tube.
Snake layout (double line)
Image

- Install a double row of drip tubing for medium-sized plants, mature size 24"-48" diameter.
- Insert blank tubing if there are gaps in the planting row where no water is needed.
- Install at least 3 emitters per plant on each side of the root ball and stake the two middle emitters on top of the root ball.
- Secure with wire stakes at 24" apart along the tube.
Ring Layout
Image
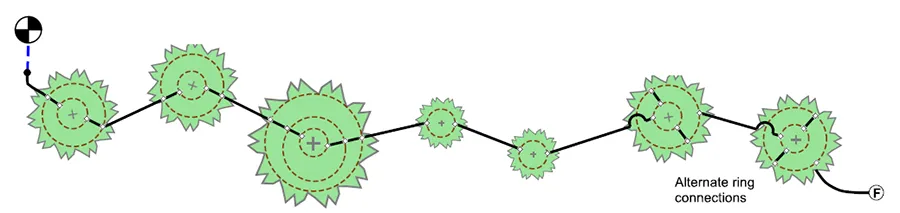
- Install one or more concentric rings of drip tubing around medium and large-sized shrubs that are widely spaced.
- The first ring can be 2 to 2.5 ft. in diameter.
- Space each successive ring 18" apart to mature drip line of the shrub.
- Connect rings with blank tubing
- Note how the connections between the rings allow water to flow through the rings for proper flushing.
- Concentric rings are an especially good way to irrigate trees. Install trees and shrubs on separate valves
- Secure with wire stakes at 24" apart along the tube.
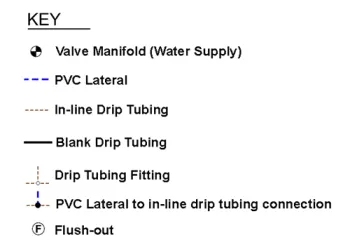
KEY symbols explained:
- Valve Manifold (water supply): The valve manifold includes a valve, a pressure regulator, and a filter. Refer to the manufacturer's catalog for the appropriate filter and pressure regulator.
- PVC Lateral: A PVC lateral may be installed new or reused from an existing sprinkler system conversion. A PVC lateral connects the valve manifold to one or more sub-zones.
- In-line Drip Tubing is ½ inch diameter drip tubing (not ¼") sold with reliable, high-quality, pressure-compensating emitters pre-installed inside the tube at 12" or 18" on center. Install tubing neatly in parallel, equally spaced rows, and secure it to the soil surface with wire stakes at each fitting and 24 inches apart along the tubing. Refer to the manufacturer's catalog for the appropriate emitter flow rate based on soil type and use 12" emitter spacing for shallow-rooted plants and 18" emitter spacing for deeper-rooted plants. Irrigate shallow-rooted and deeper-rooted plants independently using separate valve manifolds.
- Blank Tubing Fitting: Use blank and in-line tubing from the same manufacturer. Blank tubing is the same tubing without emitters. Use blank tubing where you don't need or want water between plants or to locate a flush-out at an accessible location where it won't get lost in the middle of a planting bed.
- Drip Tubing Fitting: Elbow, tee, cross, or other as required. Use fittings and tubing from the same manufacturer.
- PVC Lateral to Inline drip tubing connection: Use a connection adapter fitting and tubing from the same manufacturer.
- Flush-out: Install a flush-out at the hydraulic point on the grid from where the valve manifold is connected to the grid. Recommended installing a flush-out in an 8" diameter valve box. A flush-out can be a ball valve or screw cap fitting. Recommend using a flexible Cobra connector between the ball valve and the grid.
From PDF article dated 2020-03-09
UC Master Gardener Program of Contra Costa County
2380 Bisso Lane, Concord, CA 94520
Website: https://ucanr.edu/site/uc-master-gardener-program-contra-costa-county